How to remove everything but duplicate rows in Excel?
Maybe, there are some duplicate values in a column of your worksheet, and now, you want to remove non-duplicate values and keep only the duplicate records in the column. Do you have any good ideas to solve this problem in Excel? In this article, I will talk about how to quickly and easily remove all but keeping the duplicate rows in Excel.
Remove everything but duplicate rows with a helper column
Remove everything but duplicate rows with Kutools for Excel
| Feature | Helper Column + Filter | Kutools for Excel |
|---|---|---|
| Best for | Removing unique rows with Excel’s built-in tools while keeping duplicate records | Quickly selecting and deleting unique rows so only duplicates remain |
| Main advantage | Uses Excel’s built-in tools and gives full control over the filtering process | No formulas or helper columns, and unique rows can be selected in only a few steps |
| Main limitation | Requires a helper column, formula, filter, Visible Cells Only, and several deletion steps | Requires Kutools for Excel |
| Recommended use | Users who prefer a built-in Excel solution and do not mind multiple steps | Fast cleanup when you need to keep only duplicate records |
Remove everything but duplicate rows with a helper column
To remove the non-duplicate rows, you need to create a formula helper column first, and then filter all the unique values based on your helper column, finally, delete the filtered unique values. Please do as follows:
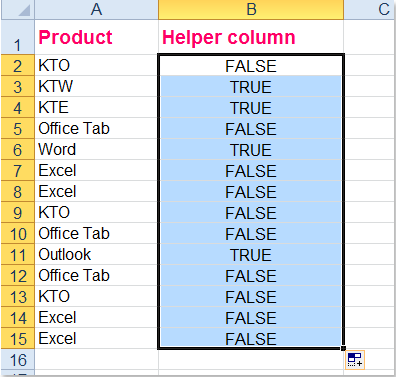
1. Enter this formula =COUNTIF($A$2:$A$15, A2)=1 into a blank cell besides your data, such as cell B2, see screenshot:

Tip: In the above formula, A2:A15 is the column range you want to remove the unique values, you can change it as you need.
2. And then drag the fill handle down to the cells that you want to apply this formula, False indicates the duplicate values and True stands for the unique values, see screenshot:
3. Then select the data range and click Data > Filter, see screenshot:

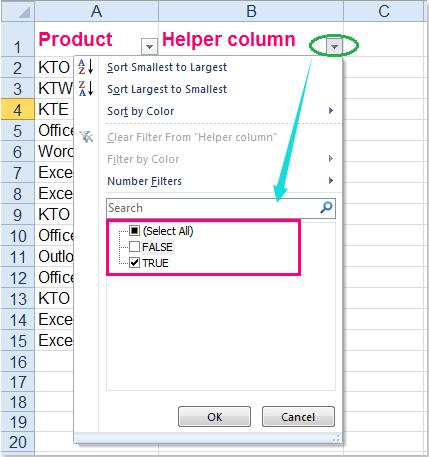
4. Click the filter drop-down in the new helper column B and uncheck FALSE option to just show the unique values of column A, and then click OK button, see screenshot:
5. After showing only the non-duplicate records, select the entire rows of these visible rows, and then click Home > Find & Select > Go To Special, in the Go To Special dialog box, select Visible cells only option, see screenshots:
 |  |  |
6. Then click OK to close the dialog box, and only the visible rows have been selected as following screenshot shown:

7. And then you need to remove these visible rows only, put the cursor at the selected rows, right click to choose Delete Row from the context menu, see screenshot:

8. And only the visible rows are deleted at once, then you need to cancel the filter by clicking Data > Filter again to disable the Filter function, and you can see all the unique value rows have been removed, and only leave the duplicate records, see screenshot:

9. At last, you can delete the content of helper column B as you want.
Remove everything but duplicate rows with Kutools for Excel
With above method, there are so many steps needed to be followed, if you have a handy tool – Kutools for Excel, it may save you a lot of time.
After installing Kutools for Excel, please do as follows:
1. Select the data range that you want to use.
2. Then click Kutools > Select > Select Duplicate & Unique Cells, see screenshot:

3. In the Select Duplicate & Unique Cells dialog box, select Unique values only under the Rule section, and check Select entire rows option, see screenshot:

4. Then click OK button, and a prompt box will pop out to remind you how many rows have been selected:

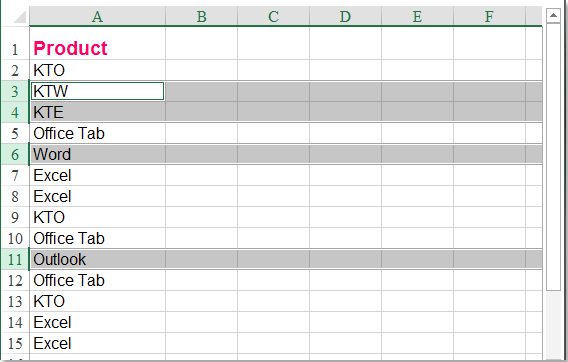
5. And then click OK to close theses dialogs, and all the unique value rows have been selected, see screenshot:
6. Then you just need to remove theses selected rows, click Home > Delete > Delete Sheet Rows, see screenshot:

7. And all the selected unique rows have been deleted immediately.
With this Select Duplicate & Unique Cells feature, you can also finish the following tasks:
How to find duplicate rows in a range in Excel?
How to filter or select unique records from selected range in Excel?
How to remove duplicates and replace with blank cells in Excel?
Kutools for Excel - Supercharge Excel with over 300 essential tools, making your work faster and easier, and take advantage of AI features for smarter data processing and productivity. Get It Now
Conclusion
Keeping only duplicate records can be useful when you need to focus on repeated entries, review possible data issues, or prepare duplicate records for further analysis.
The Helper Column + Filter method uses Excel’s built-in tools and gives you full control over the process, but it requires a formula, filtering, selecting visible cells, and several deletion steps. For a faster approach, Kutools for Excel can directly select all unique rows so you can remove them and leave only duplicate records, without using formulas or helper columns.
Choose the built-in method when you prefer manual control, or use Kutools when you want a quicker way to remove unique rows and keep only duplicate records.
Demo: Remove everything but duplicate rows with Kutools for Excel
Best Office Productivity Tools
Supercharge Your Excel Skills with Kutools for Excel, and Experience Efficiency Like Never Before. Kutools for Excel Offers Over 300 Advanced Features to Boost Productivity and Save Time. Click Here to Get The Feature You Need The Most...
Office Tab Brings Tabbed interface to Office, and Make Your Work Much Easier
- Enable tabbed editing and reading in Word, Excel, PowerPoint, Publisher, Access, Visio and Project.
- Open and create multiple documents in new tabs of the same window, rather than in new windows.
- Increases your productivity by 50%, and reduces hundreds of mouse clicks for you every day!
All Kutools add-ins. One installer
Kutools for Office suite bundles add-ins for Excel, Word, Outlook & PowerPoint plus Office Tab Pro, which is ideal for teams working across Office apps.





- All-in-one suite — Excel, Word, Outlook & PowerPoint add-ins + Office Tab Pro
- One installer, one license — set up in minutes (MSI-ready)
- Works better together — streamlined productivity across Office apps
- 30-day full-featured trial — no registration, no credit card
- Best value — save vs buying individual add-in