How to transpose every 5 or n rows from one column to multiple columns?
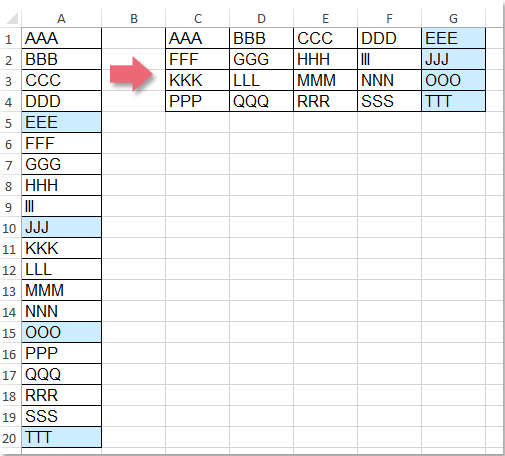
Transposing every 5 or n rows from a single column into multiple columns can make long lists easier to analyze or report. For example, you may want to transpose A1:A5 to C6:G6, A6:A10 to C7:G7, and so on, as shown in the screenshot.
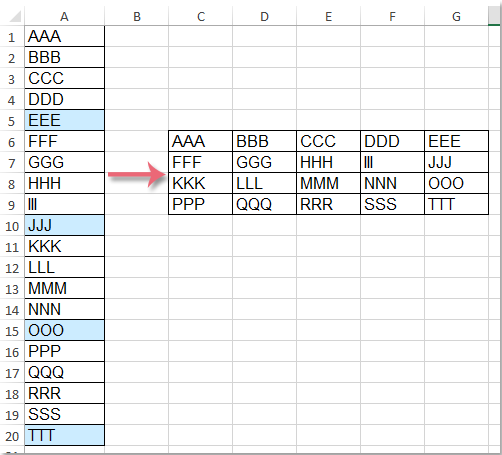
Excel offers several ways to complete this task, depending on whether you prefer a formula, a dedicated tool, or VBA code.
| Method | Best for | Setup | Changing the number of rows |
|---|---|---|---|
| Formula | Users comfortable working with formulas | Enter a formula, then fill it across and down | Edit the number in the formula and adjust the filled range |
| Kutools for Excel | Users who want a quick, code-free solution | Select the data and specify the rows per record | Enter the required number directly in the dialog box |
| VBA | Users familiar with macros who need an automated solution | Insert and run VBA code | Change the number in the code before running it |
Transpose every 5 or n rows from one column to multiple columns with a formula
In Excel, you can use the following formula to transpose every n rows from one column into multiple columns:
- Enter the following formula in the first blank cell where you want to display the result:
=INDEX($A:$A,ROW(A1)*5-5+COLUMN(A1))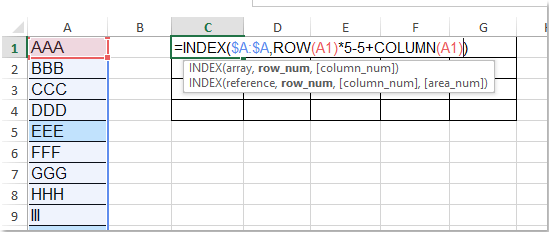
📝 Note:
In this formula, A:A is the column you want to transpose, A1 represents the first row of the source list, and 5 is the number of items to place in each output row. Change these references and values as needed. This formula assumes that the source list begins in the first row of the worksheet.
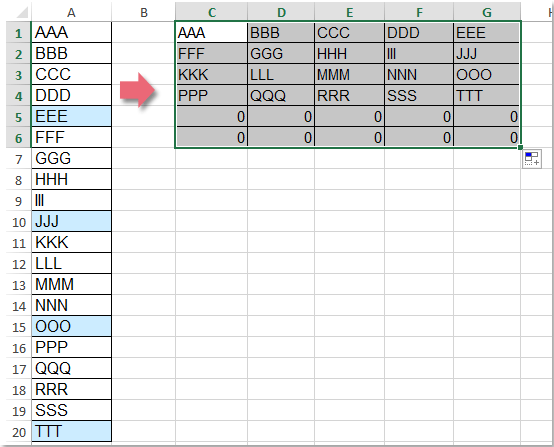
- Drag the fill handle five cells to the right. Then continue dragging the filled range down until the remaining cells display 0.
Transpose every 5 or n rows from one column to multiple columns with Kutools for Excel
With the Transform Range feature in Kutools for Excel, you can convert every 5 rows—or any number of rows—from a single column into multiple columns without creating a formula or editing VBA code. Simply specify how many source rows should be placed in each output row.
After installing Kutools for Excel, follow these steps:
- Select the data in the column, and then click Kutools > Range > Transform Range.
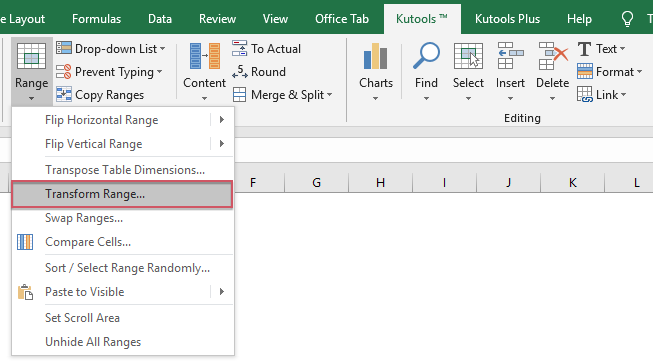
- In the Transform Range dialog box:
- Select Single column to range under Transform type.
- Select Fixed value under Rows per record.
- Enter the number of items you want to place in each output row.
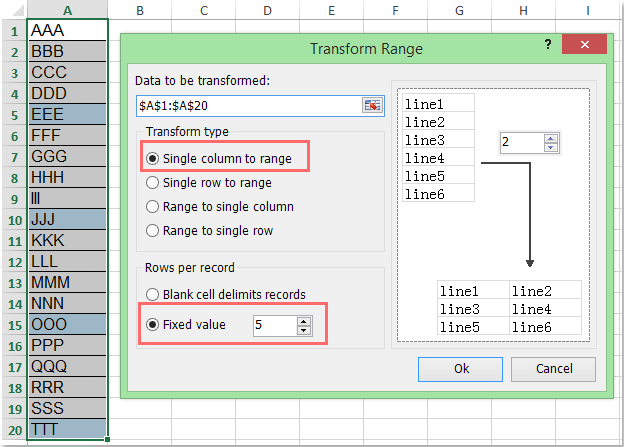
- Click OK. In the dialog box that appears, select the first cell of the output range.
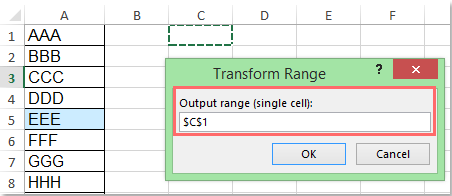
- Click OK. The data from the column is transposed into rows containing five items each.
Transpose every 5 or n rows from one column to multiple columns with VBA code
If you prefer an automated method and are comfortable working with macros, the following VBA code can also transpose every five rows from one column into multiple columns.
- Press Alt + F11 to open the Microsoft Visual Basic for Applications window.
- Click Insert > Module, and then paste the following code into the Module window:
VBA code: Transpose every 5 or n rows from one column to multiple columns
Public Sub TransposeData() 'updateby Extendoffice Dim xLRow As Long Dim xNRow As Long Dim i As Long Dim xUpdate As Boolean Dim xRg As Range Dim xOutRg As Range Dim xTxt As String On Error Resume Next xTxt = ActiveWindow.RangeSelection.Address Set xRg = Application.InputBox("Please select data range(only one column):", "Kutools for Excel", xTxt, , , , , 8) Set xRg = Application.Intersect(xRg, xRg.Worksheet.UsedRange) If xRg Is Nothing Then Exit Sub If (xRg.Columns.Count > 1) Or _ (xRg.Areas.Count > 1) Then MsgBox "the used range only contain one column", , "Kutools for Excel" Exit Sub End If Set xOutRg = Application.InputBox("please select output range(specify one cell):", "Kutools for Excel", xTxt, , , , , 8) If xOutRg Is Nothing Then Exit Sub Set xOutRg = xOutRg.Range(1) xUpdate = Application.ScreenUpdating Application.ScreenUpdating = False xLRow = xRg.Rows.Count For i = 1 To xLRow Step 5 xRg.Cells(i).Resize(5).Copy xOutRg.Offset(xNRow, 0).PasteSpecial Paste:=xlPasteAll, Transpose:=True xNRow = xNRow + 1 Next Application.ScreenUpdating = xUpdate End Sub - Press F5 to run the code. In the first dialog box, select the column you want to transpose.
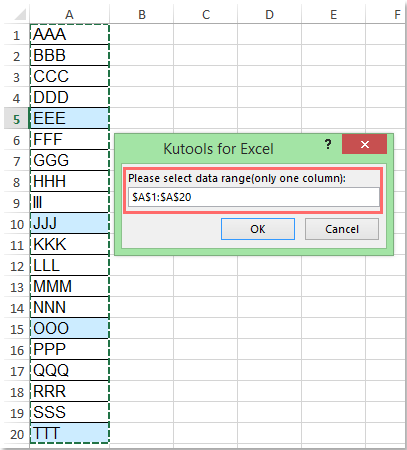
- Click OK, and then select the first cell where you want to place the result.
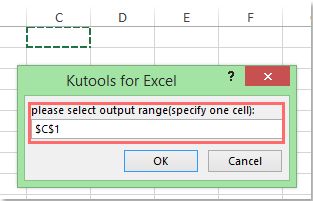
- Click OK. The data in the selected column is converted into rows containing five items each.
📝 Note:
To use a different number of items per output row, replace both instances of 5 in the following lines with the required number:
For i = 1 To xLRow Step 5
xRg.Cells(i).Resize(5).Copy
This article introduces three ways to transpose every 5 or n rows from one column into multiple columns. A formula works well for users familiar with Excel functions, while VBA can automate the process through code. For a simpler option, Kutools for Excel lets you specify the number of rows directly and complete the transformation without formulas or programming. For more Excel tips and tricks, visit our collection of Excel tutorials.
Frequently Asked Questions
How can I transpose a number of rows other than five?
In the formula, replace both instances of 5 with the required number. In Kutools for Excel, enter the number in the Fixed value box. In the VBA code, change both instances of 5 in the loop and Resize statements.
Why does the formula return 0 in some cells?
The formula may return 0 after it reaches the end of the source list or when the referenced source cell is blank. You can stop filling the formula down once all source data has been transposed.
Can the source list begin below row 1?
Yes, but the formula shown in this article must be adjusted because it assumes the source list begins in row 1. Kutools for Excel and the VBA method allow you to select the actual source range directly.
What happens if the total number of items is not evenly divisible by five?
The final output row will contain the remaining items. Any unused positions in that row will remain blank or may display 0 when using the formula, depending on the referenced cells.
Will the transposed results update if the source data changes?
The formula results update automatically when the source data changes. Results created with Kutools for Excel or VBA are static, so you need to run the transformation again to reflect later changes.
Best Office Productivity Tools
Supercharge Your Excel Skills with Kutools for Excel, and Experience Efficiency Like Never Before. Kutools for Excel Offers Over 300 Advanced Features to Boost Productivity and Save Time. Click Here to Get The Feature You Need The Most...
Office Tab Brings Tabbed interface to Office, and Make Your Work Much Easier
- Enable tabbed editing and reading in Word, Excel, PowerPoint, Publisher, Access, Visio and Project.
- Open and create multiple documents in new tabs of the same window, rather than in new windows.
- Increases your productivity by 50%, and reduces hundreds of mouse clicks for you every day!
All Kutools add-ins. One installer
Kutools for Office suite bundles add-ins for Excel, Word, Outlook & PowerPoint plus Office Tab Pro, which is ideal for teams working across Office apps.





- All-in-one suite — Excel, Word, Outlook & PowerPoint add-ins + Office Tab Pro
- One installer, one license — set up in minutes (MSI-ready)
- Works better together — streamlined productivity across Office apps
- 30-day full-featured trial — no registration, no credit card
- Best value — save vs buying individual add-in