How to print even/odd pages only in Excel?
When working with Excel spreadsheets, it is quite common to need to print your data for reports, archiving, or sharing with others. Typically, Excel offers built-in options to print the current selection, an entire workbook, or to print specific ranges of pages (for example, pages 1 to 3). However, sometimes you might encounter a situation where you need to print only the even-numbered or only the odd-numbered pages of your workbook. Excel does not provide a direct built-in option for this scenario, which can make this task seem challenging at first glance.
Scenarios for printing even or odd pages may arise in various situations, such as when organizing double-sided printing for physical documents, or only reviewing every other page before finalizing a printout. This article will introduce several practical techniques to help you print even pages, odd pages, or specific page ranges as needed in your Excel workbook. Solutions include using VBA code, leveraging the features of Kutools for Excel, and other practical alternatives. Each method comes with a brief analysis of its use case and a step-by-step guide, so you can choose the most suitable approach based on your requirements and level of Excel expertise.
Print even/odd pages only with VBA
Print specific pages with Kutools for Excel
Print first page of each worksheet with Kutools for Excel
Print even/odd pages only with VB
Excel's standard print options do not directly allow users to print only even or only odd pages. However, using a simple VBA macro, you can quickly achieve this functionality and print only the pages you need. This method is especially helpful when dealing with large workbooks or when preparing documents for double-sided printing, where printing only odd or even pages separately is often required.
Before proceeding, remember to save your workbook in case you need to undo any changes, and ensure macros are enabled in your Excel settings. VBA solutions are best suited for users familiar with basic macro operations. If you have never used VBA before, rest assured that the following steps are straightforward.
1. Press Alt + F11 to open the Microsoft Visual Basic for Applications editor window.
2. In the VBA interface, click Insert > Module, then copy and paste the following VBA code into the newly created Module window.
VBA: Print even or odd pages only
Sub PrintOddEven()
'UpdatebyKutoolsforExcel20160105
    Dim xPages As Long
    Dim xFPage As Variant
    Dim Page As Integer
    xPages = Application.ExecuteExcel4Macro("GET.DOCUMENT(50)")
    xFPage = Application.InputBox("Enter 1 for odd pages, enter 2 for even pages", "Kutools for Excel", , , , , , 1)
    If TypeName(xFPage) = "Boolean" Then Exit Sub
    If xFPage > 0 Then
        xFPage = Abs((xFPage Mod 2) - 2)
        For Page = xFPage To xPages Step 2
            ActiveSheet.PrintOut Page, Page
        Next
    End If
End Sub
3. Press F5 on your keyboard to run the macro. A dialog will appear asking you to specify which pages to print. Enter 1 to print all odd pages, or enter 2 to print all even pages. The dialog is titled Kutools for Excel for your reference. 
4. Click OK. Excel will begin printing either only the odd pages or only the even pages, according to your input.
Tips and notes: After running this macro, remember that your printer settings may affect the output. For accurate results, ensure your page breaks and print areas are properly set before running the macro. If you encounter an error, double-check that you have pasted the full code correctly and that your selected worksheet has content spanning multiple pages.
When to use: This VBA approach is recommended when you want a flexible, automated way to handle even/odd page printing across various versions of Excel, or if you regularly process large workbooks with different print ranges. However, VBA macros require enabling and saving your workbook in macro-enabled format (.xlsm), and this method may not be preferred for users uncomfortable with using code.
Print specific pages with Kutools for Excel
If you are not familiar with VBA, or if you prefer a user-friendly graphical interface, Kutools for Excel provides a convenient Print Specific Pages tool to make page-based printing much simpler. With this feature, you can quickly set odd/even page printing, custom page range printing (such as pages 5 to 12), and more with just a few clicks.
After installing Kutools for Excel, please do as below: (Free Download Kutools for Excel Now!))
- Click the Kutools Plus tab > Printing > Print Specific Pages.

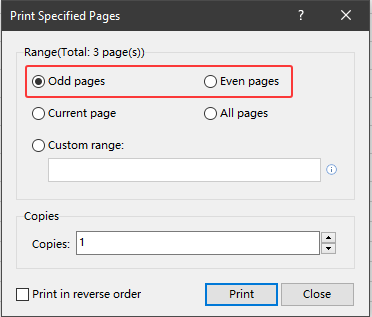
- In the dialog that pops up, you have several options:
- Check Odd Pages if you wish to print only the odd-numbered pages.
- Or check Even Pages for only even-numbered pages.
- Click Print.


Kutools for Excel will immediately initiate the print job and only the pages you selected (odd or even) will be sent to your printer.
Advantages: This solution is especially advantageous for users who want a reliable, non-code method and need the convenience of additional print options, such as batch printing across sheets, remembering custom settings, and the ability to trial the function risk-free.
Precautions: Before printing, always use Print Preview in Excel to confirm your page breaks and content layout. If the result isn't as expected, adjust your print area or scaling settings accordingly. Kutools' print tools respect your current worksheet and print area, so double-check your selection prior to running the command.
Print Odd/Even/Specific Pages Only
Print first page of each worksheet with Kutools for Excel
In workbooks containing multiple worksheets, you may need to print only the first page of each worksheet—commonly required when summarizing reports, reviewing the main data of each sheet, or for documentation purposes. The Print First Page of Each Worksheet utility in Kutools for Excel helps you perform this task with one click, saving you from laboriously selecting and printing each sheet manually.
After installing Kutools for Excel, please do as below: (Free Download Kutools for Excel Now!))
Enable the workbook you want to print the first page of every worksheet for, then click Kutools Plus > Printing > Print First Page of Each Worksheet. 
Kutools will automatically print the first page of all the worksheets in your active workbook. You do not need to select sheets individually or specify page ranges. This is especially useful for users who manage reports in large workbooks with numerous tabs.
Tips: To get consistent results, check that each worksheet’s print area and page break are set up correctly before using this feature. If you find the wrong pages are being printed, revisit the Page Layout tab in Excel to adjust the areas as needed.
Relative Articles:
Best Office Productivity Tools
Supercharge Your Excel Skills with Kutools for Excel, and Experience Efficiency Like Never Before. Kutools for Excel Offers Over 300 Advanced Features to Boost Productivity and Save Time. Click Here to Get The Feature You Need The Most...
Office Tab Brings Tabbed interface to Office, and Make Your Work Much Easier
- Enable tabbed editing and reading in Word, Excel, PowerPoint, Publisher, Access, Visio and Project.
- Open and create multiple documents in new tabs of the same window, rather than in new windows.
- Increases your productivity by 50%, and reduces hundreds of mouse clicks for you every day!
All Kutools add-ins. One installer
Kutools for Office suite bundles add-ins for Excel, Word, Outlook & PowerPoint plus Office Tab Pro, which is ideal for teams working across Office apps.
- All-in-one suite — Excel, Word, Outlook & PowerPoint add-ins + Office Tab Pro
- One installer, one license — set up in minutes (MSI-ready)
- Works better together — streamlined productivity across Office apps
- 30-day full-featured trial — no registration, no credit card
- Best value — save vs buying individual add-in