How to remove duplicates but keep blank rows in Excel?
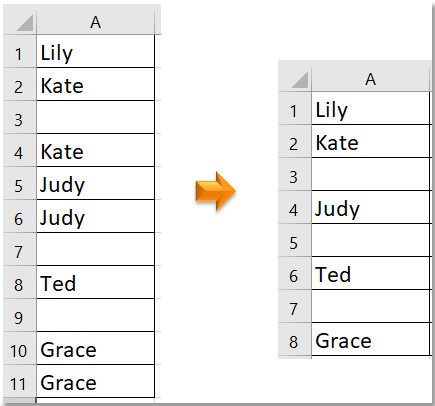
In Excel, the Remove Duplicate function offers a convenient way to eliminate repeated values from a list. However, a common challenge arises when your lists contain blank rows; the standard function will also remove those, potentially disrupting the original structure of your data by closing up the gaps. This is often problematic if the blank rows serve as logical separators or for formatting purposes.
If your goal is to remove duplicate entries but retain all blank rows exactly as they are, there are several effective approaches. These methods help you clean your list without affecting the blank rows, offering more professional data management and maintaining the visual structure of your worksheet. Below, several solutions are outlined for achieving this in Excel under various scenarios.
Remove duplicates keep blanks with formula and Remove Duplicates
Select and highlight duplicates with Select Duplicate & Unique Cells![]()
VBA macro: Remove duplicates but keep blank rows automatically
Excel formula/advanced filter: Extract unique values while keeping blank rows
Remove duplicates keep blanks with formula and Remove Duplicates
To remove duplicates and preserve the blank rows, it's necessary to first identify and mark which rows are blank using a helper column, and then utilize the Remove Duplicates tool built into Excel. This combined method ensures unique values remain, and all existing blank rows are left untouched. This solution works well if you want an integrated, mostly manual Excel workflow with visible helper columns.
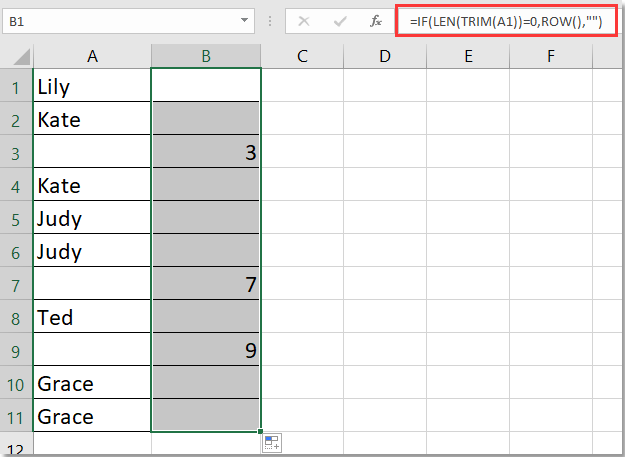
Step1. In an adjacent column (for example, if your data starts in A1, start in B1), enter the following formula to mark blank rows:
=IF(LEN(TRIM(A1))=0,ROW(),"")This formula checks if cell A1 is blank or contains only spaces. If so, it displays the row number; otherwise, it leaves the cell empty. Drag the formula down alongside all entries in your list to mark every blank row.
Note: If your data spans multiple columns, adjust the reference (e.g., use A1 or B1 as needed). Using TRIM ensures that cells with only spaces are treated as blank too.
Step2. Select both your original data column and the new helper column. Then go to Data > Remove Duplicates. In the pop-up dialog, check only the box for your original column (not the helper), so duplicates are identified based on your target data.

Tip: Make sure your data selection includes the helper column, but use the original data column as the key for removing duplicates. This prevents accidental removal of blank rows marked by the helper.
Step3. A notification will appear showing how many duplicate values were removed. Click OK to confirm and close the message.
At this point, the list will display all unique values as well as all previously existing blank rows. You can delete the helper column if you no longer need it.
Applicable Scenarios: This method is recommended when you want to use only standard Excel functions, and your data is simple. It is not fully automatic if your data is frequently updated, as it requires repeating the steps. Also, ensure you create a backup of your data before removing duplicates, as this process can’t be undone after saving and closing the file.
Troubleshooting: If blank rows are still being removed, double-check that your helper formula correctly marks all blank lines and that you're only using your main column as the "Remove Duplicates" key in the dialog.
Select and highlight duplicates with Select Duplicate & Unique Cells
The Select Duplicate & Unique Cells utility by Kutools for Excel is particularly useful for visually identifying duplicate entries before deleting them, while blank rows are preserved by default. This solution is excellent if you prefer to manually review duplicates before deletion or simply want to highlight them for further action.
1. Select the range containing your data (including blank rows), then click Kutools > Select > Select Duplicate & Unique Cells.
2. In the Select Duplicate & Unique Cells dialog, choose Duplicates (Except1st one) under "Rule." You can also check Fill backcolor and Fill font color boxes to automatically highlight duplicates using colors of your choice.
Tip: If you want to select the entire duplicate row, select the full data range instead of just one column, and apply the utility accordingly.
3. Click OK. A dialog will report how many duplicate cells or rows were found and selected. Click OK to close.
Now, the duplicates in your list are highlighted, making it easy to spot and delete them manually as needed, without affecting any blank rows.
Advantages: More flexible, risk-free, and supports reviewing before removal. Blank rows are untouched by default. This approach is also useful when you want more visual control or need to process duplicates case by case.
Note: You can sort or filter the highlighted rows if you need to batch-delete duplicates, and retain the visual structure of your original worksheet.
Kutools for Excel - Supercharge Excel with over 300 essential tools, making your work faster and easier, and take advantage of AI features for smarter data processing and productivity. Get It Now
Demo: Select duplicates & unique cells using Kutools for Excel
VBA macro: Remove duplicates but keep blank rows automatically
For users who frequently need to automate the process of removing duplicates while retaining all blank rows, using a VBA macro is a practical choice. With a macro, you can clean up your data in one click, regardless of how often your list changes, and without relying on helper columns. This method is ideal if your worksheet structure is consistent and you want a repeatable solution that ensures performance and accuracy.
Note: Always save a copy of your worksheet before running any macros, as actions are not easily undone after execution.
1. Go to Developer Tools > Visual Basic. In the VBA editor, click Insert > Module. Then paste the code below into the new module window:
Sub RemoveDuplicatesKeepBlankRows()
    Dim ws As Worksheet
    Dim lastRow As Long
    Dim dict As Object
    Dim cell As Range
    Dim checkRange As Range
    Dim i As Long

    Set ws = ActiveSheet
    Set dict = CreateObject("Scripting.Dictionary")

    lastRow = ws.Cells(ws.Rows.Count, 1).End(xlUp).Row
    Set checkRange = ws.Range("A1:A" & lastRow)

    Application.ScreenUpdating = False

    For i = lastRow To 1 Step -1
        Set cell = ws.Cells(i, 1)

        If Trim(cell.Value) = "" Then
            ' Blank row, do nothing and keep row
        Else
            If dict.Exists(cell.Value) Then
                cell.EntireRow.Delete
            Else
                dict.Add cell.Value, True
            End If
        End If
    Next i

    Application.ScreenUpdating = True
End Sub
2. To run the code, click the ![]() button, or press F5 with the module selected. The macro will immediately scan your first column (A), removing duplicate values while leaving all previously blank rows in their original positions.
button, or press F5 with the module selected. The macro will immediately scan your first column (A), removing duplicate values while leaving all previously blank rows in their original positions.
How it works: The macro loops from the bottom to the top of the specified column, deleting previous values while retaining all blank lines. It automatically adjusts to lists of different lengths by identifying the last non-empty cell.
Parameters and tips:
- If your data is in another column, change
Cells(i,1)to the relevant column number (e.g., 2 for B, 3 for C). - The macro starts from the last row upwards, preventing row shifts from interfering with the deletion process.
- Any cell containing only spaces will also be treated as blank. If you only want to identify truly empty cells, replace
Trim(cell.Value) = ""withcell.Value = "".
Troubleshooting: If the macro does not behave as expected, check for merged cells, hidden rows, or unexpected data types in the targeted column.
Best for: Repetitive clean-up operations, handling larger datasets, or when working with macros as part of an automated workflow.
Excel formula/advanced filter: Extract unique values while keeping blank rows
If you want to extract a unique list from original data and keep blank rows aligned where they appear, you can use an advanced filter with a criteria formula, or cleverly use Excel formulas to build a new list. This is especially useful if you want to create a separate, deduplicated list for reports or further analysis, all while respecting the original layout including the blank lines.
You can use the follwing formula to construct a list of unique values while retaining blank rows in their places. Here's a streamlined approach:
1. In a new column (for example, B1), use this formula (assuming your original data is in A1:A100):
=IF(TRIM(A1)="","",IF(COUNTIF(A$1:A1,A1)=1,A1,""))2. Drag this formula down alongside all rows of your data. Unique entries will appear in their original positions; subsequent duplicates will display as blank, and original blank rows will remain blank.
Precautions: Be sure there are no hidden values or leading/trailing spaces that might affect the uniqueness. TRIM helps guard against this. For legacy versions of Excel, methods may need to be adjusted or use helper columns with manual filtering.
Suitable for: Creating new reports, side-by-side lists, or preparing cleaned data for further processing. This approach is also ideal for those who want a formula-only approach without VBA or add-ins.
Best Office Productivity Tools
Supercharge Your Excel Skills with Kutools for Excel, and Experience Efficiency Like Never Before. Kutools for Excel Offers Over 300 Advanced Features to Boost Productivity and Save Time. Click Here to Get The Feature You Need The Most...
Office Tab Brings Tabbed interface to Office, and Make Your Work Much Easier
- Enable tabbed editing and reading in Word, Excel, PowerPoint, Publisher, Access, Visio and Project.
- Open and create multiple documents in new tabs of the same window, rather than in new windows.
- Increases your productivity by 50%, and reduces hundreds of mouse clicks for you every day!
All Kutools add-ins. One installer
Kutools for Office suite bundles add-ins for Excel, Word, Outlook & PowerPoint plus Office Tab Pro, which is ideal for teams working across Office apps.
- All-in-one suite — Excel, Word, Outlook & PowerPoint add-ins + Office Tab Pro
- One installer, one license — set up in minutes (MSI-ready)
- Works better together — streamlined productivity across Office apps
- 30-day full-featured trial — no registration, no credit card
- Best value — save vs buying individual add-in