How to Save and Use Your VBA Macros in All Workbooks in Excel?
There are many situations where you might need to use the same VBA macro repeatedly in different Excel workbooks for tasks such as automating repetitive calculations, data formatting, or custom functions like converting numbers into words. A common challenge is that by default, macros are stored only within the workbook where they are created, meaning you can't readily access or reuse them in new documents. However, Excel offers several flexible methods to make a VBA macro available globally, eliminating the need to recopy code every time you start a new workbook. This tutorial provides comprehensive instructions for various approaches to ensure your VBA macros are easily accessible across all workbooks, improving your productivity and workflow.

Save and Use the VBA Code in All Workbooks
Personal Macro Workbook Method
For instance, suppose you want to be able to convert numbers to their equivalent English words using a custom VBA code and ensure this feature is always available no matter which workbook you are working in. With the right approach, you can save your VBA modules so they're reusable whenever you need them in Excel. This is especially helpful for custom functions or automation that you want accessible every time, without duplicating code in multiple files.
To do this, you can package your VBA code as a custom Excel Add-in. This add-in can be enabled in Excel and will expose your custom functionality as a function that is available globally.
Follow these steps:
1. Press Alt + F11 in Excel to open the "Microsoft Visual Basic for Applications" window.
2. In the VBA editor, click Insert > Module and paste the following macro into the newly created Module window.
VBA code: Convert numbers to words
Function NumberstoWords(ByVal MyNumber)
'Update by ExtendofficeDim xStr As StringDim xFNum As IntegerDim xStrPointDim xStrNumberDim xPoint As StringDim xNumber As StringDim xP() As VariantDim xDPDim xCnt As IntegerDim xResult, xT As StringDim xLen As IntegerOn Error Resume NextxP = Array("", "Thousand ", "Million ", "Billion ", "Trillion ", " ", " ", " ", " ")
xNumber = Trim(Str(MyNumber))
xDP = InStr(xNumber, ".")
xPoint = ""
xStrNumber = ""
If xDP >0 ThenxPoint = " point "
xStr = Mid(xNumber, xDP +1)
xStrPoint = Left(xStr, Len(xNumber) - xDP)
For xFNum =1 To Len(xStrPoint)
xStr = Mid(xStrPoint, xFNum,1)
xPoint = xPoint & GetDigits(xStr) & " "
Next xFNumxNumber = Trim(Left(xNumber, xDP -1))
End IfxCnt =0xResult = ""
xT = ""
xLen =0xLen = Int(Len(Str(xNumber)) /3)
If (Len(Str(xNumber)) Mod3) =0 Then xLen = xLen -1Do While xNumber <> ""
If xLen = xCnt ThenxT = GetHundredsDigits(Right(xNumber,3), False)
ElseIf xCnt =0 ThenxT = GetHundredsDigits(Right(xNumber,3), True)
ElsexT = GetHundredsDigits(Right(xNumber,3), False)
End IfEnd IfIf xT <> "" ThenxResult = xT & xP(xCnt) & xResultEnd IfIf Len(xNumber) >3 ThenxNumber = Left(xNumber, Len(xNumber) -3)
ElsexNumber = ""
End IfxCnt = xCnt +1LoopxResult = xResult & xPointNumberstoWords = xResultEnd FunctionFunction GetHundredsDigits(xHDgt, xB As Boolean)
Dim xRStr As StringDim xStrNum As StringDim xStr As StringDim xI As IntegerDim xBB As BooleanxStrNum = xHDgtxRStr = ""
On Error Resume NextxBB = TrueIf Val(xStrNum) =0 Then Exit FunctionxStrNum = Right("000" & xStrNum,3)
xStr = Mid(xStrNum,1,1)
If xStr <> "0" ThenxRStr = GetDigits(Mid(xStrNum,1,1)) & "Hundred "
ElseIf xB ThenxRStr = "and "
xBB = FalseElsexRStr = " "
xBB = FalseEnd IfEnd IfIf Mid(xStrNum,2,2) <> "00" ThenxRStr = xRStr & GetTenDigits(Mid(xStrNum,2,2), xBB)
End IfGetHundredsDigits = xRStrEnd FunctionFunction GetTenDigits(xTDgt, xB As Boolean)
Dim xStr As StringDim xI As IntegerDim xArr_1() As VariantDim xArr_2() As VariantDim xT As BooleanxArr_1 = Array("Ten ", "Eleven ", "Twelve ", "Thirteen ", "Fourteen ", "Fifteen ", "Sixteen ", "Seventeen ", "Eighteen ", "Nineteen ")
xArr_2 = Array("", "", "Twenty ", "Thirty ", "Forty ", "Fifty ", "Sixty ", "Seventy ", "Eighty ", "Ninety ")
xStr = ""
xT = TrueOn Error Resume NextIf Val(Left(xTDgt,1)) =1 ThenxI = Val(Right(xTDgt,1))
If xB Then xStr = "and "
xStr = xStr & xArr_1(xI)
ElsexI = Val(Left(xTDgt,1))
If Val(Left(xTDgt,1)) >1 ThenIf xB Then xStr = "and "
xStr = xStr & xArr_2(Val(Left(xTDgt,1)))
xT = FalseEnd IfIf xStr = "" ThenIf xB ThenxStr = "and "
End IfEnd IfIf Right(xTDgt,1) <> "0" ThenxStr = xStr & GetDigits(Right(xTDgt,1))
End IfEnd IfGetTenDigits = xStrEnd FunctionFunction GetDigits(xDgt)
Dim xStr As StringDim xArr_1() As VariantxArr_1 = Array("Zero ", "One ", "Two ", "Three ", "Four ", "Five ", "Six ", "Seven ", "Eight ", "Nine ")
xStr = ""
On Error Resume NextxStr = xArr_1(Val(xDgt))
GetDigits = xStrEnd Function
3. Now, click the "Save" icon located at the top-left corner of the window or simply press Ctrl + S to open the "Save As" dialog.
4. Within the "Save As" window, enter the desired file name in the "File name" field. For the "Save as type" dropdown, be sure to select Excel Add-in (*.xlam).
5. Click the "Save" button to store your workbook as an Excel Add-in file. This creates a reusable add-in that can be enabled at any time for any workbook.
6. Once saved, return to Excel and close the workbook that you just converted to an Add-in.
7. Open a new or existing workbook where you want to use your macro. Enter the custom formula in the appropriate cell (for example, in B2):
=NumberstoWords(A2)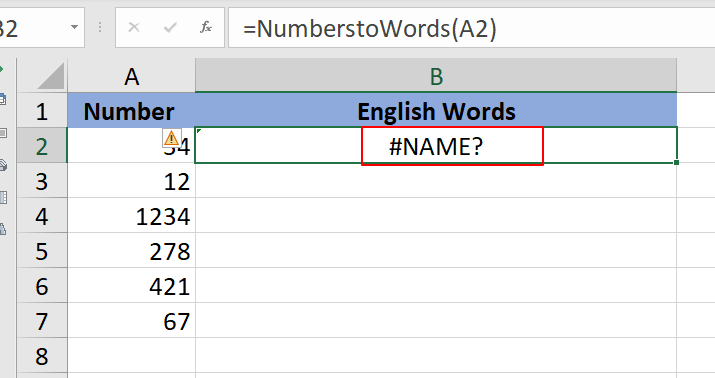
8. Head to the Developer tab and click the Excel Add-ins button in the Add-ins group.
9. In the Add-ins dialog that appears, select Browse.
10. Locate and select the Add-in file you saved earlier, then click OK.
11. Your custom Add-in, such as "Convert Number To Words Add-in", should now appear in the Add-ins list. Make sure it's checked and click OK to enable it.
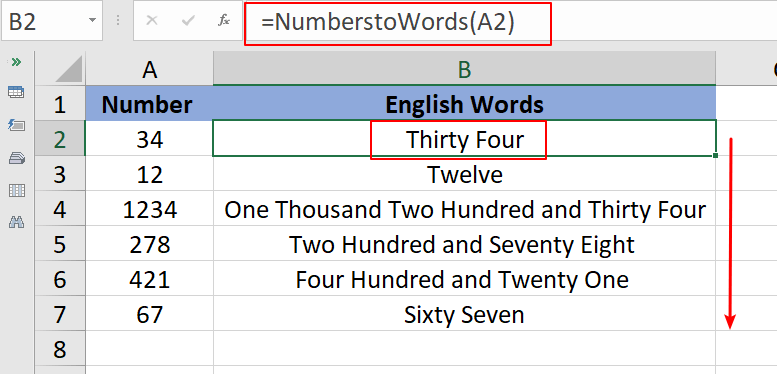
12. Now, enter the custom function again in the target cell (such as B2) and press Enter. You should see the formula return the correct English words for the number.
=NumberstoWords(A2)13. To quickly apply the conversion formula to multiple numbers, drag the cell's autofill handle downward to copy the function to other cells.
Tips & Notes:
- Saving your macro as an Add-in lets you use the same custom functions, code, or automations across all your workbooks, saving time and improving consistency.
- If Excel is closed or the Add-in is disabled later, functions from the Add-in may temporarily show "#NAME?" until the Add-in is loaded again. To avoid confusion, ensure the Add-in is always enabled in the Add-ins manager when needed.
- Some users may not see the Developer tab by default. To enable it, right-click the ribbon, choose "Customize the Ribbon", and check the "Developer" option.
- It's a good practice to store Add-ins in a permanent folder to avoid missing references if files are moved or renamed.
If you prefer running code manually, that is also possible and sometimes helpful when debugging or for ad hoc usage:
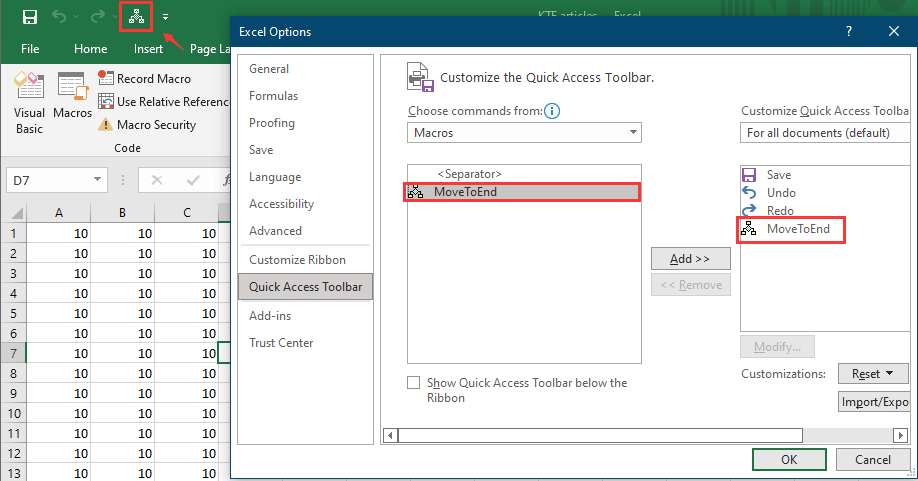
- You can assign a macro to the Quick Access Toolbar for one-click execution in any visible workbook. To do this, right-click the Quick Access Toolbar, select "Customize Quick Access Toolbar", then add your macro.
- You can also press Alt + F11 to open the VBA editor, manually select your macro, and press F5 to run the code as needed.

Pros: This solution lets you create and share rich, reusable macro functionality that always works as long as the Add-in is enabled.
Cons: Users must remember to load the Add-in and, if sharing workbooks, also share the Add-in file and function details. Also, Add-ins cannot be used in Excel Online.
Another highly practical way to ensure your favorite or most-used macros are ready in every Excel session, no matter which workbook is open, is by using the Personal Macro Workbook (PERSONAL.XLSB). This is a special hidden Excel file that loads automatically every time Excel launches, allowing any macro stored inside to be accessible across all open workbooks.
Applicable scenarios: Ideal for personal automation, routine formatting scripts, or utility functions that you do not need to share as formal Excel Add-ins. Macros in PERSONAL.XLSB are available on your computer regardless of which file is open.
Pros: Macros are available globally for your local Excel profile and require no installation of add-ins or extra files.
Cons: Macros stored this way are usable only on the computer and account where PERSONAL.XLSB exists. Sharing with others requires exporting and importing modules manually.
- To use this method, you first need to record or create a macro and ensure it's saved to the Personal Macro Workbook.
Follow these steps:
- Open Excel. On the View tab, click Macros and then Record Macro.
- In the dialog, under "Store macro in", select Personal Macro Workbook. Complete recording (you can stop right away if not needed).
- Press Alt + F11 to enter the VBA editor where you'll see a project for PERSONAL.XLSB. Here, insert a new module or paste your desired macro code.
- Save your changes. Excel automatically creates and maintains the PERSONAL.XLSB workbook in its startup folder.
- Macros in PERSONAL.XLSB can then be run via Macros dialog (Alt + F8), assigned to ribbon or toolbar buttons, or called from VBA.
Troubleshooting & Maintenance: If macros in PERSONAL.XLSB are not available, check if Excel is opening in Safe Mode or if macro security settings are set to “Disable all macros.” Additionally, PERSONAL.XLSB is hidden by default; if you accidentally close without saving or delete it, you may need to re-record a macro to regenerate it.
C:\Users\[YourUserName]\AppData\Roaming\Microsoft\Excel\XLSTART\PERSONAL.XLSBA VBA Code To List All Add Ins In Excel
In Excel, you may add or insert some add ins for better dealing with data. As we know, we can go to the Options window to view all add ins, but is there any way to list all add ins in a sheet? Now, in this tutorial, it provides a VBA code for listing all add ins in Excel.
How To Run VBA Macro When Open Or Close Workbook?
In this article, I will tell you how to run the VBA code while opening or closing the workbook every time.
How To Protect / Lock VBA Code In Excel?
Just like you can use password to protect workbooks and worksheets, you can also set a password for protecting the macros in Excel.
How To Use Time Delay After Running A VBA Macro In Excel?
In some cases, you may need to make a timer delay for triggering a VBA Macro in Excel. For example, when clicking to run a specified macro, it will take effect after10 seconds. This article will show you a method to achieve it.
Best Office Productivity Tools
Supercharge Your Excel Skills with Kutools for Excel, and Experience Efficiency Like Never Before. Kutools for Excel Offers Over 300 Advanced Features to Boost Productivity and Save Time. Click Here to Get The Feature You Need The Most...
Office Tab Brings Tabbed interface to Office, and Make Your Work Much Easier
- Enable tabbed editing and reading in Word, Excel, PowerPoint, Publisher, Access, Visio and Project.
- Open and create multiple documents in new tabs of the same window, rather than in new windows.
- Increases your productivity by 50%, and reduces hundreds of mouse clicks for you every day!
All Kutools add-ins. One installer
Kutools for Office suite bundles add-ins for Excel, Word, Outlook & PowerPoint plus Office Tab Pro, which is ideal for teams working across Office apps.
- All-in-one suite — Excel, Word, Outlook & PowerPoint add-ins + Office Tab Pro
- One installer, one license — set up in minutes (MSI-ready)
- Works better together — streamlined productivity across Office apps
- 30-day full-featured trial — no registration, no credit card
- Best value — save vs buying individual add-in