Create, insert, adjust: your watermark guide in Excel
Have you ever considered enhancing the professionalism and security of your Excel documents? Watermarks can effectively showcase brand identity, indicate document status, or elevate aesthetics without overshadowing your data. In this guide, we unravel the process of incorporating watermarks into your spreadsheets. We'll walk you through creating, inserting, and adjusting watermarks, empowering you to make your spreadsheets not only functional but also visually impressive.
| Without Watermark | With Watermark |
 |  |
Create an image for watermark by using WordArt
First, we need to craft the perfect watermark image to adorn the backdrop of your work. You're free to use any design program you're comfortable with, but for this guide, we are using Excel’s WordArt. If you're already ahead of the game with a ready-to-go watermark, feel free to jump ahead to our Add an image as watermark by using Header & Footer section. Let's dive in!
Step 1: Click View > Page Layout to switch worksheet to the Page Layout view

Step 2: Select a type of WordArt
Click Inserttab and select WordArt in Textgroup, then choose a type of WordArt as you need.

Step 3: Type the text you want to use for the watermark in the textbox

In this step, the watermark is almost ready. If you want to rotate or improve its appearance, proceed to Step 4. If you do not want to do other settings, directly go to Step 5.
Step 4: Rotate or change other formats to match your need
- To use the WordArt as a watermark across your worksheet, you'll need to rotate it. Simply click on the rotate icon
 and adjust it to the direction as needed.
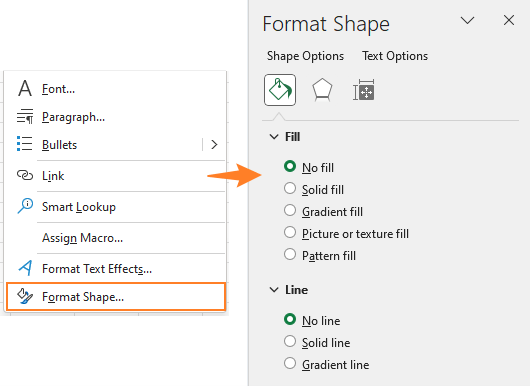
- For additional formatting adjustments to enhance the appearance of your WordArt, simply right-click on it and select Format Shape. In the Format Shape pane, you'll find an array of options to refine your watermark exactly to your liking.


Step 5: Save the WordArt as a picture
Right-click at the border of the WordArt textbox, select Save as Picture command in the context menu, then choose a folder to place it, then nameit and click Save.

Now the image for watermark is done.
Add an image as watermark by using Header & Footer
Once you've created your watermark image, the next step is to add the watermark in Excel. To achieve this job, you could add the watermark image by using the Header & Footer feature.
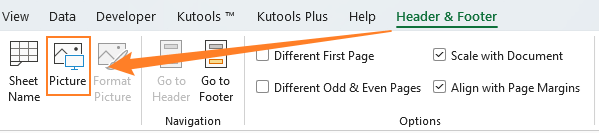
Step 1: Go to Insert tab and select Header & Footer in the Text group

Step 2: Insert the watermark image
Once you've selected Header & Footer, the cursor will automatically position itself in the center header.

- Click Pictureunder Header & Footer tab.
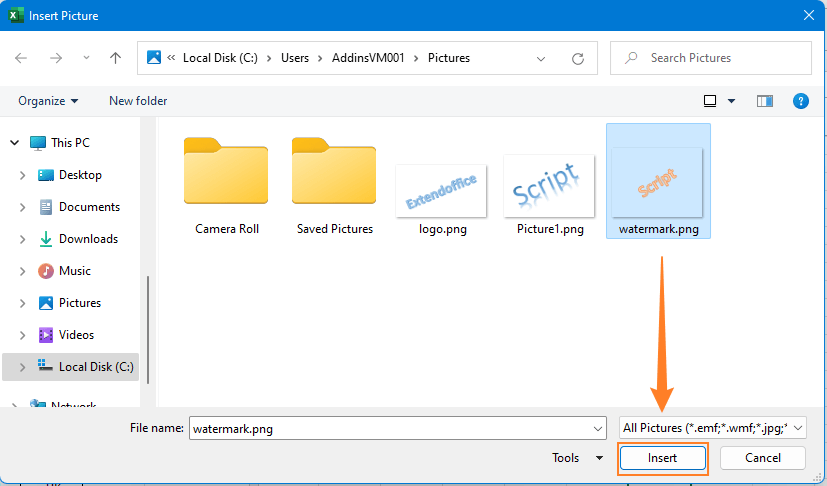
- In the Insert Pictures window, you can navigate to an image file on your computeror utilize resources from Bing Image or OneDrive.

- When you find the desired image, select it and click Insert to insert it.


Now you can see the text &[Picture] appears in the header box, which means that the header contains a picture.
![A screenshot of the text &[Picture] in the header box of Excel, indicating an inserted image](http://cdn.extendoffice.com/images/stories/doc-excel/excel-watermark/doc-watermark-12.png)
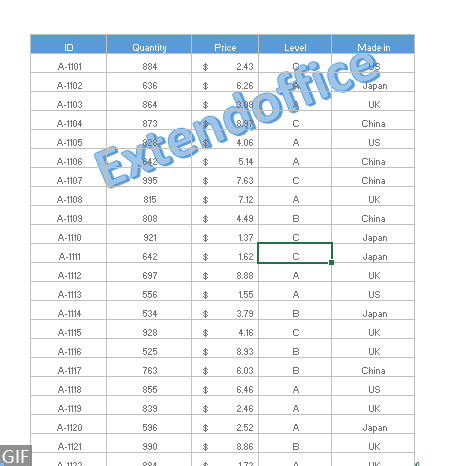
Step 3: View the watermark by clicking at any cell
After inserting the picture into header, you still do not see the watermark in the worksheet. Click any cell out of the header box to see what the watermark looks like.

- Regardless of the worksheet where you place the header, the watermark will be automatically applied to all other pages of the worksheet.
- To return to the normal view, navigate to View tab, and click Normal in the Workbook Views group.
- The watermark is visible only in Page Layout view, in the Print Preview window and on the printed worksheet. You cannot see it in the Normal view.
- There is a limit of one picture that can be inserted in the header of a worksheet.
Transform your Excel watermarking with Kutools! Effortlessly create, format, and insert custom text or image watermarks. Boost your spreadsheets' professionalism in a flash. Experience the Kutools for Excel’s Insert Watermark magic today!

Format watermark
After inserting your watermark image, you'll probably want to change its position, adjust its size, or rotate it for coming across the whole worksheet.
Reposition
Once you've added the picture into the header box, it will appear at the top, meaning your watermark image is positioned at the upper part of the worksheet. If you're looking to reposition the watermark (for instance, moving it downward), here's what you need to do:
- Go to the header box.
- Place the cursor at the front of the text &[Picture].
- Press Enterkey once or several times to reposit the watermark as you need.
![A screenshot of an Excel header showing the &[Picture] text for watermark repositioning](//cdn.extendoffice.com/images/stories/doc-excel/excel-watermark/doc-watermark-15.png)
- Click any cell to view the relocated watermark.
![A screenshot of an Excel header showing the &[Picture] text for watermark repositioning](http://cdn.extendoffice.com/images/stories/doc-excel/excel-watermark/doc-watermark-15.png)

Resize
If you want to resize the watermark, please do as below:
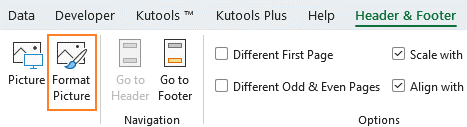
- Click on the header box which contains the picture, then select Format Pictureunder Header & Footer tab.
- In the Format Picturedialog, change the Heightand Width or the Scale as you need. Then click OK.


Rotate
Excel doesn't support rotating watermarks post-insertion. If you wish to rotate your watermark image, ensure you do so prior to inserting it.
- Click Insert> Pictures, then find the picture you want to rotate from the computer, stock images or online pictures, then select the picture and click Insertto insert the picture to Excel.

- Click on the rotate icon and drag either left or right to rotate the picture.

- Right-click at the border of the picture and select Save as Picture to place a folder to save this rotated image.


 and drag either left or right to rotate the picture.

Add editable text watermark in Header & Footer
If you want to add an editable text watermark in worksheet, you can follow these steps:
Step 1: Go to Insert tab and select Header & Footer in the Text group

Step 2: Type the text you want to show as watermark
Once you've selected Header & Footer, the cursor will automatically position itself in the center header.
Then type the text you want to show as watermark in worksheets, typing "Craft" in this example.

Step 3: Format the text as you need
Select the text, then go to the Fontgroup under Hometab, change the font size, font style, font color and other formats as you need.

Step 4: Adjust the position of the text
Place the cursor at the front of the text, and then press Enterkey once or several times to reposit the watermark as you need.

Step 5: View the watermark by clicking at any cell

Easily insert professional watermark by Kutools
Inserting a watermark image or an editable text watermark in Excel isn't straightforward. However, Kutools for Excel offers an exceptional feature – Insert Watermark, which simplifies the task significantly. It allows you to add both editable text and image watermarks, offering a range of customization options, all presented in a user-friendly interface. Forget about the convoluted process of Excel's native tool. With Kutools, adding a watermark becomes as easy as a few clicks.
Click Kutools> Insert> Insert Watermark. Then specify the options as you need in the popping dialog, you can preview the watermark you set in the right section, click OKto finish inserting.

- If you haven't experienced the magic of Kutools for Excel yet, it's about time you do. Download it now and discover an Excel experience like no other.
- Click Kutools > Delete > Delete Watermark to quickly delete watermark.
Remove watermark
To remove watermark, please follow below steps:
Step 1: Go to Insert tab and select Header & Footer in the Text group

Step 2: Delete watermark
Once you've selected Header & Footer, the cursor will automatically position itself in the center header and select the header contents.
Press Deletekey or Backspacekey to remove it.

Step 3: Click any cell to view the result, watermark is removed

In wrapping up, mastering the art of creating, inserting, and adjusting watermarks in Excel can elevate your worksheets. I trust you've found this guide insightful. For more invaluable Excel tips and tricks that can transform your data processing, dive in here.
Best Office Productivity Tools
Supercharge Your Excel Skills with Kutools for Excel, and Experience Efficiency Like Never Before. Kutools for Excel Offers Over 300 Advanced Features to Boost Productivity and Save Time. Click Here to Get The Feature You Need The Most...
Office Tab Brings Tabbed interface to Office, and Make Your Work Much Easier
- Enable tabbed editing and reading in Word, Excel, PowerPoint, Publisher, Access, Visio and Project.
- Open and create multiple documents in new tabs of the same window, rather than in new windows.
- Increases your productivity by 50%, and reduces hundreds of mouse clicks for you every day!
All Kutools add-ins. One installer
Kutools for Office suite bundles add-ins for Excel, Word, Outlook & PowerPoint plus Office Tab Pro, which is ideal for teams working across Office apps.
- All-in-one suite — Excel, Word, Outlook & PowerPoint add-ins + Office Tab Pro
- One installer, one license — set up in minutes (MSI-ready)
- Works better together — streamlined productivity across Office apps
- 30-day full-featured trial — no registration, no credit card
- Best value — save vs buying individual add-in
Table of contents
- Video: Create, insert, adjust watermark
- Create an image for watermark by using WordArt
- Add an image as watermark by using Header & Footer
- Format image watermark
- Reposition
- Resize
- Rotate
- Add editable text watermark
- Easily insert professional watermark by Kutools
- Remove watermark
- Best Office Productivity Tools
- Comments