Excel borders: how to add, customize, remove and more
Excel offers a variety of ways to enhance the appearance and readability of your spreadsheets, with cell borders being a fundamental tool for achieving this. Unlike gridlines, which provide a visual structure to your entire worksheet by default, cell borders allow for more customization and can be applied selectively to highlight specific areas of your data. In this tutorial, we'll dive deep into everything about Excel borders, from basic additions to customizations and removals.
Cell borders vs. gridlines
Gridlines are light grey lines that delineate the cells on your worksheet by default, aiding in data entry and reading. However, these lines don't print unless specifically set to.
Cell borders, on the other hand, are fully customizable lines that can be added around cells or ranges. They are especially useful for printing and can be tailored in terms of style, color, and thickness.

Add Excel built-in borders
By default, Excel provides quick access to several predefined border styles on its ribbon. If you want to add built-in borders to cells, please do as follows to get it done.
- Select the cells where you want to add borders.
- Go to the Home tab, click the Border drop-down to reveal the predefined border styles, and then choose any one as needed.


Result
Add bottom border: If you select a range of cells and apply the Bottom Border style, the bottom border will be added to the last row within the range.

Add right border: If you select a range of cells and apply the Right Border style, the right border will be added to the right edge of the last column within the selected range.

Add all borders: Applying the All Borders style to a range of cells in Excel indeed adds borders to the inside and outside edges of all cells within the selected range, ensuring each cell is individually outlined.

Add outside borders: Applying the Outside Borders option to a range of cells in Excel adds borders around the outer edges of the selected range. This means the top, bottom, left, and right borders of the range will have borders, but individual cells inside the range will not have borders between them.

- Windows shortcut: Ctrl + Shift + &
- Mac shortcut: Command + Option + 0
- If you apply a border to a selected cell, the border is also applied to adjacent cells that share a bordered cell boundary. For example, if you apply a box border to enclose the range B1:C5, the cells D1:D5 acquire a left border.
- When conflicting border styles are applied to a common cell edge, the border added last will be the one that's displayed.

Unlock Excel Magic with Kutools AI
- Smart Execution: Perform cell operations, analyze data, and create charts—all driven by simple commands.
- Custom Formulas: Generate tailored formulas to streamline your workflows.
- VBA Coding: Write and implement VBA code effortlessly.
- Formula Interpretation: Understand complex formulas with ease.
- Text Translation: Break language barriers within your spreadsheets.
Create custom borders
For more control over the appearance of borders, Excel allows you to customize the border settings. Please do as the following instructions to add custom borders to cells.
- Select the cells where you want to add borders. Here I select the range B2:E2.
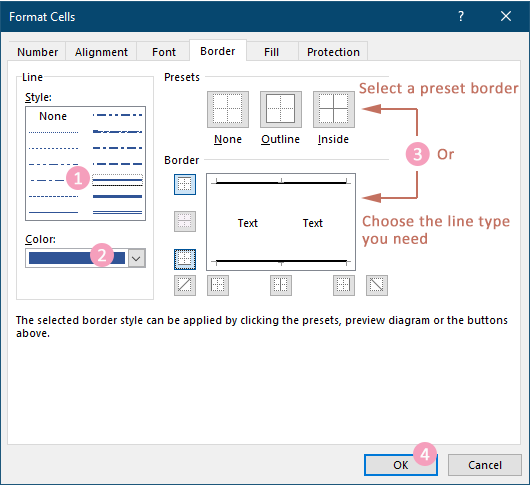
- Go to the Home tab, click the Border drop-down, and then select More Borders from the drop-down menu.
 Tip: You can also press the Ctrl + 1 keys to open the Format Cells dialog box and then navigate to the Border tab.
 - In the Format Cells dialog box and under the Border tab, you can configure your custom border as follows.
- Choose your desired line style from the Style box.
- Pick a line color from the Color drop-down list.
- Use the presets in the Presets section or manually apply borders using the options in the Border section.
- Click OK to apply your settings. See screenshot:


Result
The selected range now features the custom border you've applied, as depicted in the screenshot below.

Draw cell borders manually
Drawing borders in Excel allows for precise control over which cells or areas of your spreadsheet have borders, without the need to pre-select a range. This flexibility enables users to customize their data presentation directly and efficiently, ensuring specific cells or regions are highlighted precisely as needed. Please do as follows to draw cell borders manually.
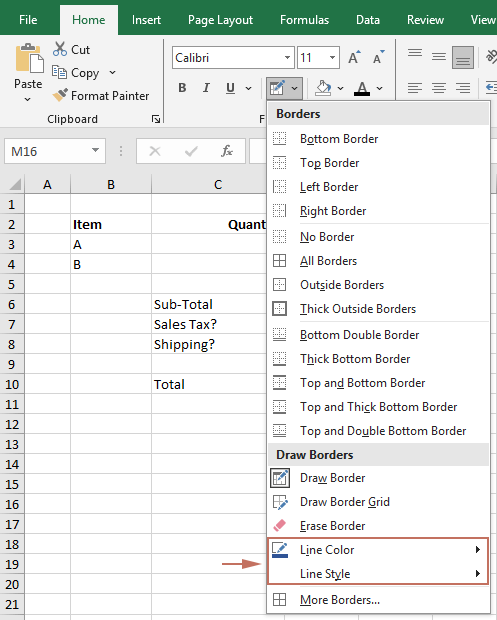
- On the Home tab, click the Borders drop-down menu in the Font group.
- Select your desired line color and line style from the Draw Borders section.
 Tips:
Tips:- After selecting each option (line color or style), the Borders drop-down menu will close, requiring you to open it again to select the next option.
- Once either color or style is selected, Excel automatically switches to Draw Border mode, indicated by the cursor changing to a pencil icon.
- You can then draw borders on any cell or range directly on your spreadsheet by clicking and dragging across the desired range.

Save custom border styles for future use
While Excel offers a variety of predefined border styles, you might find yourself frequently using a specific combination of borders that isn't readily available. To streamline your workflow and maintain consistency across your workbooks, you can save custom border styles for future use. Here's how you can save time and effort by creating and reusing your custom border styles.
Step 1: Creating a Custom Cell Style for Borders
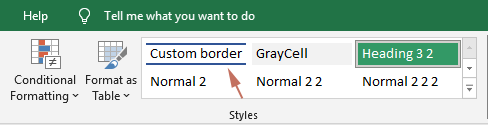
- On the Home tab, find the Styles group, click on the More button (the small downward arrow) at the bottom right corner of the Styles box to expand the menu.

- Select New Cell Style from the drop-down menu.

- In the opening Style dialog box, you need to:
- In the Style name box, give your new border style a descriptive name.
- Click the Format button.

- The Format Cells dialog box is now open for you to customize your border.
- Switch to the Border tab.
- Choose your desired line style from the Style box.
- Pick a line color from the Color drop-down list.
- Use the presets in the Presets section or manually apply borders using the options in the Border section.
- Click OK to apply your settings. See screenshot:

- Now it returns to the Style dialog box. Please uncheck any formatting options you don’t want included in your new style (make sure the Border option remains checked), and then click OK to save your custom cell style.


Step 2: Applying Your Custom Border Style
After saving the custom border style, you can apply it as follows.
- Select your target cells or range to which you want to apply your custom border style (here I select the range B2:E2).
- Under the Home tab, and in the Styles box, find and select your newly created custom style.
 Tip: If it's not immediately visible, click the More button to find your style listed under Custom.

Result
The custom style is now applied to the selected cells as shown in the screenshot below.

Remove borders from cells
Removing borders can clean up your data presentation or prepare cells for new formatting. This section illustrates how to remove borders from selected cells, including removing all borders and removing individual borders.
Remove all borders
To remove all borders from selected cells, please do as follows.
- Select the cells from which you want to remove borders.
- Under the Home tab, click the Border drop-down to reveal the drop-down menu, and then select No Border.


Then all borders are removed from the selected cells.
Remove individual borders
If you only want to remove individual borders in a range, you can apply the Erase Border feature as follows.
- Select the cells from which you want to remove borders.
- Under the Home tab, click the Border drop-down to reveal the drop-down menu, and then select Erase Border.

- Then the cursor changes to an eraser icon, allowing you to click on a border to remove it or drag the eraser across cells to clear multiple borders at once.

Notes for borders in Excel
- When applying multiple borders to the same cell, Excel displays the most recently applied border style. If you apply conflicting border types to a cell, the last one applied takes precedence.
- Borders are different from gridlines. Borders are part of cell formatting and remain visible in printouts if selected, whereas gridlines are for screen view only unless specifically set to print under Page Layout options.
- To automatically insert cell borders, format your data as an Excel table and choose from a rich set of predefined table styles.
Cell borders are a versatile tool in Excel, enabling users to delineate important data clearly, enhance spreadsheet readability, and customize reports for a professional appearance. Whether you're adding, customizing, or removing borders, the process is straightforward and can greatly impact your data's presentation. With this guide, you should now feel confident in managing borders in your Excel worksheets, making your data not only more organized but visually appealing as well. For those eager to delve deeper into Excel's capabilities, our website boasts a wealth of tutorials. Discover more Excel tips and tricks here.
Table of contents
- Cell borders vs. gridlines
- Add borders to cells
- Add Excel built-in borders
- Create custom borders
- Draw cell borders manually
- Save custom border styles for future use
- Remove borders from cells
- Remove all borders
- Remove individual borders
- Notes for borders in Excel
- Related Articles
- The Best Office Productivity Tools
- Comments
Best Office Productivity Tools
Supercharge Your Excel Skills with Kutools for Excel, and Experience Efficiency Like Never Before. Kutools for Excel Offers Over 300 Advanced Features to Boost Productivity and Save Time. Click Here to Get The Feature You Need The Most...
Office Tab Brings Tabbed interface to Office, and Make Your Work Much Easier
- Enable tabbed editing and reading in Word, Excel, PowerPoint, Publisher, Access, Visio and Project.
- Open and create multiple documents in new tabs of the same window, rather than in new windows.
- Increases your productivity by 50%, and reduces hundreds of mouse clicks for you every day!
All Kutools add-ins. One installer
Kutools for Office suite bundles add-ins for Excel, Word, Outlook & PowerPoint plus Office Tab Pro, which is ideal for teams working across Office apps.
- All-in-one suite — Excel, Word, Outlook & PowerPoint add-ins + Office Tab Pro
- One installer, one license — set up in minutes (MSI-ready)
- Works better together — streamlined productivity across Office apps
- 30-day full-featured trial — no registration, no credit card
- Best value — save vs buying individual add-in