How to set column width and row height for a range in Excel?
In Excel, there are many situations where you need to adjust the column width and row height for a specific range, rather than the entire worksheet. For example, you may be preparing a table for printing, aligning data for better readability, or formatting templates where cell size consistency is important. This article explores several practical ways to set both column width and row height simultaneously for a selected range in Microsoft Excel, allowing you to efficiently fine-tune your worksheet layout.
Compare methods for setting column width and row height
Set column width and row height for a range with Format commands
Set column width and row height for a range with Kutools for Excel
VBA Code - Automate setting column width and row height for a specified range
Compare methods for setting column width and row height
All three methods can resize the rows and columns that intersect a selected range, but the setup is quite different. Excel's built-in Format commands require row height and column width to be entered separately, VBA can automate both settings through code, while Kutools for Excel provides a dedicated dialog for adjusting both dimensions together with a consistent measurement unit.
| Method | Row height + column width | Measurement | Best for |
|---|---|---|---|
| Excel Format commands | Set separately in two dialogs | Uses Excel's native row-height and column-width measurements | Simple one-off adjustments using built-in Excel tools |
| Kutools for Excel | Set both together in one dialog | Choose points, centimeters, inches, or pixels for both dimensions | Creating precisely sized tables, forms, templates, or print layouts with less repetitive setup |
| VBA | Can set both during one macro run | Uses Excel's native RowHeight and ColumnWidth properties | Repeatable or customized automation for users comfortable with macros |
Note: Row height and column width are properties of entire rows and columns in Excel. Therefore, when you select a cell range, these methods resize the rows and columns that intersect that selection rather than changing the dimensions of individual cells independently.
Set column width and row height for a range with Format commands
You can use Excel's built-in Format commands to manually set the column width and row height for any range. This method is straightforward and flexible, especially for quick formatting tasks or when you want full control over the exact measurements.
However, row height and column width must be set separately through two different commands. In addition, Excel uses different native measurement conventions for row height and column width, which can make it less convenient when you are trying to create cells with precisely coordinated dimensions.
1. Select the cells or range where you want to set the column width and row height. Keep in mind that changing row height or column width affects the entire rows or columns that intersect the selection.
2. Go to the Home tab, click Format in the Cells group, and then choose Row Height... to set the row height for your selection.
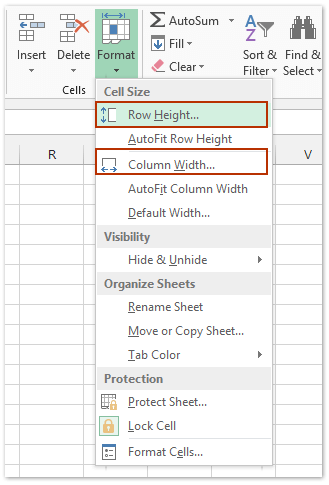
3. In the Row Height dialog box, type the desired height for the rows included in your selection, then click OK. Excel will apply the new height to the corresponding rows.

4. Similarly, go to Home > Format > Column Width... to change the width of the columns in your selection.
5. In the Column Width dialog box, enter the desired column width, and then click OK. The new width will apply to the corresponding columns.

Tip: Excel places limits on row height and column width. If you enter a value outside the supported range, Excel will not apply the requested size as entered.
Set column width and row height for a range with Kutools for Excel
If you frequently need to control both row height and column width, Kutools for Excel's Adjust Cell Size utility provides a more unified approach. Instead of opening separate Row Height and Column Width dialogs, you can enter both dimensions together and apply a common measurement unit. This is particularly useful for creating consistently sized tables, forms, templates, or print layouts.
1. Select the target range you wish to format, then click Kutools > Format > Adjust Cell Size. This opens the Adjust Cell Size dialog box where both dimensions can be configured.

2. In the Adjust Cell Size dialog, choose the measurement unit you prefer—points, centimeters, inches, or pixels. Then enter the desired values for Row height and Column width.
3. Click OK. Kutools applies the specified row height and column width to the rows and columns that intersect your selected range in one operation.
Because both dimensions are configured in the same dialog with the same selectable measurement unit, this method is especially convenient when you need precise and repeatable sizing.
Kutools for Excel - Supercharge Excel with over 300 essential tools, making your work faster and easier, and take advantage of AI features for smarter data processing and productivity. Get It Now
VBA Code - Automate setting column width and row height for a specified range
If you regularly need to set column widths and row heights for particular areas or want to automate this task to reduce manual repetition, you can use a short VBA macro to batch-adjust both for any range you select. This approach is suitable for users comfortable with macros and can be customized further for repeated formatting workflows.
1. Press Alt + F11 to open the Microsoft Visual Basic for Applications editor.
2. In the VBA interface, click Insert > Module, and paste the following macro into the new module window:
Sub SetColWidthRowHeight()
    Dim rng As Range
    Dim colWidth As Double
    Dim rowHeight As Double
    On Error Resume Next
    xTitleId = "KutoolsforExcel"
    Set rng = Application.Selection
    Set rng = Application.InputBox("Select the range to adjust:", xTitleId, rng.Address, Type:=8)
    colWidth = Application.InputBox("Enter the column width:", xTitleId, "", Type:=1)
    rowHeight = Application.InputBox("Enter the row height:", xTitleId, "", Type:=1)
    Dim col As Range
    Dim rw As Range
    ' Set column widths
    For Each col In rng.Columns
        col.ColumnWidth = colWidth
    Next
    ' Set row heights
    For Each rw In rng.Rows
        rw.RowHeight = rowHeight
    Next
End Sub3. Close the VBA editor, then return to Excel. Go to the Developer tab, or press Alt + F8, select SetColWidthRowHeight from the list of macros, and click Run.
You will be prompted to select the target range, then enter the desired column width and row height. Both settings will be applied to the corresponding columns and rows in one macro run.
Note: This macro uses Excel's native ColumnWidth and RowHeight properties. Unlike Kutools' Adjust Cell Size dialog, it does not provide a shared choice of centimeters, inches, pixels, or points for both settings unless additional conversion logic is added to the VBA code.
In summary, the built-in Format commands are suitable for quick one-off adjustments, while VBA can automate repeated sizing when you are comfortable maintaining macro code. When you regularly need to specify both row height and column width—particularly in a consistent physical or pixel-based unit—Kutools for Excel's Adjust Cell Size offers a more direct and convenient workflow by bringing both settings together in one dialog.
Demo
Related articles:
How to set cell size in cm (centimeters) in Excel?
How to square multiple cells in Excel?
Best Office Productivity Tools
Supercharge Your Excel Skills with Kutools for Excel, and Experience Efficiency Like Never Before. Kutools for Excel Offers Over 300 Advanced Features to Boost Productivity and Save Time. Click Here to Get The Feature You Need The Most...
Office Tab Brings Tabbed interface to Office, and Make Your Work Much Easier
- Enable tabbed editing and reading in Word, Excel, PowerPoint, Publisher, Access, Visio and Project.
- Open and create multiple documents in new tabs of the same window, rather than in new windows.
- Increases your productivity by 50%, and reduces hundreds of mouse clicks for you every day!
All Kutools add-ins. One installer
Kutools for Office suite bundles add-ins for Excel, Word, Outlook & PowerPoint plus Office Tab Pro, which is ideal for teams working across Office apps.





- All-in-one suite — Excel, Word, Outlook & PowerPoint add-ins + Office Tab Pro
- One installer, one license — set up in minutes (MSI-ready)
- Works better together — streamlined productivity across Office apps
- 30-day full-featured trial — no registration, no credit card
- Best value — save vs buying individual add-in