How to add and remove meeting (required/optional/resource) attendees in Outlook
Managing meeting attendees efficiently is an important task for anyone organizing events or team collaboration in Outlook. Whether you’re planning a new meeting or revising a previously scheduled meeting, you may often need to adjust the attendee list by adding new participants or removing those who are no longer needed. Outlook offers convenient tools that let you add or remove required, optional, or resource attendees smoothly, helping you ensure that the right people are involved and making scheduling simpler. This guide provides practical steps for updating attendee lists in both new and existing meetings, as well as notes on typical situations where these features are especially valuable, such as coordinating project teams, booking shared resources (like conference rooms), or managing recurring appointments as group memberships change.
- Add meeting (required/optional/resource) attendees in Appointment page
- Add meeting (required/optional/resource) attendees in Scheduling page
- Delete meeting (required/optional/resource) attendees
Add meeting (required/optional/resource) attendees in Appointment page
Most users organize meetings through the Appointment page, which is the default interface for creating and editing meetings in Outlook. Here, the process of adding required, optional, or resource attendees is straightforward.
1. Open the meeting window using one of these actions depending on your Outlook version:
- For Outlook 2010/2013: Click Home > New Item > Meeting to create a new meeting.
- For Outlook 2007: Click File > New > Meeting Request.
- If you want to edit an existing meeting, double-click the meeting item in your calendar.
2. Once the meeting window is open, enter attendee email addresses directly in the To… box. This is helpful for small groups where you know all email addresses. Adding attendees this way automatically designates them as required by default.
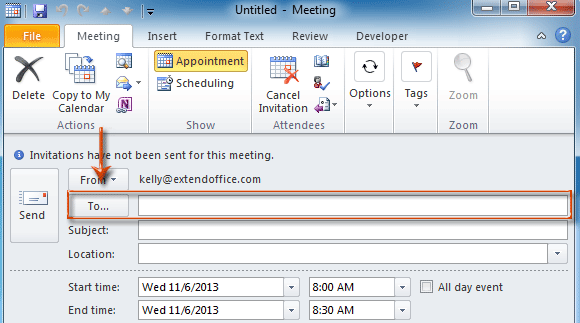
If you’re unsure of all email addresses, need to add optional or resource attendees, or want to select from an existing contact list, you can use the Address Book for a more accurate and organized approach.
3. Click the Address Book button located in the Attendees group under the Meeting tab to open the attendee picker.

4. In the Select Attendees and Resources: Contacts dialog box, use the following options:
- Add Required Attendees: Select and highlight the necessary email addresses in the Address Book and then click the Required -> button. Required attendees are expected and essential for the meeting.
- Add Optional Attendees: Highlight names and click the Optional -> button. Optional attendees can join if available but their presence is not required. This helps avoid confusion about who must attend, particularly for large meetings.
- Add Resource Attendees: For rooms or equipment, select the corresponding entries and click Resources ->. Assigning resources helps with central scheduling and avoids double-booking physical assets.
Tip: To select several non-adjacent entries, hold the Ctrl key and click each desired contact. For selecting adjacent names, hold the Shift key and click the first and last name of the range. These selection techniques are crucial for efficiently managing large distribution lists or multiple invitees.
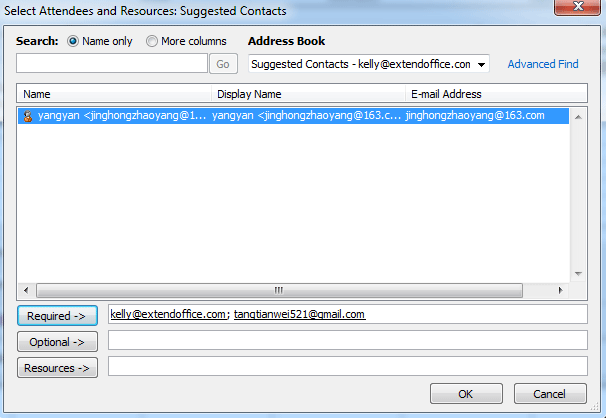
5. When finished, click OK to confirm your selections and add them to the meeting invitation.
6. To finalize the meeting request, click Send if you are creating a new meeting, or Send Update to distribute changes to the attendee list when editing an existing event. It is important to note that sending an update will notify all involved parties of the changes, so use with care when removing attendees.
AI Mail Assistant in Outlook: Smarter Replies, Clearer Communication (one-click magic!)
Streamline your daily Outlook tasks with the AI Mail Assistant from Kutools for Outlook. This powerful tool learns from your past emails to offer intelligent and accurate responses, optimize your email content, and help you draft and refine messages effortlessly.

This feature supports:
- Smart Replies: Get responses crafted from your past conversations—tailored, precise, and ready to go.
- Enhanced Content: Automatically refine your email text for clarity and impact.
- Effortless Composition: Just provide keywords, and let AI handle the rest, with multiple writing styles.
- Intelligent Extensions: Expand your thoughts with context-aware suggestions.
- Summarization: Get concise overviews of long emails instantly.
- Global Reach: Translate your emails into any language with ease.
This feature supports:
- Smart email replies
- Optimized content
- Keyword-based drafts
- Intelligent content extension
- Email summarization
- Multi-language translation
Don’t wait—download AI Mail Assistant now and enjoy!
Add meeting (required/optional/resource) attendees in Scheduling page
The Scheduling page offers a visual timeline of all attendees’ availability, making it especially useful for group meetings where time coordination is essential. This method is often used when scheduling cross-departmental meetings, booking shared resources, or reconciling complex team calendars.
1. Open the Meeting window as described above, choosing the method appropriate for your Outlook version or by double-clicking an existing meeting entry in the calendar view.
- To create a meeting in Outlook 2010/2013, click Home > New Item > Meeting.
- For Outlook 2007, use File > New > Meeting Request.
- Open existing meeting: double click the meeting in calendar view.
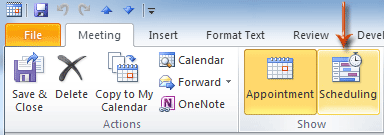
2. In the meeting window, click the Scheduling button within the Show group found under the Meeting tab.
3. Next, click Add Others > Add from Address Book to open the attendee selection dialog.
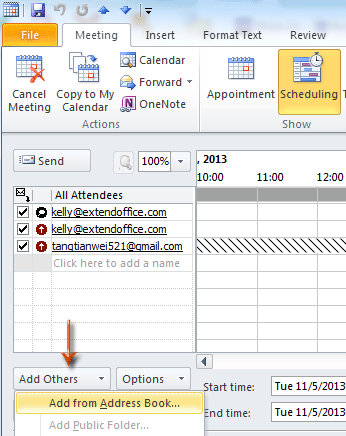
4. Within this dialog, follow the same steps outlined above for the Appointment page; add required, optional, or resource attendees as appropriate (see step4 in the Appointment page). This ensures attendees and resources are included systematically and availability is displayed for easy scheduling.
5. Click Send for new meetings or Send Update for changes to existing ones to finalize the invitation. Sending an update will refresh all attendee lists and availability.
Delete meeting (required/optional/resource) attendees
Over time, it often becomes necessary to revise attendee lists, such as when team members leave a project or resource requirements change. You can easily delete specific participants or all attendees from a meeting by following these straightforward steps:
1. Open the Meeting window for the event you wish to update, then click the Address Book button in the Attendees group under the Meeting tab.
2. Locate the attendee in one of the respective boxes: Required ->, Optional ->, or Resource ->. Highlight the email address of the individual you wish to remove.
3. After selecting all attendees to remove, press Delete on your keyboard or use the right-click menu if available. Then click OK to confirm.
4. To apply the changes, click Send for new meetings or Send Update for existing appointments to notify attendees. When removing people from meetings, Outlook will prompt you regarding whether to notify only the deleted attendees or the entire list. Carefully choose the notification scope to minimize confusion.
Tip: If you accidentally remove an attendee, you can easily re-add them using the steps outlined above. Always review the recipient lists before sending updates to avoid missing important invitations or causing booking conflicts for resources.
Best Office Productivity Tools
Experience the all-new Kutools for Outlook with 100+ incredible features! Click to download now!
📧 Email Automation: Auto Reply (Available for POP and IMAP) / Schedule Send Emails / Auto CC/BCC by Rules When Sending Email / Auto Forward (Advanced Rules) / Auto Add Greeting / Automatically Split Multi-Recipient Emails into Individual Messages ...
📨 Email Management: Recall Emails / Block Scam Emails by Subjects and Others / Delete Duplicate Emails / Advanced Search / Consolidate Folders ...
📁 Attachments Pro: Batch Save / Batch Detach / Batch Compress / Auto Save / Auto Detach / Auto Compress ...
🌟 Interface Magic: 😊More Pretty and Cool Emojis / Remind you when important emails come / Minimize Outlook Instead of Closing ...
👍 One-click Wonders: Reply All with Attachments / Anti-Phishing Emails / 🕘Show Sender's Time Zone ...
👩🏼🤝👩🏻 Contacts & Calendar: Batch Add Contacts From Selected Emails / Split a Contact Group to Individual Groups / Remove Birthday Reminders ...
Use Kutools in your preferred language – supports English, Spanish, German, French, Chinese, and 40+ others!


🚀 One-Click Download — Get All Office Add-ins
Strongly Recommended: Kutools for Office (5-in-1)
One click to download five installers at once — Kutools for Excel, Outlook, Word, PowerPoint and Office Tab Pro. Click to download now!
- ✅ One-click convenience: Download all five setup packages in a single action.
- 🚀 Ready for any Office task: Install the add-ins you need, when you need them.
- 🧰 Included: Kutools for Excel / Kutools for Outlook / Kutools for Word / Office Tab Pro / Kutools for PowerPoint