How to insert vertical lines in Outlook?
When composing emails in Microsoft Outlook, properly separating different content sections can greatly enhance your message’s clarity and visual appeal. While adding horizontal lines is simple using the built-in Border > Horizontal Line feature, users sometimes wonder how to insert vertical lines to divide content vertically. Whether you’re highlighting key points, splitting columns in a newsletter, or creating a visually structured email, vertical lines can provide an elegant solution. Outlook doesn’t directly offer a dedicated vertical line tool, but there are several practical methods to achieve the same result by utilizing shapes or table borders. Each method has its own advantages and considerations depending on your formatting needs.
Insert vertical lines with Line shape in Outlook
Insert vertical lines with table in Outlook
Insert vertical lines with VBA code (Alternative Solution)
Insert vertical lines with Line shape in Outlook
Using the Shapes feature in Outlook allows you to create a customized vertical line in your email. This method is particularly effective if you want to adjust the look, length, and position of the line freely. Here are the steps to draw a vertical line using Shapes:
- In Outlook 2007: Go to File > New > Mail Message to open a new message window.
- In Outlook 2010, 2013, or later versions: Click New Email on the Home tab in the New group.
Next, click on the Insert tab, find the Illustrations group, and select Shapes > Line.
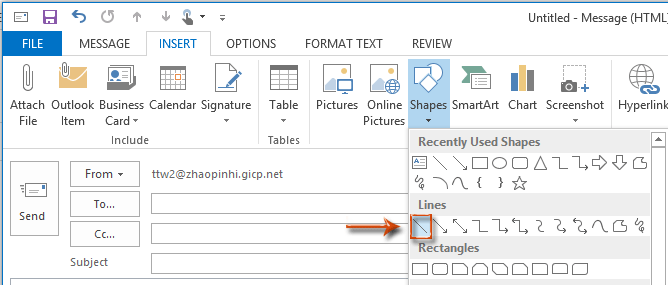
When you select the Line tool, your cursor will change to a cross shape ![]() . To ensure the line is perfectly vertical, press and hold the Shift key while clicking and dragging the mouse from the top to the bottom position where you want the line to appear. Holding Shift helps to constrain the angle of the line, keeping it straight.
. To ensure the line is perfectly vertical, press and hold the Shift key while clicking and dragging the mouse from the top to the bottom position where you want the line to appear. Holding Shift helps to constrain the angle of the line, keeping it straight.
After you release the mouse button, a vertical line is immediately inserted into your email message. You can then adjust the line's color, thickness, and position by selecting the line and using the formatting options available in the Drawing Tools tab. Here’s an example of how it looks:

This approach is ideal for emails that require flexible positioning of vertical lines, such as dividing content in business correspondence or newsletters. However, note that drawing shapes is only possible when composing emails in HTML format, not in plain text or rich text format. If you can’t find the Shapes feature or can’t draw lines, please check your message format.
For best results, avoid placing shapes too close to images—Outlook may alter the layout when the email is received or previewed on mobile devices. To adjust a line’s color or thickness, select the inserted line and use the options in the Format tab. If you need to move the line, simply drag it to the desired location within your message body. Also, remember that extremely long or thick lines can sometimes disrupt email rendering on different mail clients, so it’s wise to preview the email before sending it.
AI Mail Assistant in Outlook: Smarter Replies, Clearer Communication (one-click magic!)
Streamline your daily Outlook tasks with the AI Mail Assistant from Kutools for Outlook. This powerful tool learns from your past emails to offer intelligent and accurate responses, optimize your email content, and help you draft and refine messages effortlessly.

This feature supports:
- Smart Replies: Get responses crafted from your past conversations—tailored, precise, and ready to go.
- Enhanced Content: Automatically refine your email text for clarity and impact.
- Effortless Composition: Just provide keywords, and let AI handle the rest, with multiple writing styles.
- Intelligent Extensions: Expand your thoughts with context-aware suggestions.
- Summarization: Get concise overviews of long emails instantly.
- Global Reach: Translate your emails into any language with ease.
This feature supports:
- Smart email replies
- Optimized content
- Keyword-based drafts
- Intelligent content extension
- Email summarization
- Multi-language translation
Don’t wait—download AI Mail Assistant now and enjoy!
Insert vertical lines with table in Outlook
Another effective way to insert a vertical line is by using a table. This method works well when you need a precise, straight line that remains aligned with your email content, such as separating sections in a multi-column layout or adding a visual guide. The principle is simple: you create a single-cell table and adjust its borders so only the right border is visible, simulating a vertical line.
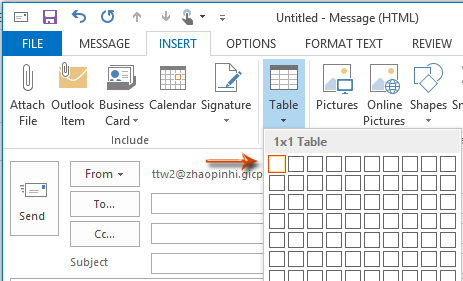
To use this method, begin by clicking the Insert tab on the Ribbon and then click the Table button in the Tables group. In the dropdown, select a 1x1 Table to insert a single cell into your message.
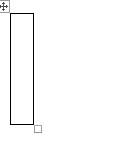
Select the newly inserted 1x1 table and use your mouse or the table properties to adjust its width and height so the cell forms a narrow, tall rectangle—the desired size for your vertical line.
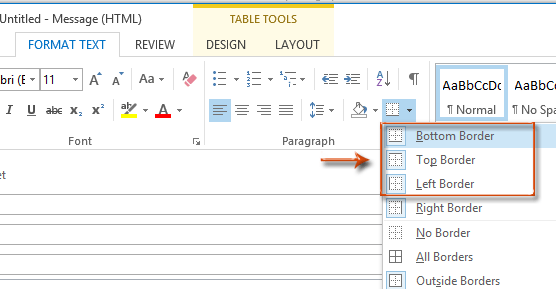
Next, go to the Format Text tab and locate the Paragraph group. Click the Border button, then select Bottom Border, Top Border, and Left Border to remove them. Only the right border will remain visible, making the cell look like a vertical line.
You’ll now see a clean vertical line in your email message, positioned using the table cell.
This table method ensures the vertical line is consistently aligned with text, images, or other elements, making it particularly useful in structured layouts. However, bear in mind that if recipients reply to or forward the email, they may accidentally alter table properties, so review your formatting in a test email before final distribution. For more advanced layouts, you can use additional table cells or adjust border formatting for creative visual effects.
If you notice unusual spacing or if the line doesn’t appear as expected, double-check that all unwanted borders are removed and try resizing the cell further for optimal length and thickness.
Insert vertical lines with VBA code (Alternative Solution)
In scenarios where you wish to automate the process of inserting a vertical line, for example when customizing a series of emails or using batch operations, a simple VBA macro can help. This is especially useful for Outlook advanced users or those editing multiple messages.
1. Start by opening the email draft you want to modify. Press Alt + F11 to launch the Microsoft Visual Basic for Applications editor.
2. In the VBA window, click Insert > Module to create a new module. Then, copy and paste the following VBA code into the module:
VBA code: Insert a vertical line at the cursor position in the currently active Outlook email
Sub InsertVerticalLine()
    Dim objMail As Outlook.MailItem
    Dim objInsp As Outlook.Inspector
    Dim objDoc As Object
    Dim objSel As Object

    On Error Resume Next
    xTitleId = "KutoolsforOutlook"

    Set objInsp = Application.ActiveInspector
    If objInsp Is Nothing Then Exit Sub

    Set objMail = objInsp.CurrentItem
    If objMail.BodyFormat <> olFormatHTML Then
        MsgBox "Please switch your email to HTML format before running this macro.", vbExclamation, xTitleId
        Set objMail = Nothing
        Set objInsp = Nothing
        Exit Sub
    End If

    Set objDoc = objInsp.WordEditor
    Set objSel = objDoc.Application.Selection
    objSel.TypeText Chr(124) ' Inserts a vertical bar symbol |

    Set objSel = Nothing
    Set objDoc = Nothing
    Set objMail = Nothing
    Set objInsp = Nothing
End Sub3. Go back to your email message window, place the cursor where you want the vertical line to appear, then return to the VBA editor and press the F5 key to execute the code. The macro will insert a vertical line (using the "|" symbol) at your selected position, and a KutoolsforOutlook dialog will prompt you if your message is not in HTML format.
This solution is quick for inserting vertical bars in precise locations within an email, especially in lists or structured formats. For more decorative or graphical lines, use the Shapes or Tables methods described earlier.
Troubleshooting Tips and Suggestions: If the vertical line does not display properly in recipient clients, ensure the email is composed in HTML format and preview the message before sending. For best compatibility, keep vertical lines simple and check alignment across devices. If Outlook's shape or table features do not respond as expected, restarting the application or checking for updates may help resolve minor display issues. For more advanced formatting, consider combining multiple methods for a cleaner layout.
Best Office Productivity Tools
Experience the all-new Kutools for Outlook with 100+ incredible features! Click to download now!
📧 Email Automation: Auto Reply (Available for POP and IMAP) / Schedule Send Emails / Auto CC/BCC by Rules When Sending Email / Auto Forward (Advanced Rules) / Auto Add Greeting / Automatically Split Multi-Recipient Emails into Individual Messages ...
📨 Email Management: Recall Emails / Block Scam Emails by Subjects and Others / Delete Duplicate Emails / Advanced Search / Consolidate Folders ...
📁 Attachments Pro: Batch Save / Batch Detach / Batch Compress / Auto Save / Auto Detach / Auto Compress ...
🌟 Interface Magic: 😊More Pretty and Cool Emojis / Remind you when important emails come / Minimize Outlook Instead of Closing ...
👍 One-click Wonders: Reply All with Attachments / Anti-Phishing Emails / 🕘Show Sender's Time Zone ...
👩🏼🤝👩🏻 Contacts & Calendar: Batch Add Contacts From Selected Emails / Split a Contact Group to Individual Groups / Remove Birthday Reminders ...
Use Kutools in your preferred language – supports English, Spanish, German, French, Chinese, and 40+ others!


🚀 One-Click Download — Get All Office Add-ins
Strongly Recommended: Kutools for Office (5-in-1)
One click to download five installers at once — Kutools for Excel, Outlook, Word, PowerPoint and Office Tab Pro. Click to download now!
- ✅ One-click convenience: Download all five setup packages in a single action.
- 🚀 Ready for any Office task: Install the add-ins you need, when you need them.
- 🧰 Included: Kutools for Excel / Kutools for Outlook / Kutools for Word / Office Tab Pro / Kutools for PowerPoint