How to print current printing date or page numbers on emails in Outlook?
For some important email messages, you may want to print them with current date or page numbers showing on the email message in order to easily keep them in file. The following tutorial will show you how to insert current printing date and page numbers on email header or footer and print it out in Outlook.
Print current printing date or page numbers on emails in Outlook
Print current printing date or page numbers on emails in Outlook
For printing current date or page numbers on emails, please do as follows.
Step 1. Select the email message that you want to print.
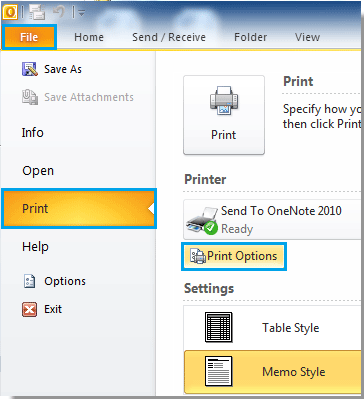
Step 2. Then click "File" > "Print" > "Print Options". (In Outlook 2007, just click "File" > "Print").
Or you can press "Ctrl" + "P" to get into the "Print" section and then click "Print Options". See screenshot:

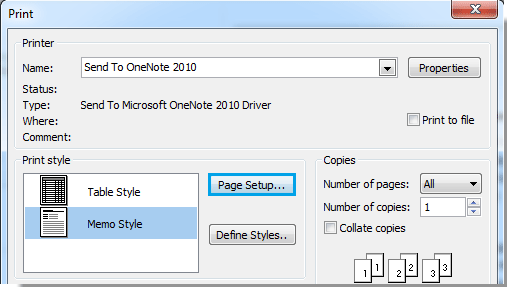
Note: Make sure that the print setting is the "Memo Style".
Step 3. In the 'Print dialog, please click "Page Setup" button.

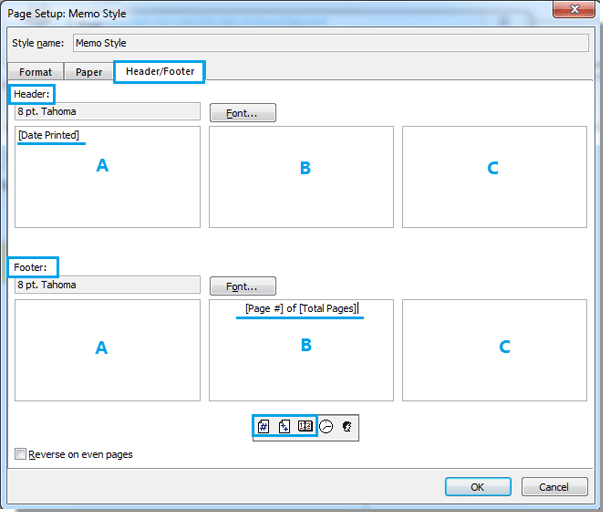
Step 4. The in the popping up "Page Setup: Meno Style" dialog:
1. Select "Header/Footer" tab;
2. Click the position of text box where you want to insert the date or page numbers under "Header" or "Footer" section.
For inserting current printing date
In the below screenshot, you can see there are textboxes marked from left to right with "A", "B", "C". If you click on the "A" textbox, and then click the "Date Printed" button  , it means that the printing date is inserted on the left of the page header. And "B" and "C" are the middle and the right of the page headers.
For inserting page numbers
Generally speaking, we insert page numbers at the bottom of the pages. In this case, I will insert the page numbers in the middle of the footer.
Please click on the "B" textbox under "Footer", and then click the "Page" button or the "Total Pages" button  .
.

"Tips:
1. You can configure the font of the inserted date or page numbers by clicking the Font button; and check the "Reverse on even pages" box to reverse the position on the even pages.
2. If you want to insert the page number style like "1" of "12", you need to enter a word “of” between the "Page" and the "Total pages" area. See screenshot:

Step 5. Click "OK" in the "Page Setup: Meno Style" dialog.
Step 6. When it returns to the previous "Print" dialog, click "Preview" button to preview and make sure the date or the page numbers are inserted correctly.
Step 7: Select your printer and then click "Print" to print the email.
After printing, you can see the result as follows.
Current printing date:
 |  |  |
Page numbers:
 |
 |
 |
Best Office Productivity Tools
Experience the all-new Kutools for Outlook with 100+ incredible features! Click to download now!
📧 Email Automation: Auto Reply (Available for POP and IMAP) / Schedule Send Emails / Auto CC/BCC by Rules When Sending Email / Auto Forward (Advanced Rules) / Auto Add Greeting / Automatically Split Multi-Recipient Emails into Individual Messages ...
📨 Email Management: Recall Emails / Block Scam Emails by Subjects and Others / Delete Duplicate Emails / Advanced Search / Consolidate Folders ...
📁 Attachments Pro: Batch Save / Batch Detach / Batch Compress / Auto Save / Auto Detach / Auto Compress ...
🌟 Interface Magic: 😊More Pretty and Cool Emojis / Remind you when important emails come / Minimize Outlook Instead of Closing ...
👍 One-click Wonders: Reply All with Attachments / Anti-Phishing Emails / 🕘Show Sender's Time Zone ...
👩🏼🤝👩🏻 Contacts & Calendar: Batch Add Contacts From Selected Emails / Split a Contact Group to Individual Groups / Remove Birthday Reminders ...
Use Kutools in your preferred language – supports English, Spanish, German, French, Chinese, and 40+ others!


🚀 One-Click Download — Get All Office Add-ins
Strongly Recommended: Kutools for Office (5-in-1)
One click to download five installers at once — Kutools for Excel, Outlook, Word, PowerPoint and Office Tab Pro. Click to download now!
- ✅ One-click convenience: Download all five setup packages in a single action.
- 🚀 Ready for any Office task: Install the add-ins you need, when you need them.
- 🧰 Included: Kutools for Excel / Kutools for Outlook / Kutools for Word / Office Tab Pro / Kutools for PowerPoint