How to convert the distribution list to individual contacts in Outlook?
Converting a distribution list into individual contacts in Outlook can seem challenging, especially since Outlook doesn’t offer a built-in solution for this task. Whether you're organizing your contacts or need to work with them individually, this guide explores three effective methods. Among these, one stands out as a highly recommended, quick, and effortless tool that simplifies the entire process.
3 Methods to Convert a Distribution List to Individual Contacts in Outlook:
- Manual Expansion and Saving One by One (Manual; Tedious)
Suitable only for small contact groups with few members. - Kutools for Outlook’s Break Contact Group Feature 👍 (Quick; Effortless)
A highly recommended, automated solution that saves time and effort. - Importing via CSV File (Lengthy; Complicated)
It involves multiple steps and is less practical for most users.
Convert a Distribution List to Individual Contacts via Manual Expansion and Saving One by One
This method is only suitable for small distribution lists, as it involves manually saving each contact one by one.
Step 1: Create a New Email
Open Outlook, and click New Email under the Home tab to create a new message.

Step 2: Expand the Distribution List
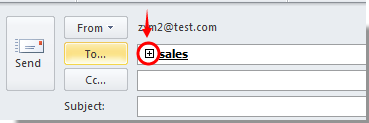
- Click the To button, select the distribution list, and add it to the recipient field.
- Click the + button next to the distribution list to expand it.

Step 3: Confirm Expansion
In the pop-up Expand List dialog box, click OK.

Step 4: Save Contacts Individually
- Right-click each contact and select Add to Outlook Contacts.

- Fill in the necessary details and click Save & Close.

Step 5: Repeat Step 4 for Each Contact
Repeat Step 4 for each contact until all are saved.
Step 6: Close Without Sending
After saving all contacts of the distribution list, close the Message window without sending.
🌟 Effortlessly Split Contact Groups in Outlook 🌟
🚀 Quickly reorganize your contact groups in Outlook! With the Split to Multiple Contact Groups feature of Kutools for Outlook, you can split large groups into smaller, more manageable ones in just a few clicks.
✨ How It Works:
- Switch to the Contacts view and select the group to split.
- Click "Kutools Plus" > "Contacts" > "Split to Multiple Contact Groups".
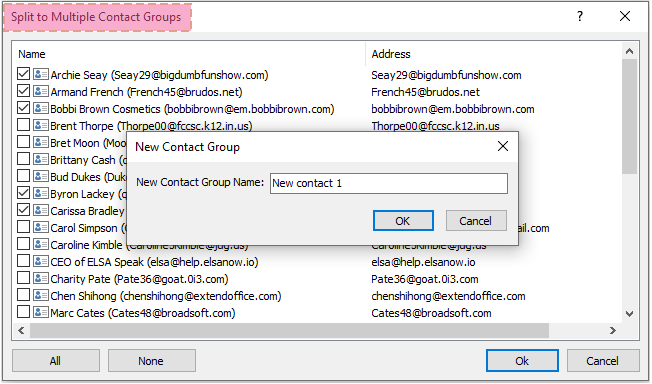
- Select the contacts to move into a new group and name the group.
- Click "OK" and let Kutools handle the rest!
Convert a Distribution List to Individual Contacts via Kutools for Outlook’s Break Contact Group Feature 👍
For users managing larger distribution lists or those seeking efficiency, Kutools for Outlook offers the Break Contact Group utility. This tool automates the process, converting all or selected members of a distribution list into individual contacts with just a few clicks.
The Ultimate Solution for Effortless Contact Conversion
Say goodbye to Outlook inefficiency! Kutools for Outlook makes batch email processing easier - now with a 30-day free trial! Download Kutools for Outlook Now!!
1. Switch to the Contacts (People) view and select the contact group you wish to split. Then, click Kutools Plus > Contact Group > Break Contact Group.

2. In the Break Contact Group dialog box, select the members you want to separate, or use the All button to select all contacts at once. Then, click OK. Confirm the action by clicking Yes in the next dialog box.

Result:
- If you select all members, the original contact group is deleted, and all members are added as individual contacts.
- If you select specific members, only those selected are converted into individual contacts, leaving the rest in the original group.
Why Choose the Kutools for Outlook Method?
- Time-Saving: Converts entire contact groups in seconds.
- User-Friendly: No technical skills required—perfect for beginners.
- Error-Free: Ensures accurate transfer of contact details like names and email addresses.
- Flexible: Offers the ability to split entire groups or only selected members.
Convert a Distribution List to Individual Contacts by Importing via CSV File
This method involves saving the distribution list as a text file, converting it to a CSV file in Excel, and importing it into Outlook.
Step 1: Save the distribution list as a TXT file
- Navigate to the Contacts or People view. And select and open the distribution list in the Contacts folder.
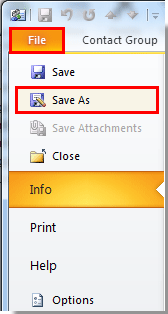
- Click File > Save As.
- In the Save As dialog box, you need to:
- 3.1 Set the file type to Text Only (.txt) in the Save as type drop-down.
- 3.2 Choose a location to save the file (e.g., your desktop).
- 3.3 Give the file a name and click Save.


Step 2: Convert the TXT file to a CSV file in Excel
- Open a new workbook in Excel.
- In cell A1, type Name; in cell B1, type E-mail Address. These will serve as your column headers.

- Open the saved TXT file in Notepad and highlight only the lines containing names and email addresses. Copy the selection using Ctrl + C.

- Return to Excel and paste the copied content starting from cell A2.

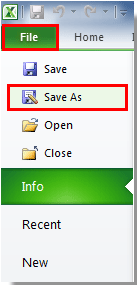
- Click File > Save As.
- In the Save As dialog box, you need to:
- 6.1 Choose a location, name the file, and select CSV (Comma delimited) (*.csv) from the Save as type drop-down list as the file type.
- 6.2 Click Save.


Step 3: Ensure proper formatting
1. Open the CSV file in Notepad with right-clicking it, then click Open with > Notepad.

2. Make sure that the Names and the E-mail Addresses are separated by commas.

Notes:
- If they are separated by commas, please close the Notepad window.
- If they are separated by any other character (e.g., semi-colons), replace them with commas:
- Press Ctrl + H to open the Replace dialog.
- In the Find what field, type the incorrect separator (e.g., ;).
- In the Replace with field, type a comma ,.
- Click Replace All, then save and close the file.
Step 4: Import the CSV file to the Outlook Contacts folder
1. Click File > Open & Export > Import/Export to launch the Import/Export Wizard.
2. In the Import and Export Wizard dialog box, click Import from another program or file, then click the Next button.

3. In the Import a File dialog box, click Comma Separated Value (DOS), and then click the Next button.

4. In the next Import a File dialog box, please click the Browse button to find and open the CSV file you have created; then click the Next button.

Note: The three Options are optional for your own needs.
5. In the next dialog box, please select a Contacts folder which you want to save the contacts in the Select destination folder box. Then click the Next button.

6. In the last dialog box, click the Finish button to start importing.

7. Then an Import and Export Progress dialog box pops up, after finishing importing, it will be closes automatically.

Best Office Productivity Tools
Experience the all-new Kutools for Outlook with 100+ incredible features! Click to download now!
📧 Email Automation: Auto Reply (Available for POP and IMAP) / Schedule Send Emails / Auto CC/BCC by Rules When Sending Email / Auto Forward (Advanced Rules) / Auto Add Greeting / Automatically Split Multi-Recipient Emails into Individual Messages ...
📨 Email Management: Recall Emails / Block Scam Emails by Subjects and Others / Delete Duplicate Emails / Advanced Search / Consolidate Folders ...
📁 Attachments Pro: Batch Save / Batch Detach / Batch Compress / Auto Save / Auto Detach / Auto Compress ...
🌟 Interface Magic: 😊More Pretty and Cool Emojis / Remind you when important emails come / Minimize Outlook Instead of Closing ...
👍 One-click Wonders: Reply All with Attachments / Anti-Phishing Emails / 🕘Show Sender's Time Zone ...
👩🏼🤝👩🏻 Contacts & Calendar: Batch Add Contacts From Selected Emails / Split a Contact Group to Individual Groups / Remove Birthday Reminders ...
Use Kutools in your preferred language – supports English, Spanish, German, French, Chinese, and 40+ others!


🚀 One-Click Download — Get All Office Add-ins
Strongly Recommended: Kutools for Office (5-in-1)
One click to download five installers at once — Kutools for Excel, Outlook, Word, PowerPoint and Office Tab Pro. Click to download now!
- ✅ One-click convenience: Download all five setup packages in a single action.
- 🚀 Ready for any Office task: Install the add-ins you need, when you need them.
- 🧰 Included: Kutools for Excel / Kutools for Outlook / Kutools for Word / Office Tab Pro / Kutools for PowerPoint