How to change appointment colors in Outlook?
Sometimes, you may want to highlight your appointments and make them easy-to-find in Microsoft Outlook. The common way is to change the appointments’ color. Here I will introduce two tricks to change appointment colors in Microsoft Outlook with ease.
Change color for one appointment in Outlook
Auto change color for multiple appointments in Outlook
Change color for one appointment in Outlook
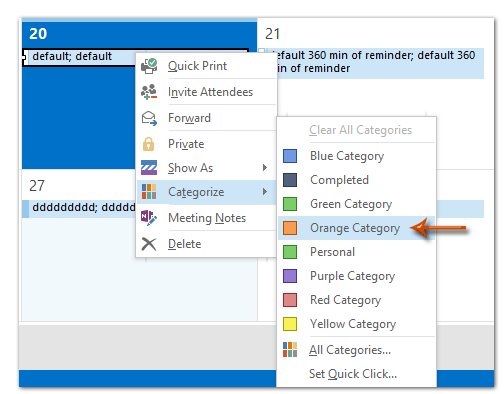
It’s quite easy to change an appointment’s color in Microsoft Outlook. You can get it done easily by right-clicking the appointment, selecting "Category" from the drop-down list, and specifying a color from the submenu. See screenshot below:
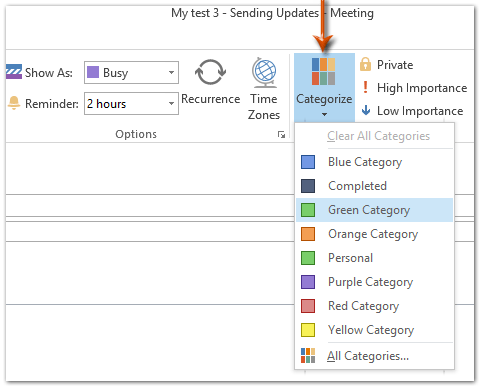
When composing an appointment, you can also change its color by clicking the "Categorize" button on the "Appointments" tab, and specifying a category color from the drop-down list.
Auto change color for multiple appointments in Outlook
In this section, I will guide you to change the "Calendar" folder’s view settings and set up "Conditional Formatting", so that Microsoft Outlook can automatically change colors for multiple appointments easily.
Step 1: Shift to the "Calendar" view, and open the "Calendar" folder where you will change the color for multiple appointments.
Step 2: Click the "View Settings" button on the "View" tab.

Note: In Outlook 2007, you can click "View" > "Current View" > "Customize Current View".
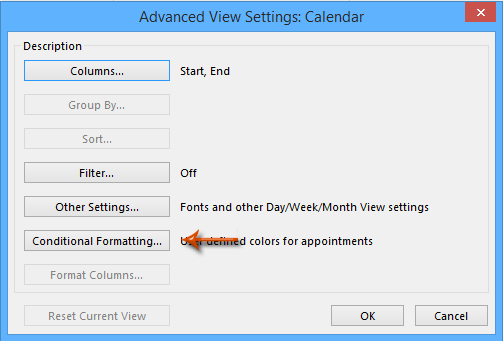
Step 3: In the opening dialog box, click the "Conditional Formatting" button (or "Automatic Formatting" button).
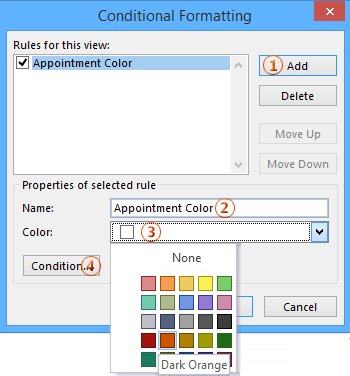
Step 4: In the "Conditional Formatting" dialog box:
(1) Click the "Add" button;
(2) Enter a name for the new rule in the "Name" box;
(3) Click the "Color" box, and specify a color from the drop-down list;
(4) Click the "Condition" button.
Step 5: In the popping-up "Filter" dialog box, specify your filter criteria.
For example, to change color for all appointments whose subject contains "test", enter "test" into the "Search for the word(s)" box.
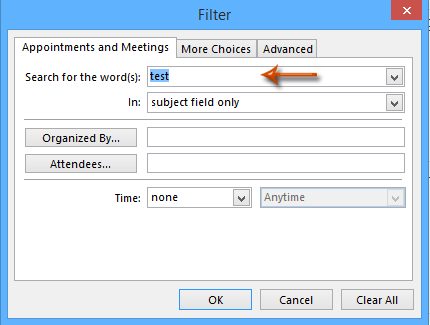
Step 6: Click all "OK" buttons to close all dialog boxes.
Then Microsoft Outlook changes the color of all appointments that meet the filter criteria you specified in Step 5 automatically.
Best Office Productivity Tools
Experience the all-new Kutools for Outlook with 100+ incredible features! Click to download now!
📧 Email Automation: Auto Reply (Available for POP and IMAP) / Schedule Send Emails / Auto CC/BCC by Rules When Sending Email / Auto Forward (Advanced Rules) / Auto Add Greeting / Automatically Split Multi-Recipient Emails into Individual Messages ...
📨 Email Management: Recall Emails / Block Scam Emails by Subjects and Others / Delete Duplicate Emails / Advanced Search / Consolidate Folders ...
📁 Attachments Pro: Batch Save / Batch Detach / Batch Compress / Auto Save / Auto Detach / Auto Compress ...
🌟 Interface Magic: 😊More Pretty and Cool Emojis / Remind you when important emails come / Minimize Outlook Instead of Closing ...
👍 One-click Wonders: Reply All with Attachments / Anti-Phishing Emails / 🕘Show Sender's Time Zone ...
👩🏼🤝👩🏻 Contacts & Calendar: Batch Add Contacts From Selected Emails / Split a Contact Group to Individual Groups / Remove Birthday Reminders ...
Use Kutools in your preferred language – supports English, Spanish, German, French, Chinese, and 40+ others!


🚀 One-Click Download — Get All Office Add-ins
Strongly Recommended: Kutools for Office (5-in-1)
One click to download five installers at once — Kutools for Excel, Outlook, Word, PowerPoint and Office Tab Pro. Click to download now!
- ✅ One-click convenience: Download all five setup packages in a single action.
- 🚀 Ready for any Office task: Install the add-ins you need, when you need them.
- 🧰 Included: Kutools for Excel / Kutools for Outlook / Kutools for Word / Office Tab Pro / Kutools for PowerPoint