How to insert images with actual size (prevent from resizing) in Outlook?
Sometimes, when inserting an image in an Outlook email, the image will be resized automatically. That’s because the inserted image’s resolution is not equal to 96 dpi, and Microsoft Outlook adjusts the image’s resolution to 96 dpi automatically. But you may just need to insert the image with its actual size. How? This article will introduce some tricky ways to solve this problem.
- Insert images with actual size by Reset Picture & Size feature in Outlook
- Insert images with actual size by Screen Clipping feature in Outlook
- Insert images with actual size by adjusting image’s size manually in Outlook
Insert images with actual size by Reset Picture & Size feature in Outlook
This method allows you to reset the size of the picture you inserted with one click. To do so, please follow the steps below:
1. Double-click the picture to show the tab "Picture Format".
2. Under the "Picture Format" tab, in the "Adjust" group, click the drop-down arrow beside "Reset Picture". Then select "Reset Picture & Size" on the drop-down list.
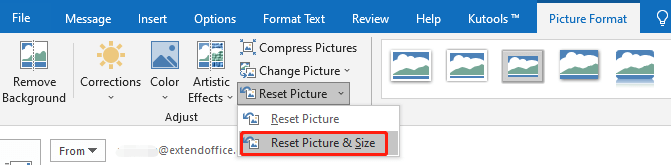
3. Now you can see that the picture you selected was resetted to its original size.
Insert images with actual size by Screen Clipping feature in Outlook
This method will guide you to open the image you will insert at first, and then insert the image with the "Screen Clipping" feature in Outlook. Please do as follows:
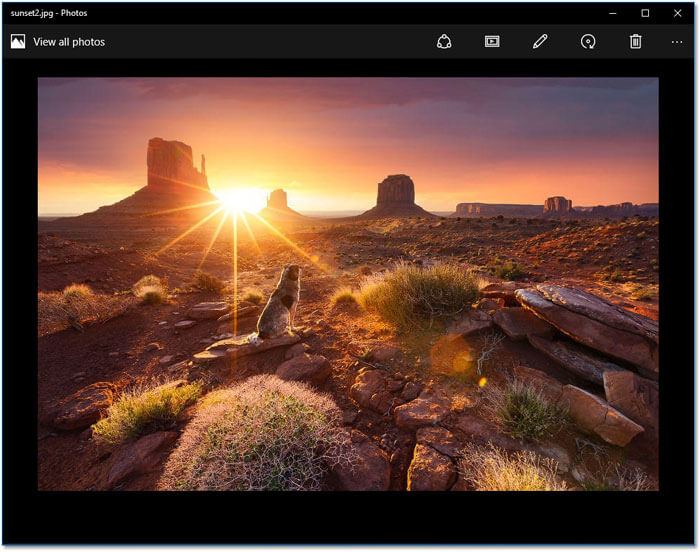
1. In your computer, open the folder containing the image you will insert, and then double click to open the image in the Photos viewer.
2. Adjust the zoom to 100% for viewing the image in actual size.
3. Go to the Mail view in Outlook, create a new email with clicking "Home" > "New Email".
4. In the new Message window, place the cursor in the message body where you will insert the image, and click "Insert" > "Screenshot" > "Screen Clipping".
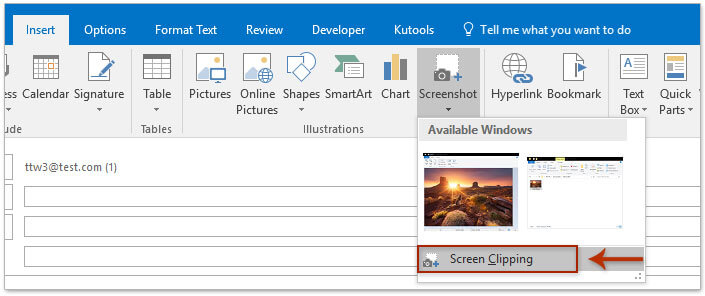
5. Drag the mouse to select the whole image displaying in the Photos viewer.
Now the image is inserted into the message body with its actual size.
6. Compose the email and send it, and then close the Photos viewer.
Insert images with actual size by adjusting image’s size manually in Outlook
Sometimes, you may have inserted the image into a composing email by clicking "Insert" > "Pictures", and the image has been resized. And now you can restore the image’s actual size with below steps.
1. Go to the folder containing the inserted image, right click the image and select "Properties" from the right-clicking menu.
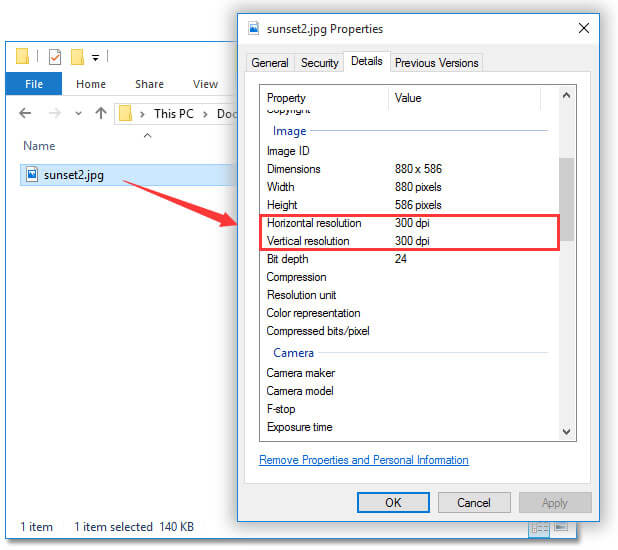
2. In the opening Properties dialog box, go to the "Details" tab, and find out this image resolution. In our case, the image’s resolution is 300 dpi.
Note: You can close the Properties dialog box after getting the image’s resolution.
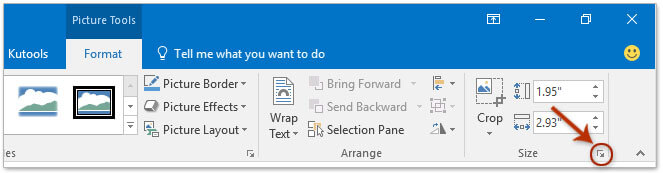
3. Return to the Message window in Outlook. Click the inserted image to activate the "Picture Tools", and then click the anchor at the bottom-right corner of the "Size" group on the "Format" tab.
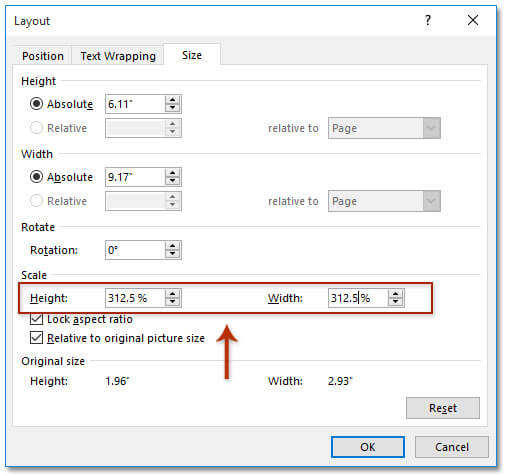
4. In the opening Layout dialog box, go to the "Scale" section, type the adjusting percentage into both "Height" and "Width" boxes, and click the "OK" button.
In our case, the adjusting percentage is 312.5% (= 300/96 * 100%, 300 is the inserted image’s resolution we got in Step 1–2).
So far the inserted image has been adjusted to its actual size already.
5. Compose the email and send it.
Related articles:
Best Office Productivity Tools
Experience the all-new Kutools for Outlook with 100+ incredible features! Click to download now!
📧 Email Automation: Auto Reply (Available for POP and IMAP) / Schedule Send Emails / Auto CC/BCC by Rules When Sending Email / Auto Forward (Advanced Rules) / Auto Add Greeting / Automatically Split Multi-Recipient Emails into Individual Messages ...
📨 Email Management: Recall Emails / Block Scam Emails by Subjects and Others / Delete Duplicate Emails / Advanced Search / Consolidate Folders ...
📁 Attachments Pro: Batch Save / Batch Detach / Batch Compress / Auto Save / Auto Detach / Auto Compress ...
🌟 Interface Magic: 😊More Pretty and Cool Emojis / Remind you when important emails come / Minimize Outlook Instead of Closing ...
👍 One-click Wonders: Reply All with Attachments / Anti-Phishing Emails / 🕘Show Sender's Time Zone ...
👩🏼🤝👩🏻 Contacts & Calendar: Batch Add Contacts From Selected Emails / Split a Contact Group to Individual Groups / Remove Birthday Reminders ...
Use Kutools in your preferred language – supports English, Spanish, German, French, Chinese, and 40+ others!


🚀 One-Click Download — Get All Office Add-ins
Strongly Recommended: Kutools for Office (5-in-1)
One click to download five installers at once — Kutools for Excel, Outlook, Word, PowerPoint and Office Tab Pro. Click to download now!
- ✅ One-click convenience: Download all five setup packages in a single action.
- 🚀 Ready for any Office task: Install the add-ins you need, when you need them.
- 🧰 Included: Kutools for Excel / Kutools for Outlook / Kutools for Word / Office Tab Pro / Kutools for PowerPoint