How to insert a date picker in emails in Outlook?
When managing projects or coordinating schedules through email, it is common to share timelines or assign tasks with specific due dates to colleagues. Manually entering dates can be error-prone, leading to confusion or miscommunication if a wrong date is typed or formatted inconsistently. By incorporating a date picker control directly into your Outlook emails, you can streamline this process—making it easier for you and your recipients to select and confirm dates accurately. This tutorial introduces several practical methods to insert a date picker in Outlook emails, helping you enhance communication and reduce manual entry errors related to dates.

- Insert a date picker in emails in Outlook with VBA code
- Insert a date picker using an Outlook UserForm (Alternative Solution)
Insert a date picker in Emails in Outlook with VBA code
If you want to add a date picker (calendar control) directly into the body of your emails, you can achieve this by using VBA code. This approach is helpful especially when you frequently prepare meeting invitations, project plans, workflow schedules, or any situation where recipients need to interactively select dates within your message. The steps below guide you through adding such a functionality to your Outlook emails.
- Open Outlook and press the Alt + F11 keys simultaneously. This opens the Microsoft Visual Basic for Applications editor, which is where you'll enter and manage macros and scripts for Outlook.
- In the left navigation pane of the editor, expand Project1 (or the project representing your Outlook profile), then double-click ThisOutlookSession under Microsoft Outlook Objects. In the code window that opens, copy and paste the following VBA code. This code will add a date picker control in the message body of your new emails.VBA code: Insert date picker in Outlook emails
Sub DatePicker()
'Updated by Extendoffice 20251024
  Dim xDoc As Document
  On Error Resume Next
  Set xDoc = Application.ActiveInspector.WordEditor
  With xDoc.Application.Selection
    .Range.ContentControls.Add (wdContentControlDate)
    .ParentContentControl.DateDisplayFormat = "MMMM d, yyyy"
    .InsertAfter Format(Now(), "MMMM d, yyyy")
    .MoveRight wdCharacter, 1
  End With
End Sub
Note: You can customize the display format by modifying "MMMM d, yyyy" in the code to your preferred date format, such as "yyyy-MM-dd" or "MM/dd/yyyy" depending on your regional settings or organizational requirements. If you use a format not supported by your system, the date may not display correctly.
- Before running macros that interact with Word in Outlook, you must ensure that the Microsoft Word xx.0 Object Library is enabled in the VBA environment. While still in the Microsoft Visual Basic for Applications window, click Tools in the menu bar and select References...

- In the References – Project1 dialog box, scroll to find and check the Microsoft Word16.0 Object Library (the version number may differ based on your Office installation), then click OK to confirm. This step links Outlook VBA with Word functionalities, which are required for content controls.

- After setting references and pasting the code, press Alt + Q to close the VBA editor and return to Outlook.
- Switch to the Mail view, and click on the New Email button under the Home tab to start composing a new message. If you want the date picker in an existing email, open that draft instead.
- To make accessing your new date picker macro easy, you can add it to the Quick Access Toolbar. In the Message window, click the Customize Quick Access Toolbar icon
 , then choose More Commands from the menu.
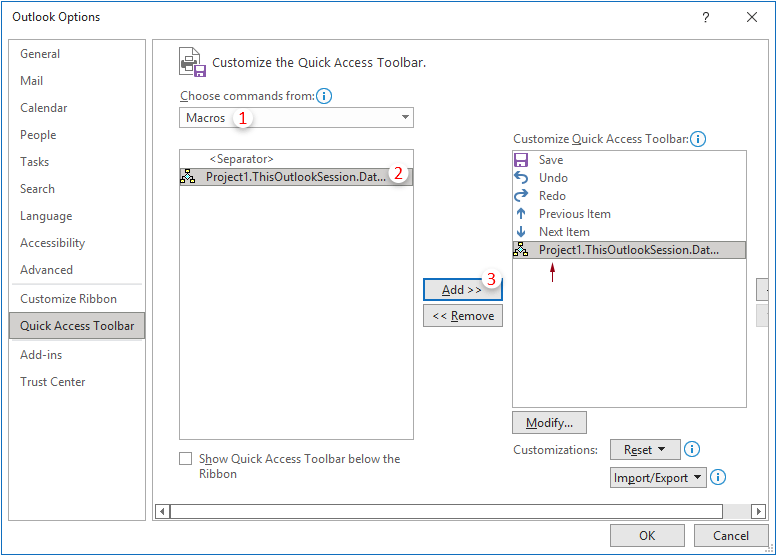
- Within the Outlook Options window that appears, follow these steps:
- Set the Choose commands from drop-down list to Macros to display all available macros including the one you just created.
- Locate and select the DatePicker script in the command list on the left.
- Click the Add button to move it to the commands listed on the right—the ones that will appear in your Quick Access Toolbar.
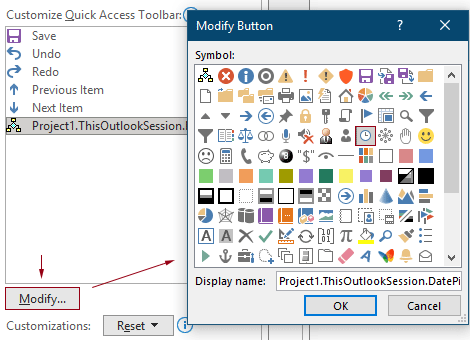
- With your macro highlighted in the right-side list, click Modify. In the Modify Button window, you can assign a custom icon and label for easy identification. Click OK to confirm your changes.
- Click OK again in the Outlook Options window to return to your message.

- You will now see the macro icon you specified in the Quick Access Toolbar at the top of your message window. This provides one-click access to insert the date picker whenever you need it in your emails.

- Whenever you need to insert a date picker while writing, simply click the macro’s icon in the Quick Access Toolbar. A date picker field will instantly appear at your cursor position in the email body, allowing you—or your recipients—to select a date easily. This feature works in real time and can be used as many times as required in each message. Here is a demonstration:


 , then choose More Commands from the menu.


- You may insert multiple date pickers within a single email. This is useful when requesting several project deadlines, booking slots, or confirming multi-step due dates.
- To change a previously selected date, simply click on it—the calendar will open for you to choose a new value. This flexibility helps avoid follow-up corrections if plans change.
- This method isn't limited to emails; you can include a date picker in the body of an appointment or a task by using the same macro. When creating a new calendar event or task, use the Quick Access Toolbar to add the picker as required.
- If the macro does not seem active after you restart Outlook, it might have been disabled due to your macro security settings. To restore macro functionality:
- Open File > Options to access the Outlook Options panel.
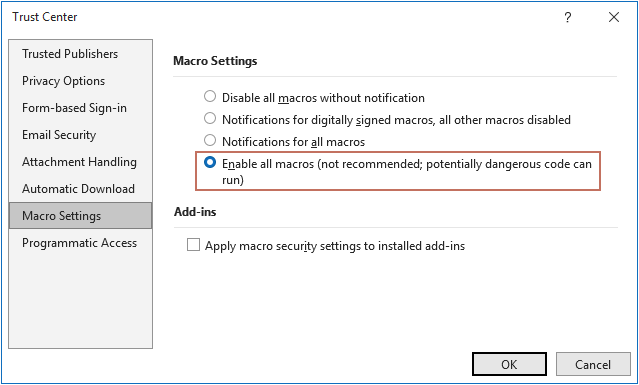
- Navigate to Trust Center > Trust Center Settings.
- Click Macro Settings, select Enable all macros, and confirm by clicking OK on all dialogs.
- Restart Outlook to activate the updated settings.
- This VBA-based solution is best suited for users who regularly send schedules or coordinated timelines and are comfortable enabling macro functionality in Outlook. Please note that organizational policies may restrict macro use for security reasons.
- Troubleshooting tip: If you encounter errors such as “Object variable not set” or the date control not appearing, double-check that the correct object library is referenced in VBA. Also, ensure that Outlook is using Word as its email editor, as this is needed for content controls to work.

Insert a date picker using an Outlook UserForm (Alternative Solution)
In certain cases, you may wish to have a more sophisticated date picker, or you want to directly prompt your message recipients to pick a date when replying. Using an Outlook UserForm you can design a custom form with a calendar control. This approach gives you more design flexibility, but requires some familiarity with Outlook forms and Visual Basic for Applications.
Advantages: Highly customizable, can include more fields (like time, notes, etc.) in addition to the date picker. Suitable for internal workflows, meeting polls, or when repeatedly collecting responses with date choices.
Limitations: Requires more setup time and recipients need to have compatible versions of Outlook to interact with UserForms.
- In Outlook, press the Alt + F11 keys to open the Microsoft Visual Basic for Applications editor.
- Click Insert > UserForm. In the toolbox, select the Microsoft Date and Time Picker Control (if available) and place it on the form. If not present, it may need to be enabled or registered first, and it may not be available in Office 64-bit environments.
- Customize your UserForm as required. Add buttons/textboxes for other information if necessary.
- You can program the UserForm to send the date value into your email, or prompt the recipient to respond by choosing their preferred date.
- Save and call this UserForm macro as needed when composing messages.
Tips: UserForms are best for workflow automation inside organizations or when requesting structured responses. If you have trouble seeing the calendar control in the toolbox, search your system for mscomct2.ocx (Date and Time Picker control library), and register it if needed.
Summary Suggestion: Whether you choose VBA code for direct insertion or UserForms for more advanced automation, always test the method thoroughly to ensure compatibility with both your Outlook configuration and organizational IT policies. Remember to periodically check macro and script settings after Office updates to maintain seamless usability.
AI Mail Assistant in Outlook: Smarter Replies, Clearer Communication (one-click magic!)
Streamline your daily Outlook tasks with the AI Mail Assistant from Kutools for Outlook. This powerful tool learns from your past emails to offer intelligent and accurate responses, optimize your email content, and help you draft and refine messages effortlessly.

This feature supports:
- Smart Replies: Get responses crafted from your past conversations—tailored, precise, and ready to go.
- Enhanced Content: Automatically refine your email text for clarity and impact.
- Effortless Composition: Just provide keywords, and let AI handle the rest, with multiple writing styles.
- Intelligent Extensions: Expand your thoughts with context-aware suggestions.
- Summarization: Get concise overviews of long emails instantly.
- Global Reach: Translate your emails into any language with ease.
This feature supports:
- Smart email replies
- Optimized content
- Keyword-based drafts
- Intelligent content extension
- Email summarization
- Multi-language translation
Don’t wait—download AI Mail Assistant now and enjoy!
Best Office Productivity Tools
Experience the all-new Kutools for Outlook with 100+ incredible features! Click to download now!
📧 Email Automation: Auto Reply (Available for POP and IMAP) / Schedule Send Emails / Auto CC/BCC by Rules When Sending Email / Auto Forward (Advanced Rules) / Auto Add Greeting / Automatically Split Multi-Recipient Emails into Individual Messages ...
📨 Email Management: Recall Emails / Block Scam Emails by Subjects and Others / Delete Duplicate Emails / Advanced Search / Consolidate Folders ...
📁 Attachments Pro: Batch Save / Batch Detach / Batch Compress / Auto Save / Auto Detach / Auto Compress ...
🌟 Interface Magic: 😊More Pretty and Cool Emojis / Remind you when important emails come / Minimize Outlook Instead of Closing ...
👍 One-click Wonders: Reply All with Attachments / Anti-Phishing Emails / 🕘Show Sender's Time Zone ...
👩🏼🤝👩🏻 Contacts & Calendar: Batch Add Contacts From Selected Emails / Split a Contact Group to Individual Groups / Remove Birthday Reminders ...
Use Kutools in your preferred language – supports English, Spanish, German, French, Chinese, and 40+ others!


🚀 One-Click Download — Get All Office Add-ins
Strongly Recommended: Kutools for Office (5-in-1)
One click to download five installers at once — Kutools for Excel, Outlook, Word, PowerPoint and Office Tab Pro. Click to download now!
- ✅ One-click convenience: Download all five setup packages in a single action.
- 🚀 Ready for any Office task: Install the add-ins you need, when you need them.
- 🧰 Included: Kutools for Excel / Kutools for Outlook / Kutools for Word / Office Tab Pro / Kutools for PowerPoint