Schedule or delay sending emails in Outlook (Step by step guide)
Scheduling emails with Outlook significantly enhances your communication effectiveness, especially when interacting with people across various time zones. This operation ensures that your emails are sent at times when recipients are most likely to read them, preventing your messages from being overlooked or lost amidst numerous others. In this article, we will share tips on how to schedule or delay sending emails in Outlook across different platforms: Windows, Web, Mac, and Mobile.

Schedule or delay sending emails in Outlook for Windows
- Schedule sending a single email by using Delay Delivery feature
- Delay sending all emails by creating a rule
- How to keep track of scheduled emails?
Schedule or delay sending email in Outlook on web
- Schedule sending an email by using Schedule send feature
- Cancel a sending email by using Undo send feature
Schedule or delay sending emails in Outlook for Mac
Schedule or delay sending emails in Outlook for Windows
In this section, we will provide a comprehensive guide that meticulously details the process of scheduling and delaying the sending of individual emails, as well as setting default delays for all outgoing emails in Outlook for Windows.
Schedule sending a single email by using Delay Delivery feature
Outlook's "Delay Delivery" feature is a powerful feature specifically designed for scheduling the dispatch of individual emails. It allows users to compose messages at their leisure and schedule them for a specific future time. Here, we will demonstrate how to use this "Delay Delivery" feature to schedule the sending of an individual email in Outlook.
Step 1: Compose a New Email
Open Outlook on Windows and click "New Email" under the "Home" tab. Then, in the new message window, compose your email as normal by filling in the recipient, subject, and the body of the message. See screenshot:
Step 2: Access the Delay Delivery Feature and set the Deliver Time
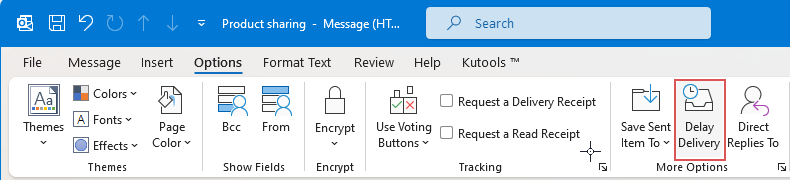
- In the new message window, click "Options" > "Delay Delivery", see screenshot:
- When the "Properties" dialog box appears, in the "Do not deliver before" section, specify the date and time you want the email to be sent. Then, click the "Close" button to exit the dialog. See screenshot:


Step 3: Complete and Send the Email
Finish composing your email, adding any other necessary attachments or information you need. Click "Send" button in the message window. The scheduled email will remain in the "Outbox" folder until it reaches the specified delivery time. See screenshot:
While it’s in the Outbox, you have the flexibility to edit or delete the message as needed.
After scheduling an email in Outlook, you can modify the delivery date and time. It's also feasible to entirely remove the scheduling from the message. To do this, please open the sent email located in your "Outbox" folder, then click "Options" > "Delay Delivery".
- To modify the date and time, please follow the same steps as when you originally configured the delivery schedule.
- To cancel the scheduled delivery, simply deselect the "Do not deliver before" option by unchecking the checkbox.
And last, click "Send" button to save any changes or dispatch the email immediately.
Simplify Your work: Auto-Sending Recurring Emails in Outlook
Recurring emails are messages sent automatically on a schedule set by the user. Normally, scheduling these in Outlook can be a bit complex. However, with "Kutools for Outlook"’s "Schedule Auto Send" feature, you can automatically send recurring emails without hassle. Just set it up once, and your emails will be sent on time. Simplify your tasks and save time with "Kutools for Outlook" now!
Delay sending all emails by creating a rule
Delaying the sending of all emails can be quite useful, especially when you want to have a moment to review or cancel an email after hitting Send button. By creating a rule in Outlook, you can set a delay for all your outgoing messages. Here's a step-by-step guide on how to accomplish this:
Step 1: Open Manage Rules & Alert in Outlook
In the main Outlook window, click "Rules" > "Manage Rules & Alerts" form the "Home" tab, see screenshot:
Step 2: Create the new rule
- In the "Rules and Alerts" dialog box, click "New Rule", see screenshot:

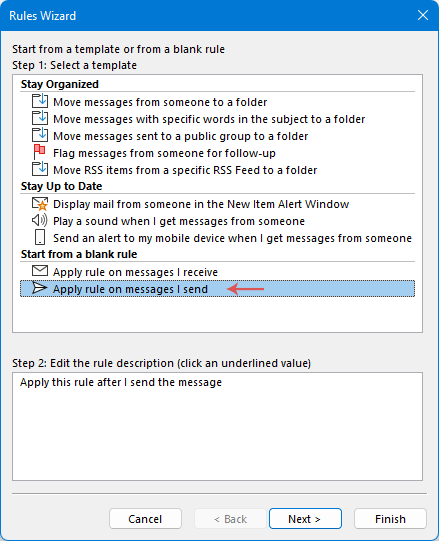
- A "Rules Wizard" appears, in the "Start from a Blank Rule" section, click the "Apply rule on messages I send" option, and then click "Next".
- To delay sending of all emails, simply click "Next" again without checking any conditions. A confirmation box will pop up, asking if you want this rule to apply to every message you send. Click "Yes".
If you want the delay emails that meet specific conditions, select the corresponding check box and set the rule. (For example, to delay emails sent through a specific account, check though the specified account box, and choose the email account.)
- In the "What do you want to do with the message?" box:
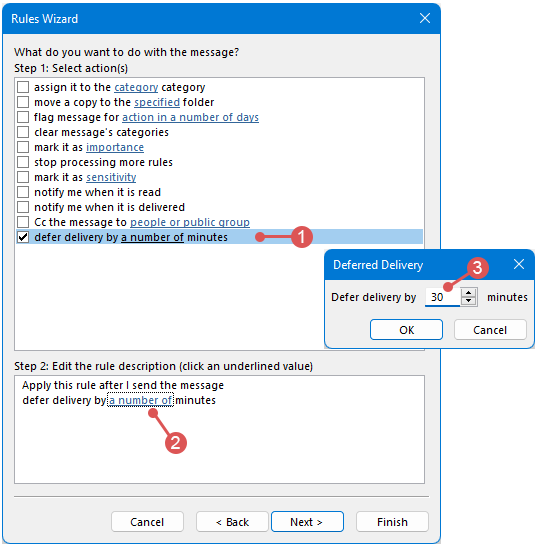
- Check the option "defer delivery by a number of minutes" from the "Step 1: Select action(s) list" box;
- In the lower pane, under "Step 2: Edit the rule description" box, click the underlined text "a number of";
- In the "Deferred Delivery" box, type a number of minutes by which you'd like to delay the sending of your emails (a maximum of 120), and then click "OK".
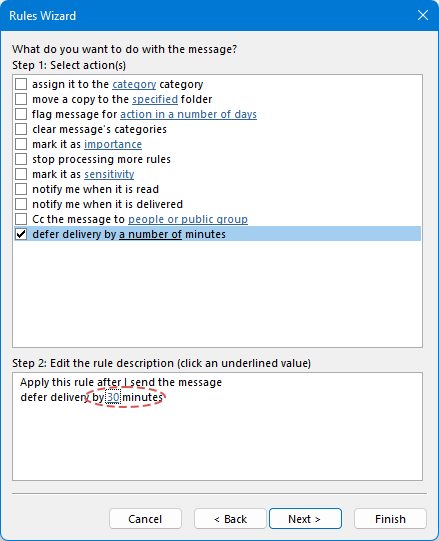
- The link text now displays the time interval for which Outlook will delay sending of emails. Please go on click "Next" button, see screenshot:
- If there is no exceptions to the delay rule, directly click "Next" button without checking any conditions.
If there are any exceptions to the delay rule, specify them in the next window. (For example, you might not want to delay emails with a specific word in the subject, set the corresponding rule you need.)
- In the final step, give your rule a name and check "Turn on this rule" option, and then click "Finish" button.
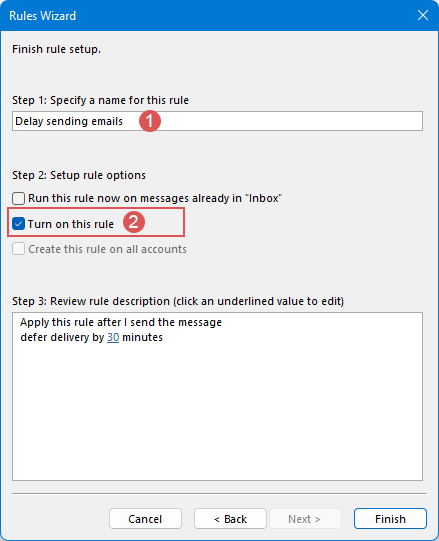
- Go on clicking "OK" button in the following prompt box, see screenshot:

- At last, click "OK" in the "Rules and Alerts" dialog box.


Result:
Now, after you click the Send button, all your emails will be stored in Outbox folder and delayed by the specified number of minutes.
If you want to adjust the scheduled delay date and time for a specific email, or decide to cancel the delay and send the email immediately, please open the sent email located in your "Outbox" folder, then click "Options" > "Delay Delivery".
- To modify the date and time, please reset the date and time in the "Do not deliver before" section.
- To cancel the scheduled delivery, set the delivery time to the current time. Simply unchecking the "Do not deliver before" option won’t be effective, as the Outlook delay delivery rule will automatically re-enable it, causing your message to be delayed even further.
And last, click "Send" button to save any changes or dispatch the email immediately.
How to keep track of scheduled emails?
Emails scheduled for later delivery will remain in your outbox. While this is useful, it can also lead to confusion due to the lack of visible indicators showing the delivery delay of the messages. In this case, adding a customized column in the Outbox that indicates the scheduled time of an email is a good solution. Here’s how to do it in Outlook:
- Open your "Outbox" folder, and then right click the bar with the column name, and choose "Field Chooser" from the context menu, see screenshot:
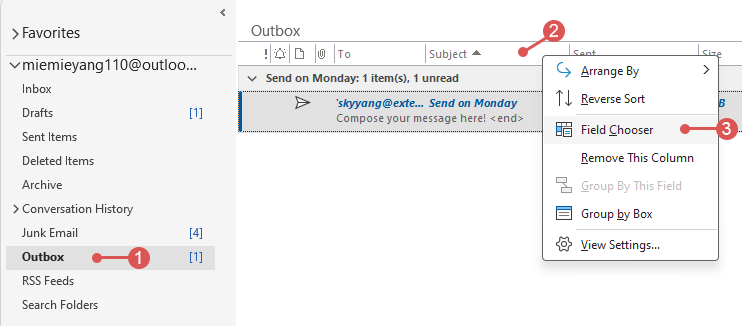
- In the "Field Chooser" box, select "Date/Time fields" from the drop-down list, and then drag the "Defer Until" option to the column bar, at last, close the box, see the demo below:
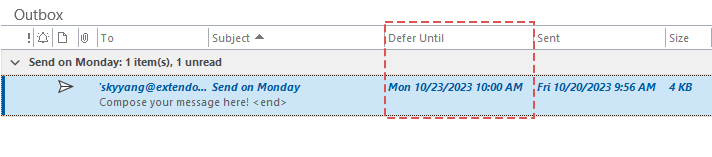
- The date and time of the scheduled email will now be visible in the "Outbox" folder, allowing you to easily check when each email is set to be sent.


Schedule or delay sending email in Outlook on web
If you are using Outlook Online, your scheduled emails are ensured to be sent at the predetermined date and time, regardless of whether you have Outlook Online open or not. In this section, we will share some tips and tricks for scheduling emails in Outlook on the Web
Schedule sending an email by using Schedule send feature
Outlook Online offers an easy-to-use feature - "Schedule Send", which allows you to send emails at a specific time you choose. Please do with the following steps:
Step 1: Login to Outlook on the Web
Visit the Outlook website and sign in with your credentials.
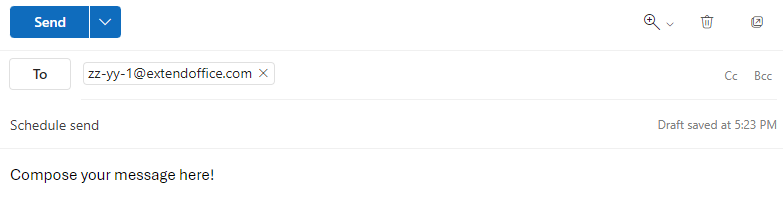
Step 2: Compose a New Emaile
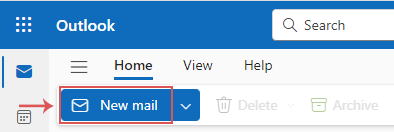
- Click "New mail" button to compose a new email, see screenshot:
- Then, add the recipient and subject and compose the email body as you need, see screenshot:


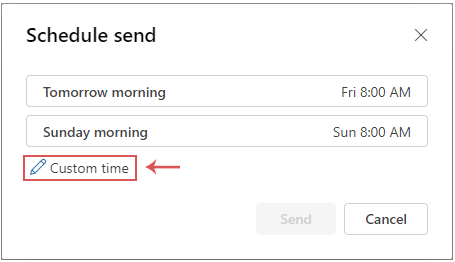
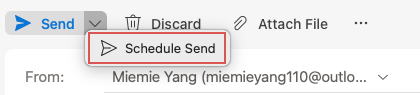
- Select "Schedule send" from the Send drop down list, see screenshot:

- In the "Schedule send" box, select one of the suggested date and times or click "Custom time" to set your own datetime. Here, I click "Custom time", see screenshot:
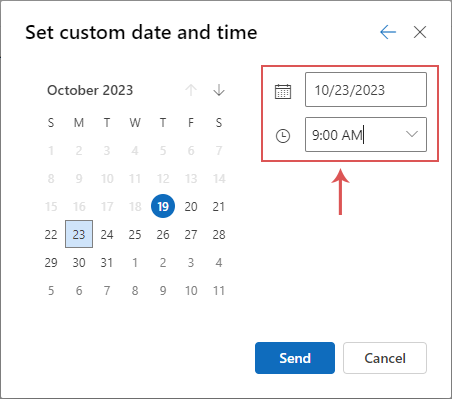
- In the "Set custom date and time" box, specify the data and time when you want the email to be sent. And then, click "Send" button, see screenshot:


Result:
Now, your scheduled email has been stored in the "Drafts" folder. And you can see a clear notification that you have scheduled the email with the date and time it’s scheduled to send. See screenshot:
While it’s in the Drafts folder, you can edit or delete the message as needed.
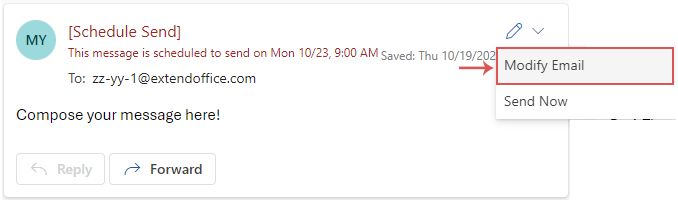
If you want to change the delivery date and time or send the email immediately, please go to Drafts folder and select the email:
- To send it at once, please click "Send Now" from the "Schedule Send Options" drop down.
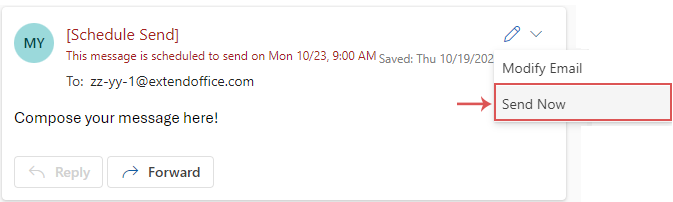
- To change the delivery date and time, please click "Modify Email" from the "Schedule Send Options" drop down, and then repeat the Step 3 to set the new scheduled date and time as you need. After finishing the operation, the scheduled date and time has been updated to the new one you specified.


Cancel a sending email by using Undo send feature
We've all been there: the moment we click Send on an email, only to realize a second later that we’ve made a mistake. It might be a typo, a forgotten attachment, or even sending it to the wrong recipient. Luckily, Outlook Online offers a convenient solution for such situations, the Undo Send feature. This powerful tool can be a lifesaver, allowing you to retract an email shortly after it’s been sent. Here’s a quick guide to how to use the Undo Send feature in Outlook Online.
Step 1: Login to Outlook on the Web
Visit the Outlook website and sign in with your credentials.
Step 2: Enable the Undo send option
- Click the gear icon
 in the top-right corner of Outlook online, see screenshot:
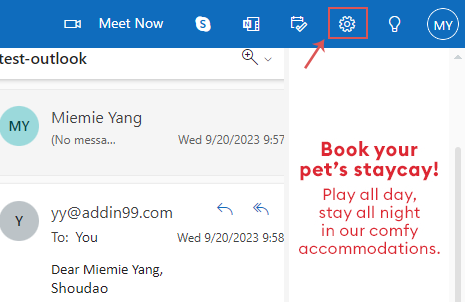
- In the "Settings" window, please do the following operations:
- Click "Mail" from the left pane;
- Then, click "Compose and reply" from the middle pane;
- Scroll down to the "Undo" send section, and then slide the slider to the right, setting how long Outlook will wait to send the message, up to 10 seconds, here, I scroll to "10";
- At last, click "Save" button.
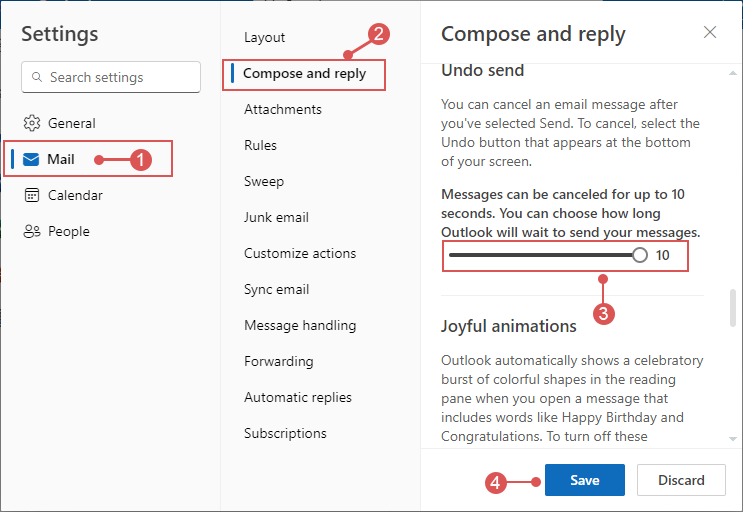
- Then close the window.
 in the top-right corner of Outlook online, see screenshot:

Now, when you send an email in Outlook Online, an "Undo" button will appear for 10 seconds. This brief delay allows you to prevent the accidental sending of an email.
Schedule or delay sending emails in Outlook for Mac
If you are using Outlook for Mac, you can directly use the Schedule Send feature on your Mac to efficiently plan emails for future delivery.
Step 1: Compose a New Email
Open Outlook on Mac and click "New Email". Fill in the recipient's email address, subject line, and the body of your message. See screenshot:
- On the "Send" button, click the drop down list and select "Schedule send", see screenshot:
- In the "Set Date and Time" window, specify the date and time for the email to be sent, and then click "OK" button, see screenshot:


Result:
Now, the message will be stored in the "Drafts" folder. And you can see a clear notification that you have scheduled the email with the date and time it’s scheduled to send. See screenshot:
While it’s in the "Drafts" folder, you can edit or delete the message as needed.
- The scheduled email will be sent automatically, even if Outlook is not open on your computer.
- This feature is only available in Outlook 2016 for Mac 15.36.1 (170721) and later versions with a Microsoft 365 subscription, Outlook 2019 and Outlook 2021 for Mac.
- This feature is exclusively available for Exchange accounts, such as Outlook.com. Unfortunately, it won’t be functional with IMAP or POP accounts, including those from Gmail, Yahoo, or iCloud.
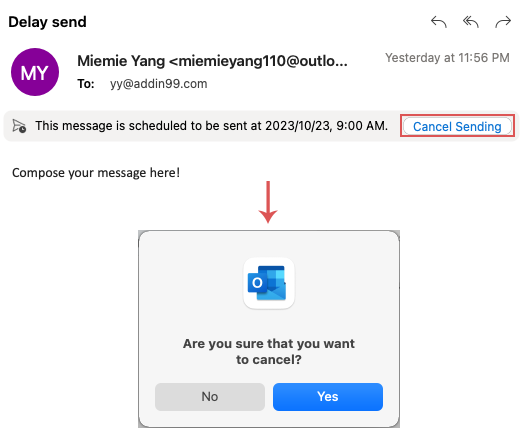
If you want to change the delivery date and time or send the email immediately, please go to Drafts folder and select the email, then click Cancel Sending, in the popped box, click Yes button, in the editing window:
- To cancel the delay, click "Send" button directly to send the email right away.
- To reschedule the email, repeat the Step 2 to set a new date and time for the email scheduling.

Schedule or delay sending emails in Outlook on mobile
In today's dynamic environment, the mobile version of Outlook has become an indispensable tool for many. With features like "Schedule Send", it ensures that your messages are sent at the right time, even when you're away from your desk. In this section, we will introduce how to delay sending emails in Outlook on Android or iOS.
Step 1: Launch the Outlook app on your Android or iOS device
Step 2: Compose a New Email
- Tap on the "New mail" floating button in the bottom right corner.
- In the new message window, compose your email as normal by filling in the recipient, subject, and the body of the message.
- Tap the "three-dot" icon before the "Send" icon.


Step 3: Schedule your email
- Then, tap "Schedule Send" option from the bottom. In the "Schedule Send" modal, specify the date and time you want to schedule the email. Here, I tap "Choose a time", see screenshot:
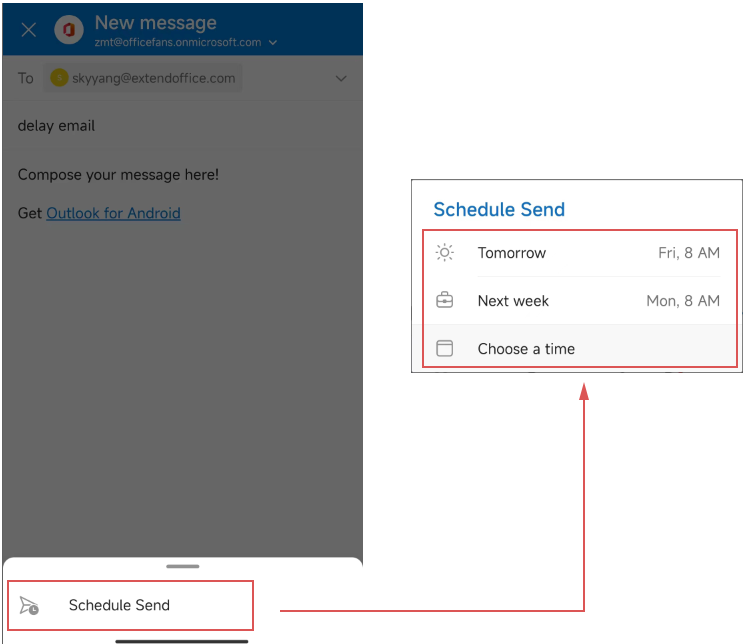
- In the "Choose a time" modal, specify the date and time, then tap "SCHEDULE", see screenshot:


Result:
The scheduled email is now stored in the "Outbox" folder until it reaches the specified delivery time.
While it’s in the "Outbox" folder, you can edit or delete the message as needed.
If you want to change the delivery date and time or send the email immediately, please go to "Outbox" folder and click the email, then an "Editing scheduled mail" modal appears, click "EDIT" to go to the editing message window:
- To send the email at once, please click the "Send" button to send the email immediately.
- To reschedule the email, follow steps 2 and 3 again to reset the scheduled date and time.


FAQs
- Do I get a confirmation when a scheduled email is sent?
Outlook doesn’t provide a direct confirmation, but you can check the Sent Items folder to confirm the email was sent. - How can I delete a Scheduled Email Outlook?
To remove a scheduled email in Outlook, go to the Outbox or Drafts folder. Locate the email that you wish to remove, and select it. Then, press the Delete button. The email will be deleted from your Outbox or Drafts folder will not be sent. - Does the recipient know that an email was scheduled?
No, the recipient will not be able to tell that an email was scheduled; it will appear as a regular email. - What time will the recipient see if the email is scheduled?
The recipient will see the time that the email was scheduled to be sent as the sending time, not the time when the sender actually created and scheduled the email. - How Can I schedule a recurring email at specific intervals, like daily or monthly?
Scheduling a recurring email isn’t a built-in feature of Outlook, but you can apply our "Schedule Auto Send" feature of "Kutools for Outlook".
Related Articles:
- Send a schedule recurring email in Outlook
- In Microsoft Outlook, you can easily send a schedule recurring appointment, meeting or task to others. But if you just want to send a schedule recurring email without any appointment, meeting or task, how can you do?
- Create a meeting recurring every other day excluding weekendsk
- Let’s say you want to create a recurring meeting which occurs every other day but excludes all weekends in Outlook, how could you achieve it? This article will introduce a solution for you.
Best Office Productivity Tools
Experience the all-new Kutools for Outlook with 100+ incredible features! Click to download now!
📧 Email Automation: Auto Reply (Available for POP and IMAP) / Schedule Send Emails / Auto CC/BCC by Rules When Sending Email / Auto Forward (Advanced Rules) / Auto Add Greeting / Automatically Split Multi-Recipient Emails into Individual Messages ...
📨 Email Management: Recall Emails / Block Scam Emails by Subjects and Others / Delete Duplicate Emails / Advanced Search / Consolidate Folders ...
📁 Attachments Pro: Batch Save / Batch Detach / Batch Compress / Auto Save / Auto Detach / Auto Compress ...
🌟 Interface Magic: 😊More Pretty and Cool Emojis / Remind you when important emails come / Minimize Outlook Instead of Closing ...
👍 One-click Wonders: Reply All with Attachments / Anti-Phishing Emails / 🕘Show Sender's Time Zone ...
👩🏼🤝👩🏻 Contacts & Calendar: Batch Add Contacts From Selected Emails / Split a Contact Group to Individual Groups / Remove Birthday Reminders ...
Use Kutools in your preferred language – supports English, Spanish, German, French, Chinese, and 40+ others!


🚀 One-Click Download — Get All Office Add-ins
Strongly Recommended: Kutools for Office (5-in-1)
One click to download five installers at once — Kutools for Excel, Outlook, Word, PowerPoint and Office Tab Pro. Click to download now!
- ✅ One-click convenience: Download all five setup packages in a single action.
- 🚀 Ready for any Office task: Install the add-ins you need, when you need them.
- 🧰 Included: Kutools for Excel / Kutools for Outlook / Kutools for Word / Office Tab Pro / Kutools for PowerPoint
Table of contents
- Video
- Schedule or delay sending emails in Outlook for Windows
- Schedule sending a single email
- Delay sending all emails
- How to keep track of scheduled emails?
- Schedule or delay sending email in Outlook on web
- Schedule sending an email
- Cancel a sending email
- Schedule or delay sending emails in Outlook for Mac
- Schedule or delay sending emails in Outlook on mobile
- FAQs
- Related Articles
- The Best Office Productivity Tools
- Comments