How To Block Emails/Senders in Outlook (Easy Guide)
Unwanted emails, also known as spam or junk mail, can be a nuisance in your Outlook inbox. Fortunately, Microsoft Outlook provides several methods to block emails by senders or domains, helping you maintain a clutter-free and organized mailbox. In this comprehensive guide, we'll walk you through the steps to block the emails from certain senders in Outlook on various platforms, including Windows Desktop, Mac Desktop, Outlook on the Web, and the mobile app for both iPhone and Android devices.

Block Emails in Outlook on the Windows Desktop
Outlook on the Windows desktop offers several ways to block emails by senders, depending on your needs. In this section, we'll cover three primary methods for blocking unwanted emails.
Block an Email Sender (Using the Block Sender Feature)
When a specific sender becomes a constant source of frustration in your inbox, you can block this sender with Outlook's Block Sender feature. This simple yet effective method ensures you won't receive any emails from that sender in the future.
Step 1: Select the email from the sender you want to block

Step 2: Enable the Block Sender Feature
- Navigate to the Home tab, and click Junk >Block Sender.

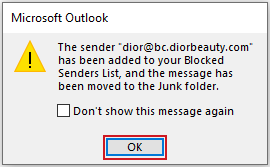
- A Microsoft Outlook warning dialog pops up. Click OK.


Result
The message you selected now has been moved to the Junk Email folder. Additionally, the specified sender has been added to your Blocked Senders List. As a result, all future messages from this sender will be blocked from your inbox and automatically moved to the Junk Email folder.

- To view the blocked senders, go to the Blocked Senders tab, then you will see the blocked senders.
- To unblock senders, also in the Blocked Senders tab, select the senders you want to unblock and click Remove. Finally, Click OK.


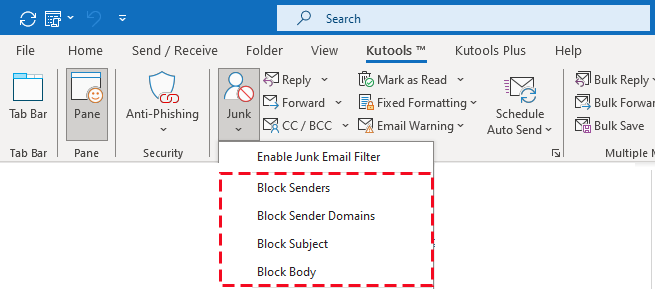
Quickly Block Multiple Emails by Sender/Domain/Subject/Body with Kutools
While Outlook's native Block Sender feature only permits blocking one sender at a time, Kutools for Outlook enhances this capability. With the Block Senders utility of the Junk feature in Kutools, you can block multiple email senders at once, significantly speeding up the process. What’s more, Kutools also supports blocking emails by specific domains, subjects, or keywords in the email body with only a few clicks.
In this section, we will show you how to quickly block multiple emails by sender and domain using Kutools for Outlook.
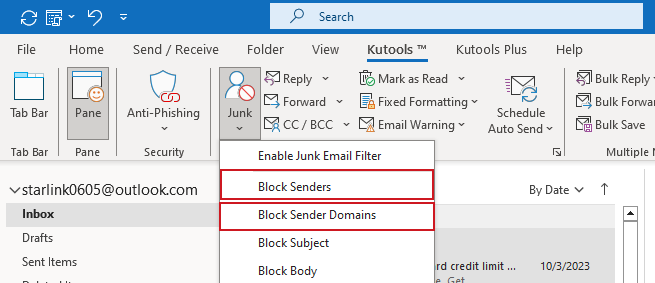
1. After selecting the emails from the senders you want to block, navigate to the Kutools tab and click Junk >Block Senders or Block Sender Domains.
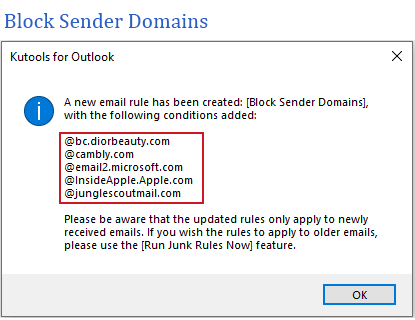
2. A dialog pops up to remind you that the senders or domains have been successfully blocked. Click OK to close the dialog.

3. Another dialog pops up. Click Yes to enable the Junk feature.

The selected messages will be moved to the Junk Email folder. And from now on, all future messages from those senders or domains will be automatically blocked from your inbox and moved to the Junk Email folder.
- Before you tap into the full power of our Junk feature, remember to download and install Kutools for Outlook. Haven't done that yet? No problem! Download now and enjoy a free 30-day trial with no limitations!
- To view the blocked senders/domains, or unblock senders/domains, you can use the Manage Junk Email Filter utility of the Junk feature. Please click Kutools >Junk >Manage Junk Email Filter to open the Junk dialog.
- To view the blocked senders/domains, first select the Block Senders rule or the Block Sender Domains rule, then you can see the blocked senders/domains in the Rule description section.
- To unblock senders/domains, first select the Block Senders rule or the Block Sender Domains rule, then click on the underlined sender emails/domains in the Rule description textbox. The Text Contains dialog shows up, untick the listed senders or domains to unblock them. Once done, click OK to save the changes.

Block Multiple Email Senders/Domains (Using Blocked Senders List)
For comprehensive blocking capabilities, you can create a list of blocked senders and domains using the Blocked Senders List of the Junk Email Options feature, ensuring you receive emails only from trusted sources.
Step 1: Go to the Home tab, and click Junk > Junk E-mail Options.

Step 2: Add the blocked senders/domains into the Blocked Senders List
- In the popping-up Junk Email Options dialog, click the Add button under the Blocked Senders tab.
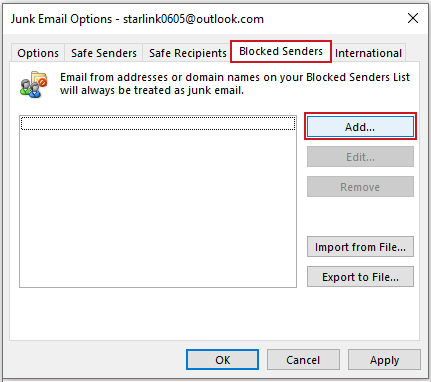
- In the popping-up Add address or domain dialog, type the email address or domain name in the textbox. Click OK.
- Repeat the above steps to add more senders or domains as you need.

Result
Now you can see the added senders and domains in the Blocked Senders List. And from now on, all future messages from those senders or domains will be automatically blocked from your inbox and moved to the Junk Email folder.

- To unblock the senders or domains, still go to the Blocked Senders tab in the Junk Email Options dialog, then select the senders or domains you want to unblock, click Remove. Finally, click OK.

- You can have up to 1,024 addresses or domains in the Blocked Senders list. If you need to include more, consider blocking entire domains rather than individual email addresses.

Block Emails in Outlook on the Mac Desktop
Blocking emails in the Mac desktop version of Outlook involves its own distinct steps. We'll walk you through the process to help you maintain a clean and organized inbox on your Mac.
Step 1. Select the messages from the senders you want to block

Step 2: Enable the Block Sender Feature
- Navigate to the toolbar and click the Block button.
- An Outlook dialog pops up. Click OK.


Result
The messages you selected have now been moved to the Junk Email folder. From now on, all future messages from those senders or domains will be automatically blocked from your inbox and moved to the Junk Email folder.


Block Emails in Outlook on the Web
Outlook on the web offers user-friendly features for blocking unwanted emails and senders, ensuring a tidy inbox. In this section, we'll introduce two methods for blocking unwanted emails when using Outlook on the web.
Block Email Senders (Using the Block Sender Feature)
Blocking emails on the web-based Outlook platform is a crucial skill for maintaining a tidy inbox and preventing unwanted emails.
Step 1: select the messages from the senders you want to block

Step 2: Enable the Block Sender Feature
- Navigate to the top toolbar and click on the More options button in the upper-right corner.
- Click Block>Block sender.
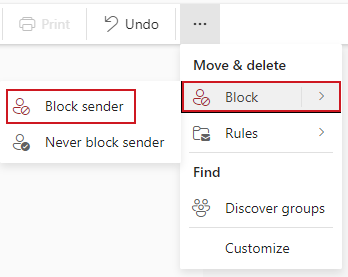
- A dialog pops out. Click OK.
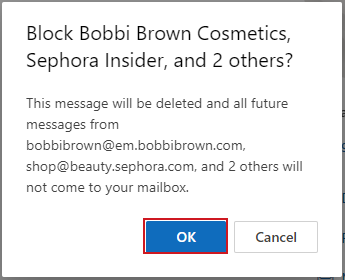


Result
The selected messages are now deleted, and in the future, you'll no longer receive any messages from those senders.

- To view the blocked senders, click Mail >Junk email. In the Blocked senders and domains section, you will see the blocked senders and domains in the Blocked Senders and domains list.
- To unblock the senders, click Mail >Junk email. In the Blocked senders and domains section, select the Trash icon next the email address to remove the blocked sender. Finally, click the Save button.

Supercharge Your Email Management: Quickly Block Emails in Outlook
Enhance your email management with Kutools for Outlook and enjoy the following features:
- Block Senders: Block multiple email senders at once and save valuable time.
- Block Sender Domains: Simplify domain blocking with ease.
- Block Subject: Customize email filtering by blocking specific subjects.
- Block Body: Efficiently filter emails by keywords or specific content in the email body.
Elevate your email management with Kutools for Outlook today!
Download NowBlock Email Senders/Domains (Using Blocked Senders List)
Outlook on the web also supports blocking email senders or domains by adding the specific senders or domains manually in the Blocked senders and domains list.
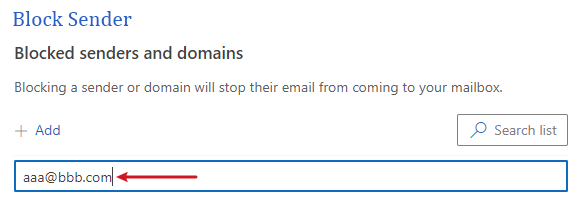
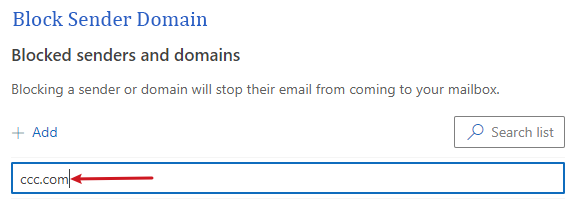
Step 1: Click the Settings button to open the Settings dialog
Step 2: : Add the blocked senders/domains using the Blocked Senders and domains list
- In the popping-up Settings dialog, click Mail >Junk email. Then click the Add button in the Blocked senders and domains section.
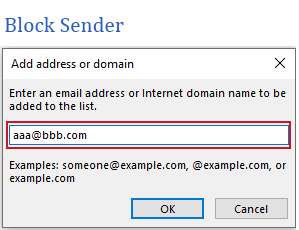
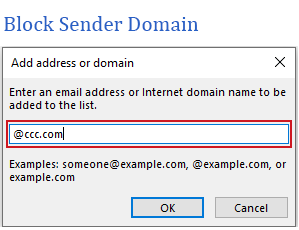
- Input the email address or domain in the textbox. For example, Here I input aaa@bbb.com for blocking a sender, and input ccc.com for blocking a domain. Then press the Enter key.
- Repeat the above steps to add more senders or domains as you need.

Result
Now you can see the added senders and domains in the Blocked Senders and domains list. Click the Save button to save all changes. From now on, all future messages from those senders or domains will be blocked from your mailbox.

- To unblock the senders or domains, still in the Blocked senders and domains section in the Junk email window in the Settings dialog, click the Trash icon next the email address or domain name to remove from the Blocked Senders and domains list.
- You can have up to 1,024 addresses or domains in the Blocked Senders list. If you need to include more, consider blocking entire domains rather than individual email addresses.
Block an Email in Outlook on the Mobile App (iPhone or Android Device)
Blocking an email on the Outlook mobile app is essential for keeping your inbox clean while you're on the go. We'll guide you through the steps for blocking an email on iPhone and Android.
Step 1: Select the message from the sender you want to block
Step 2: Enable the Block Sender Feature
- Navigate to the top toolbar and click on the More options button in the upper-right corner.
- In the drop-down menu, click Report junk > Block Sender.
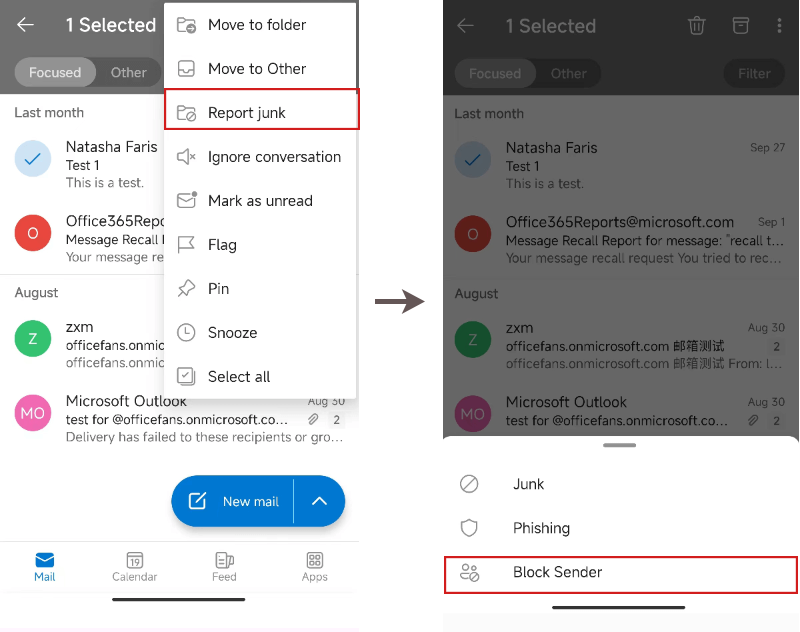
- A confirmation dialog pops up, click BLOCK SENDER.
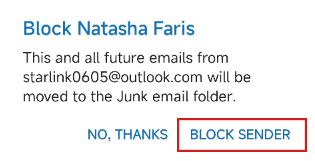


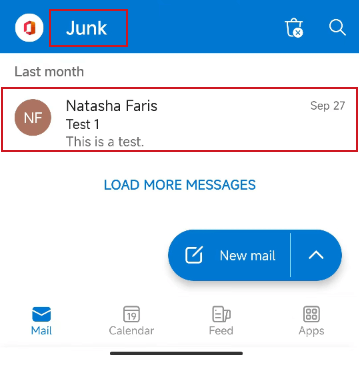
Result
The message you selected now has been moved to the Junk folder. Additionally, all future messages from this sender will be automatically blocked from your inbox and moved to the Junk folder.

You now have a comprehensive guide on how to block emails and senders in Outlook, tailored to your specific platform. And remember that you can always unblock senders if your preferences change. If you're looking to explore more Outlook tips and tricks, pleaseclick here to access our extensive collection of over thousands of Outlook tutorials.
Related articles
How to automatically delete emails from blocked senders in Outlook?
Suppose you have added a lot of email addresses to the Blocked Sender list in Outlook and want to delete all emails from these senders directly without saving them in the Junk Email folder. In fact, there is no option in Outlook to automatically delete emails from blocked senders. In this tutorial, you will learn a trick to get it done.
How to block emails based on specific subject in Outlook?
You may get multiple emails a day which the subjects always include some common words or text in your Outlook, and these annoying emails can disturb your work. In this case, you need to find some useful ways to detect the incoming emails and block them based on specific subject text.
How to block emails with no subject in Outlook?
Have you ever suffered with receiving some emails with no subject text within your Outlook? If you are painful with this problem, with this article, you may find the ways to help you to block the emails with no subject automatically in Outlook.
How to view all blocked domains in Outlook?
Besides email addresses, you may know that Outlook also allows us to block domain names so that emails from the blocked addresses and domain names will go to a special Junk Email folder instead of our inboxes. In this article, we are going to talk about the methods to view those domain names that you have blocked in Outlook.
Best Office Productivity Tools
Experience the all-new Kutools for Outlook with 100+ incredible features! Click to download now!
📧 Email Automation: Auto Reply (Available for POP and IMAP) / Schedule Send Emails / Auto CC/BCC by Rules When Sending Email / Auto Forward (Advanced Rules) / Auto Add Greeting / Automatically Split Multi-Recipient Emails into Individual Messages ...
📨 Email Management: Recall Emails / Block Scam Emails by Subjects and Others / Delete Duplicate Emails / Advanced Search / Consolidate Folders ...
📁 Attachments Pro: Batch Save / Batch Detach / Batch Compress / Auto Save / Auto Detach / Auto Compress ...
🌟 Interface Magic: 😊More Pretty and Cool Emojis / Remind you when important emails come / Minimize Outlook Instead of Closing ...
👍 One-click Wonders: Reply All with Attachments / Anti-Phishing Emails / 🕘Show Sender's Time Zone ...
👩🏼🤝👩🏻 Contacts & Calendar: Batch Add Contacts From Selected Emails / Split a Contact Group to Individual Groups / Remove Birthday Reminders ...
Use Kutools in your preferred language – supports English, Spanish, German, French, Chinese, and 40+ others!


🚀 One-Click Download — Get All Office Add-ins
Strongly Recommended: Kutools for Office (5-in-1)
One click to download five installers at once — Kutools for Excel, Outlook, Word, PowerPoint and Office Tab Pro. Click to download now!
- ✅ One-click convenience: Download all five setup packages in a single action.
- 🚀 Ready for any Office task: Install the add-ins you need, when you need them.
- 🧰 Included: Kutools for Excel / Kutools for Outlook / Kutools for Word / Office Tab Pro / Kutools for PowerPoint
Table of contents
- Block Emails in Outlook on the Windows Desktop
- Block an email sender
- Quickly block multiple emails by sender/domain/subject/body with Kutools
- Block multiple email senders/domains
- Block Emails in Outlook on the Mac Desktop
- Block Emails in Outlook on the Web
- Block email senders
- Block email senders/domains
- Block Emails in Outlook on the Mobile App (iPhone or Android Device)
- Related articles
- The Best Office Productivity Tools
- Comments