How to insert multiple pictures into Word?
To insert multiple pictures into a Word document, you can use Word’s built-in Insert Pictures feature. Simply go to Insert > Pictures > This Device, select multiple image files, and click Insert. All selected pictures will be added to the document at once.
For a small number of images, this method is quick and easy. If you need to insert many pictures, resize them, arrange them, or add filenames automatically, using VBA or Kutools for Word can save much more time.

Why Insert Multiple Pictures into Word?
When creating reports, manuals, photo lists, product documents, training materials, or project records, you may need to add many images into a Word document. Inserting them one by one can be slow, especially when there are dozens or hundreds of pictures.
By inserting multiple pictures at once, you can:
- Save time and reduce repetitive work
- Keep related images in one document
- Create photo reports or image catalogs more easily
- Organize screenshots, product pictures, or project images
- Improve document preparation efficiency
Below are several practical methods to insert multiple pictures into a Word document.
Method 1: Insert multiple pictures manually with Insert Pictures feature
The built-in Insert Pictures feature in Microsoft Word allows you to select and insert several images at the same time. This is one of the easiest methods if your pictures are already saved in one folder.
Steps:
- Open the Word document where you want to insert the pictures. Place the cursor at the position where you want the pictures to appear.
- Click Insert > Pictures > This Device.
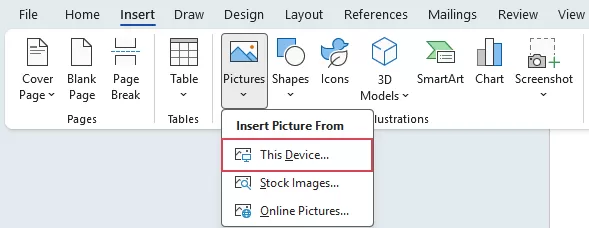
- In the Insert Picture dialog box, hold down the Ctrl key and click each picture you want to insert. Or press Ctrl + A to select all pictures in the folder. Then, click Insert button.
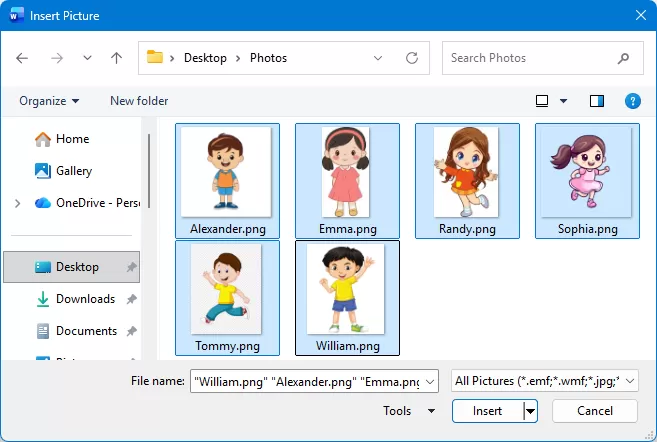
The selected pictures will be inserted into the Word document at the cursor position.
Pros:
- Built into Microsoft Word, no extra tools required.
- Easy to use for beginners.
- Allows you to select and insert several pictures at once.
- Good for inserting pictures from the same folder.
Cons:
- Pictures may need to be resized manually after insertion.
- Image order may not always be correct.
- Not ideal for inserting a very large number of pictures.
Method 2: Drag and drop multiple pictures into Word
You can also insert pictures by dragging them directly from a folder into a Word document.
Steps:
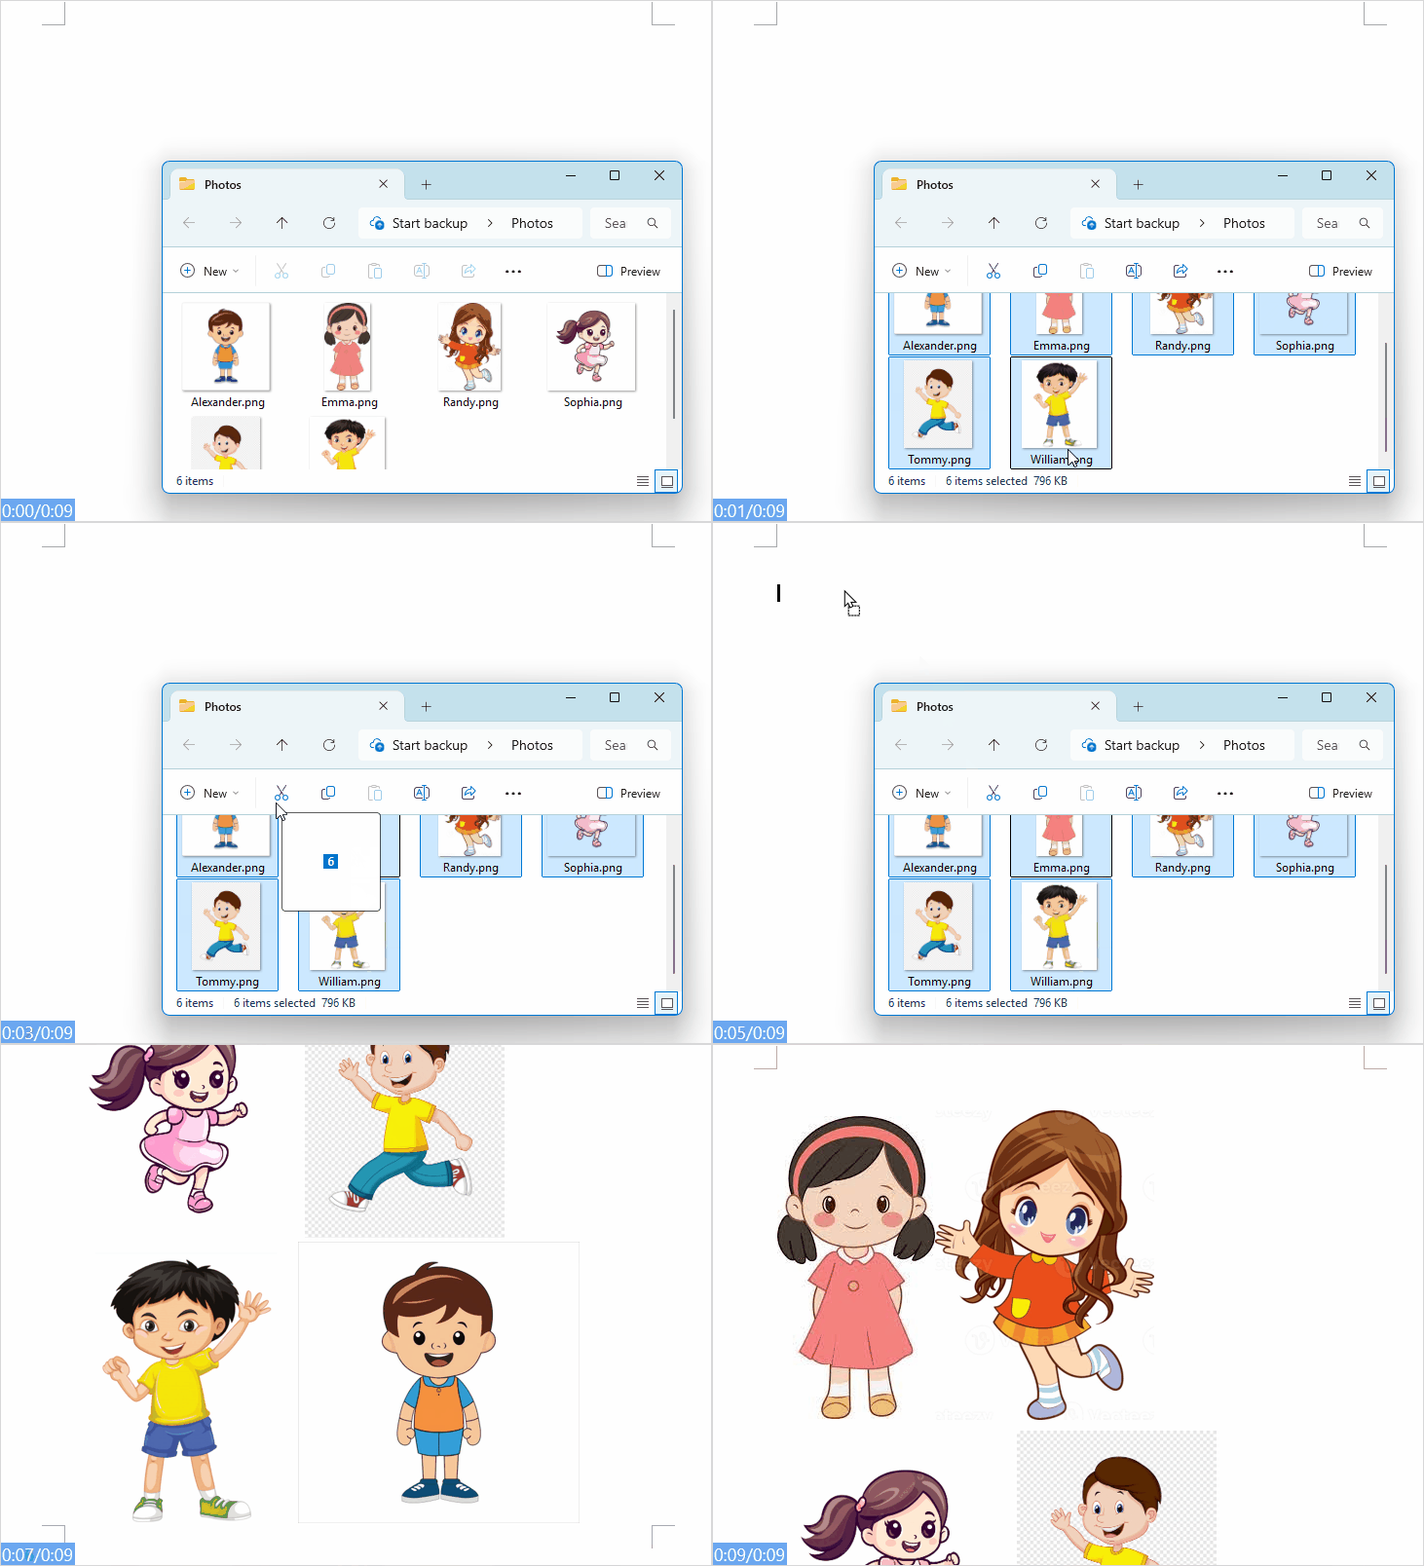
- Open your Word document, and open the folder that contains the pictures.
- Select the pictures you want to insert.
- Drag the selected pictures into the Word document.
- Release the mouse button when the cursor is placed where you want the pictures to appear. Word will insert the selected pictures into the document.
Pros:
- Very quick and simple.
- No need to open the Insert Picture dialog box.
- Works well when pictures are already in a folder.
- Suitable for quick document editing.
Cons:
- Picture order may be hard to control.
- Images are usually inserted at their original size.
- You may need to manually adjust layout and spacing.
- Not suitable for structured or large image documents.
Method 3: Insert multiple pictures and resize them in batch with VBA
If you often need to insert many pictures into Word and resize them automatically, VBA can help. With a macro, you can select multiple pictures and insert them into the document with a fixed width.
Steps:
- Open the Word document. Press Alt + F11 to open the Microsoft Visual Basic for Applications window.
- Click Insert > Module. Copy and paste the following VBA code into the module window.
Sub InsertMultiplePicturesAndResize()
    Dim fd As FileDialog
    Dim selectedItem As Variant
    Dim shp As InlineShape
    Set fd = Application.FileDialog(msoFileDialogFilePicker)
    With fd
        .Title = "Select Pictures to Insert"
        .Filters.Clear
        .Filters.Add "Image Files", "*.jpg; *.jpeg; *.png; *.bmp; *.gif"
        .AllowMultiSelect = True
        If .Show = -1 Then
            For Each selectedItem In .SelectedItems
                Set shp = Selection.InlineShapes.AddPicture( _
                    FileName:=selectedItem, _
                    LinkToFile:=False, _
                    SaveWithDocument:=True)
                ' Resize picture width to 100 points
                shp.LockAspectRatio = True
                shp.Width = 100
                Selection.TypeParagraph
            Next selectedItem
        End If
    End With
End Sub- Press F5 to run the code. Select the pictures you want to insert, and click OK.
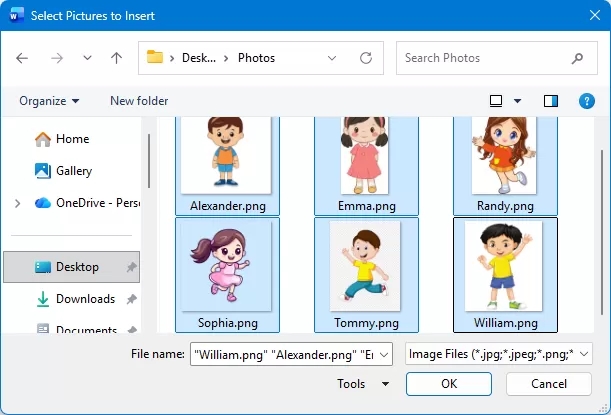
All selected pictures will be inserted into the Word document and resized to the specified width.
💡 Notes:
- You can change shp.Width = 100 to another value if you want a different image width.
- The aspect ratio is locked, so the picture height will adjust automatically.
- If macros are disabled in Word, you need to enable macros before running the code.
Pros:
- Can insert and resize pictures automatically.
- Saves time when working with many images.
- Keeps picture sizes consistent.
- The code can be reused for similar tasks.
Cons:
- Requires basic VBA knowledge.
- Macros may be disabled by Word security settings.
- Users need to modify the code if they want different sizes or layouts.
- Not beginner-friendly compared with manual methods.
Method 4: Insert multiple pictures with Kutools for Word
If you want an easier way to insert many pictures without writing code, Kutools for Word provides a convenient solution. With its Multi-Picture feature, you can add pictures from files, folders, or subfolders, and manage the picture order before inserting them.
Steps:
- Open the Word document. And click Kutools > Multi-Picture, see screenshot:

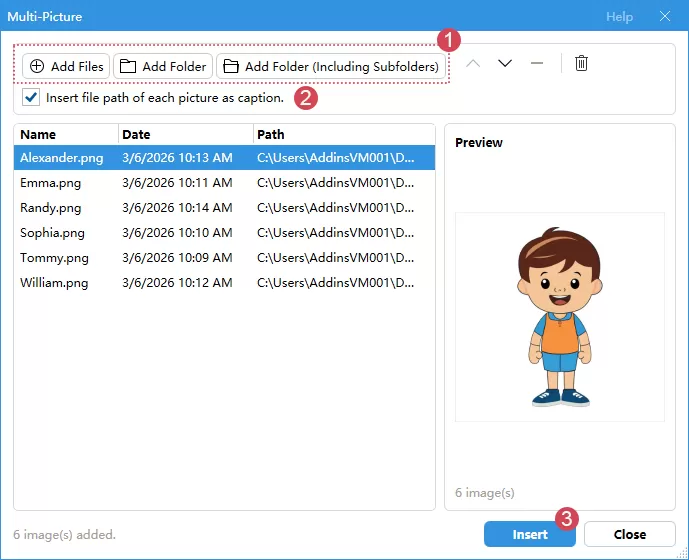
- In the popped-out Multi-Picture dialog box, perform the following operations:
- Add pictures by using one of the following buttons:
- Click Add Files to select individual image files.
- Click Add Folder to import all pictures from a selected folder.
- Click Add Folder (Including Subfolders) to import pictures from the selected folder and its subfolders.
- Optional: Check Insert file path of each picture as caption to add the file path or filename as a caption for each picture if needed.
- Click Insert button.
- Add pictures by using one of the following buttons:
Tip:
If needed, use the move up, move down, or delete buttons to adjust the picture order or remove unwanted pictures from the list.
Now, all selected pictures will be inserted into the Word document. 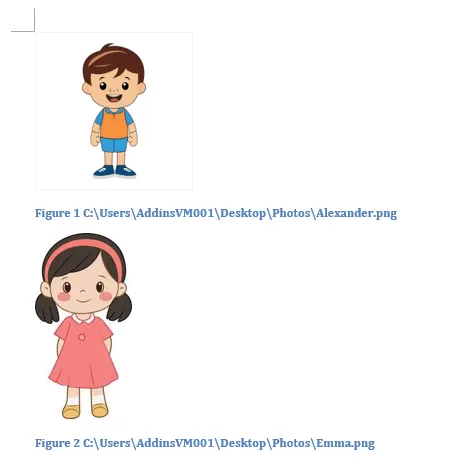
Pros:
- Insert multiple pictures from files, folders, or subfolders.
- Easily manage picture order before inserting.
- Automatically add filenames or file paths as captions.
- Save time when working with a large number of images.
- Suitable for users who prefer a visual interface instead of VBA code.
Insert Multiple Pictures into Word More Easily
With Kutools for Word, you can quickly insert multiple pictures into a Word document without adding them one by one. It helps save time and makes bulk picture insertion easier for image-heavy documents.
Comparison of Different Methods
How to Resize Pictures After Inserting Them?
After inserting multiple pictures into Word, you may find that some pictures are too large or inconsistent in size. You can resize them manually or in batch.
Resize pictures manually
- Click a picture in the Word document.
- To keep the picture proportion, hold Shift key and drag one of the corner handles to resize it.
- Repeat the same operation for other pictures.
Resize multiple pictures in bulk
If you need to resize all pictures in the document to the same width, you can use the Resize feature of Kutools for Word.
This feature is mainly useful in the following three scenarios: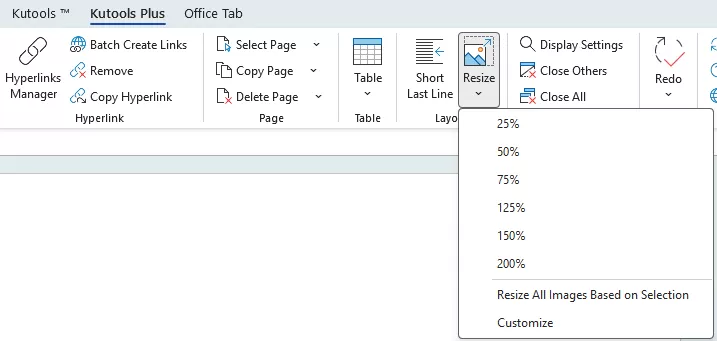
1. Resize images by preset percentage
You can quickly resize pictures by choosing a preset scale, such as 25%, 50%, 75%, 125%, 150%, or 200%.
This is useful when you want to enlarge or reduce selected images quickly without setting the exact size manually.
2. Resize all images based on selected image
The Resize All Images Based on Selection option allows you to first resize one picture to the desired size, then apply the same size to all other images in the document.
This is useful for keeping all pictures consistent in width or height.
3. Customize image size
The Customize option lets you set a specific image size or resizing rule according to your needs.
This is suitable when you want more precise control over picture width, height, or scaling settings.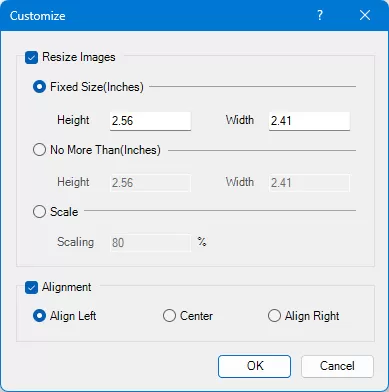
Resize Pictures in Word More Easily
Use Kutools for Word to resize selected pictures, resize all images based on one picture, or customize image size with just a few clicks.
How to Reduce Word File Size After Inserting Pictures?
When you insert many pictures into Word, the document size can become very large. This may make the file slow to open, difficult to share, or too large to send by email. You can reduce the file size by compressing pictures.
- Click any picture in the document. Go to the Picture Format tab, and then click Compress Pictures.

- In the dialog box, choose the compression options:
- Uncheck Apply only to this picture if you want to compress all pictures in the document.
- Uncheck Delete cropped areas of pictures if you want to keep the cropped parts and restore them later.
- Choose a suitable resolution, such as Print, Web or Email, if available.
- Click OK.
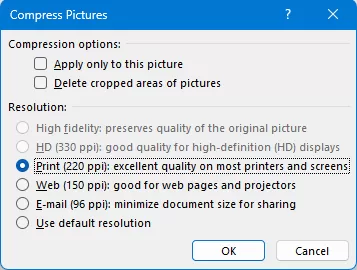
Word will compress the pictures and reduce the document size.
Frequently Asked Questions
How to Keep Pictures in the Correct Order?
Word may insert pictures based on the selection order or file order. To keep pictures in the correct order, rename them with numbers, such as 001.jpg, 002.jpg, and 003.jpg, before inserting them.
Can I automatically resize pictures when inserting them?
Yes. You can use VBA to insert and resize pictures automatically. The VBA method is useful when you need to insert many pictures with the same width. Or apply Kutools for Word’s Resize feature to quickly resize selected pictures, resize all images based on one selected picture, or customize image size.
Why does my Word file become very large after inserting pictures?
Pictures, especially high-resolution images, can greatly increase the file size. You can use Word’s Compress Pictures feature to reduce the file size.
Which method is best for inserting many pictures into Word?
If you only have a few pictures, the built-in Insert Pictures feature is enough. If you need to resize images automatically, VBA is a good choice. If you want a simple visual tool for bulk insertion, Kutools for Word is more convenient.
Conclusion
Inserting multiple pictures into Word can be done in several ways.
- For simple tasks, you can use Word’s built-in Insert Pictures feature or drag and drop images directly into the document.
- If you need to insert and resize many pictures automatically, VBA can save time.
- For users who prefer an easier and more visual method, Kutools for Word provides a convenient way to insert multiple pictures efficiently.
After inserting pictures, remember to resize and compress them if needed. This helps keep your Word document neat, organized, and easy to share.
Best Office Productivity Tools
Kutools for Word - Elevate Your Word Experience with Over 100 Remarkable Features!
🤖 Kutools AI Features: AI Assistant / Real-Time Assistant / Super Polish (Preserve Format) / Super Translate (Preserve Format) / AI Redaction / AI Proofread...
📘 Document Mastery: Split Pages / Merge Documents / Export Selection in Various Formats (PDF/TXT/DOC/HTML...) / Batch Convert to PDF...
✏ Contents Editing: Batch Find and Replace across Multiple Files / Resize All Pictures / Transpose Table Rows and Columns / Convert Table to Text...
🧹 Effortless Clean: Sweap away Extra Spaces / Section Breaks / Text Boxes / Hyperlinks / For more removing tools, head to the Remove group...
➕ Creative Inserts: Insert Thousand Separators / Check Boxes / Radio Buttons / QR Code / Barcode / Multiple Pictures / Discover more in the Insert group...
🔍 Precision Selections: Pinpoint Specific Pages / Tables / Shapes / Heading Paragraphs / Enhance navigation with more Select features...
⭐ Star Enhancements: Navigate to Any Location / Auto-Insert Repetitive Text / Toggle Between Document Windows / 11 Conversion Tools...
🌍 Supports 40+ Languages: Use Kutools in your preferred language – supports English, Spanish, German, French, Chinese, and 40+ others!

Office Tab - Brings Tabbed interface to Office, Make Your Work Much Easier
- Enable tabbed editing and reading in Word, Excel, PowerPoint, Publisher, Access, Visio and Project.
- Open and create multiple documents in new tabs of the same window, rather than in new windows.
- Increases your productivity by 50%, and reduces hundreds of mouse clicks for you every day!
✨ Kutools for Office – One Installation, Five Powerful Tools!
Includes Office Tab Pro · Kutools for Excel · Kutools for Outlook · Kutools for Word · Kutools for PowerPoint
📦 Get all 5 tools in one suite | 🔗 Seamless integration with Microsoft Office | ⚡ Save time and boost productivity instantly
Best Office Productivity Tools
Kutools for Word - 100+ Tools for Word
- 🤖 Kutools AI Features: AI Assistant / Real-Time Assistant / Super Polish / Super Translate / AI Redaction / AI Proofread
- 📘 Document Mastery: Split Pages / Merge Documents / Batch Convert to PDF
- ✏ Contents Editing: Batch Find and Replace / Resize All Pictures
- 🧹 Effortless Clean: Remove Extra Spaces / Remove Section Breaks
- ➕ Creative Inserts: Insert Thousand Separators / Insert Check Boxes / Create QR Codes
- 🌍 Supports 40+ Languages: Kutools speaks your language – 40+ languages supported!
Table of contents
- Why Insert Multiple Pictures into Word?
- Method 1: Insert multiple pictures manually
- Method 2: Drag and drop multiple pictures into Word
- Method 3: Insert multiple pictures and resize them
- Method 4: Insert multiple pictures with Kutools for Word
- Comparison of Different Methods
- How to Resize Pictures After Inserting Them?
- How to Reduce Word File Size After Inserting Pictures
- Frequently Asked Questions
- Conclusion
- The Best Office Productivity Tools
Kutools for Word
Brings 100+ advanced features to Word
- ⬇️ Free Download
- 🛒 Purchase Now
- 📘 Feature Tutorials
- 🎁 60-Day Free Trial