Removing Watermarks in Word: Complete Solutions for All Types
Watermarks serve important functions in document management by indicating status or confidentiality. However, there may be times when you need to present a clean version of your document without these marks. Whether you're dealing with standard, stubborn, or page-specific watermarks, this guide provides clear instructions on how to remove them from your Microsoft Word documents.

- Remove general watermark in Word
- Remove stubborn watermark in Word
- Remove watermark from specific pages
Remove general watermark in Word
General watermarks are typically those added through Word's built-in features. They are the easiest to remove and can be done quickly with a few clicks.
- Open the Word document from which you wish to remove the watermark.
- Go to the Design tab, select Watermark > Remove Watermark in the Page Background group.
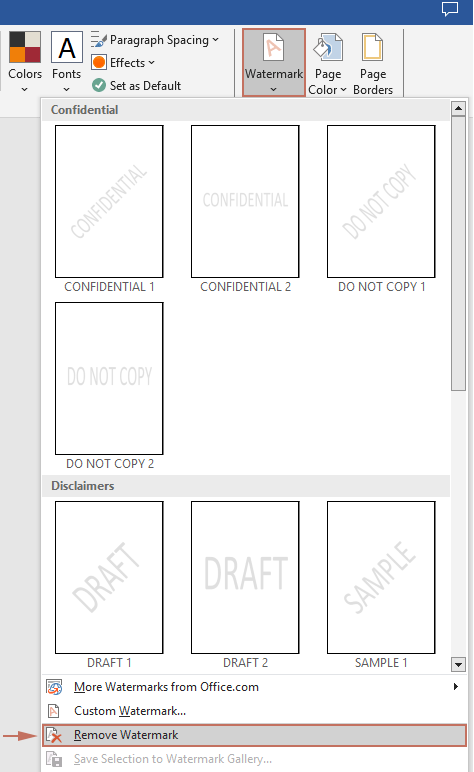
- Scroll through your document to ensure the watermark has been completely removed. And then save your document to preserve these changes.

Result
Any watermark present in the entire document has now been removed.
Remove stubborn watermark in Word
Some watermarks may not be removed through the standard method we mentioned above, often because they are not recognized by Word as watermarks or are embedded in custom headers and footers. To remove those stubborn watermarks in Word, please do as follows.
- Open the Word document from which you wish to remove the watermark.
- Double click near the top or bottom of a page to open the header or footer area.
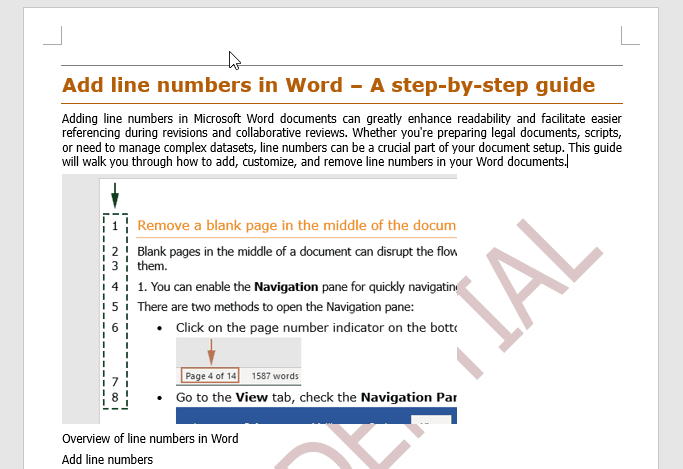
- Put your cursor over the watermark until it turns into a 4-way arrow, then click to select the watermark.
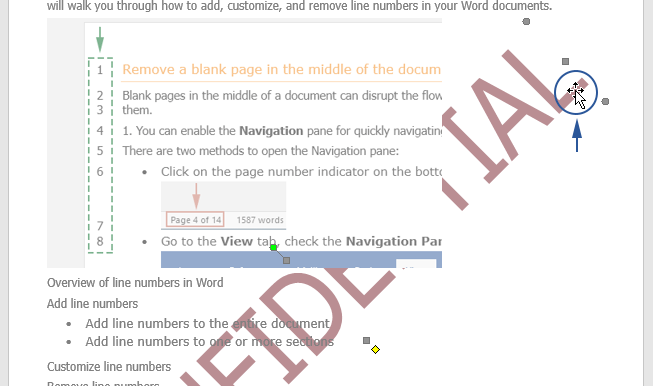
- Press the Delete key on your keyboard to remove the watermark.
Note: If the watermark is an image, right click on it and select Cut.
- Click Close Header and Footer on the Header & Footer tab to exit the header/footer mode.
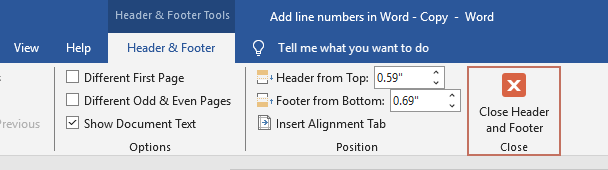
- Review the document to ensure the watermark has been completely removed. And then save the changes.


Remove watermark from specific pages
In some documents, you might need to remove watermarks only from specific pages without affecting others. This requires a more precise approach.
- Navigate to the page from which you want to remove the watermark.
- Put the cursor at the top of the page and click Layout > Breaks > Continuous.
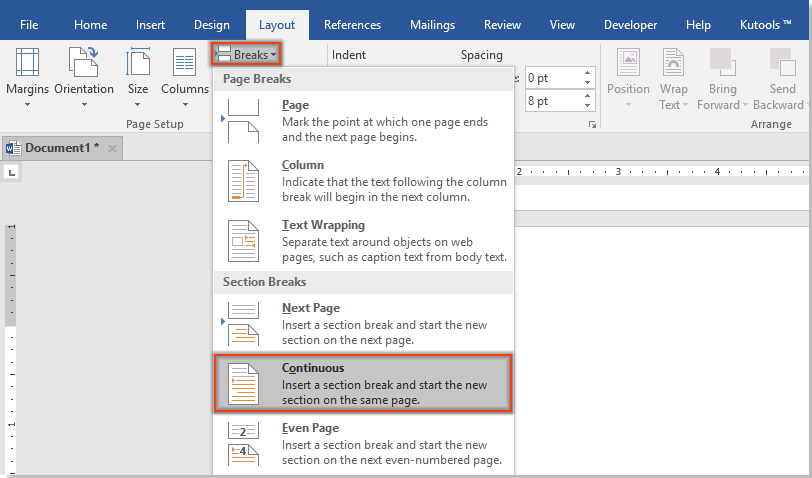 Continuous option on the Layout tab on the ribbon" />
 - Then, double click the page header section to get into the Header edit mode, and click to turn off the Link to Previous feature.
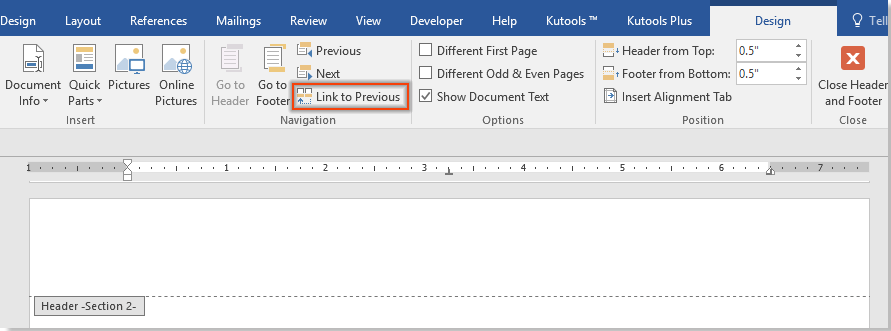
- Click the Close Header and Footer button under the Header & Footer Tools to close the header edit mode.

- Go to the next page (page 3 in this case) and repeat the above step 2 to 3.
- Go back to the previous page (page 2), click to select the watermark and press the Delete key to remove it from the page.

 Continuous option on the Layout tab on the ribbon" />


Removing watermarks from Word documents can refresh the presentation of your content, making it suitable for wider distribution or different purposes. Whether you need a blanket removal or targeted adjustments, the steps provided here should equip you to handle watermarks of all types effectively. Remember to always save your document after making changes to ensure that your edits are preserved. For those eager to delve deeper into Word's capabilities, our website boasts a wealth of tutorials. Discover more Word tips and tricks here.
Best Office Productivity Tools
Kutools for Word - Elevate Your Word Experience with Over 100 Remarkable Features!
🤖 Kutools AI Features: AI Assistant / Real-Time Assistant / Super Polish (Preserve Format) / Super Translate (Preserve Format) / AI Redaction / AI Proofread...
📘 Document Mastery: Split Pages / Merge Documents / Export Selection in Various Formats (PDF/TXT/DOC/HTML...) / Batch Convert to PDF...
✏ Contents Editing: Batch Find and Replace across Multiple Files / Resize All Pictures / Transpose Table Rows and Columns / Convert Table to Text...
🧹 Effortless Clean: Sweap away Extra Spaces / Section Breaks / Text Boxes / Hyperlinks / For more removing tools, head to the Remove group...
➕ Creative Inserts: Insert Thousand Separators / Check Boxes / Radio Buttons / QR Code / Barcode / Multiple Pictures / Discover more in the Insert group...
🔍 Precision Selections: Pinpoint Specific Pages / Tables / Shapes / Heading Paragraphs / Enhance navigation with more Select features...
⭐ Star Enhancements: Navigate to Any Location / Auto-Insert Repetitive Text / Toggle Between Document Windows / 11 Conversion Tools...
🌍 Supports 40+ Languages: Use Kutools in your preferred language – supports English, Spanish, German, French, Chinese, and 40+ others!

Office Tab - Brings Tabbed interface to Office, Make Your Work Much Easier
- Enable tabbed editing and reading in Word, Excel, PowerPoint, Publisher, Access, Visio and Project.
- Open and create multiple documents in new tabs of the same window, rather than in new windows.
- Increases your productivity by 50%, and reduces hundreds of mouse clicks for you every day!
✨ Kutools for Office – One Installation, Five Powerful Tools!
Includes Office Tab Pro · Kutools for Excel · Kutools for Outlook · Kutools for Word · Kutools for PowerPoint
📦 Get all 5 tools in one suite | 🔗 Seamless integration with Microsoft Office | ⚡ Save time and boost productivity instantly
Best Office Productivity Tools
Kutools for Word - 100+ Tools for Word
- 🤖 Kutools AI Features: AI Assistant / Real-Time Assistant / Super Polish / Super Translate / AI Redaction / AI Proofread
- 📘 Document Mastery: Split Pages / Merge Documents / Batch Convert to PDF
- ✏ Contents Editing: Batch Find and Replace / Resize All Pictures
- 🧹 Effortless Clean: Remove Extra Spaces / Remove Section Breaks
- ➕ Creative Inserts: Insert Thousand Separators / Insert Check Boxes / Create QR Codes
- 🌍 Supports 40+ Languages: Kutools speaks your language – 40+ languages supported!