How to insert a horizontal or vertical line in Word
Inserting lines in Microsoft Word can structure content, enhance readability, and improve the overall appearance of your documents. Whether you need a horizontal sweep or a vertical barrier, Word offers multiple methods to incorporate these lines effectively. This article guides you through various techniques to add both horizontal and vertical lines, explaining each method's specific benefits and applications.


Insert a Horizontal Line Across the Word
This guide will present four methods for inserting a horizontal line in Word. Choose the one that best suits your needs to accomplish the task.
- Using Shortcuts: Quickly insert a line with keyboard commands
- Using Borders: Add editable lines through the Borders tool
- Using Shapes: Insert flexible lines with the Shapes feature
- Using Tables: Automatically insert lines by manipulating table borders
Using Shortcuts: Quickly insert a line with keyboard commands
Inserting a horizontal line in Microsoft Word using shortcuts is a quick and efficient way to create visual separators in your documents. This method, part of Word's AutoFormat feature, allows for the instant addition of lines by using simple keyboard commands. Here’s how you can utilize this feature to enhance document readability and structure.
Step-by-Step Guide to Using Shortcuts for Horizontal Lines:
Step 1. Choose the Placement
Place your cursor where you want the horizontal line to appear. This could be between paragraphs, under headings, or anywhere you need a clear division.
Step 2. Use the AutoFormat Shortcut
Type three consecutive hyphens "---".
Press the "Enter" key. Instantly, Word will convert these hyphens into a solid horizontal line that spans the width of your page.


If you prefer different styles of lines, other character sequences can be used:
Three asterisks "***" for a dotted line.

Three underscores "___" for a bold line.

Three equal signs "===" for a double line.

Three tildes "~~~" for a wavy line.

Remove the line inserted by shortcut
The line inserted via shortcut becomes a border for the content above it and cannot be selected or removed directly. To remove such a line, place your cursor at the front of the content below the line and press the "Backspace" key, then the line is removed.
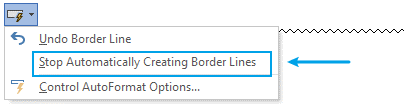
Stop Automatically Creating Border Lines
If you want to stop automatically creating border lines when pressing the "Enter" key after typing three consecutive hyphens (asterisks, underscores…), click the "Auto Format Options" button beside the line, and choose "Stop Automatically Creating Border Lines".
If you do not see the AutoFormat Options button, go to "File" > "Options", select "Proofing" from the left pane, then click the "AutoCorrect Options" button. Under the "AutoFormat As You Type" tab, uncheck "Border lines".

AI for Microsoft Word: Rewrite, Compose, and Summarize
Kutools AI Assistant transforms Microsoft Word writing, providing advanced rewriting and content generation from prompts. Efficiently create reports, emails, and manuscripts, and use its powerful summarization tool to distill lengthy texts into key insights. The assistant also offers interactive features, answering questions and clarifying content, making it essential for improving document quality and enhancing user experience in Word. Free try it now!


Using Borders: Add editable lines through the Borders tool
This tutorial explains two methods to insert editable lines using the Borders tool, each suited for different formatting needs.
Method 1: Adding a Bottom Border
The Bottom Border is primarily used to underline text. To insert a bottom border:
Step 1. Select the paragraph you want to underline with a border
Step 2. Navigate to the Bottom Border
Click "Home" > "Borders" > "Bottom Border".

Now a bottom border is added below the paragraph.

Format the Bottom Border
If you want to change the color or width of the border, go to "Home" > "Borders" > "Borders and Shading". In the popping dialog, specify the "Style", "Color," and "Width", and remember to select Bottom border in the "Preview" section.


Remove Bottom Border
Click the "Border" button to remove it.

Method 2: Adding a Horizontal Line
Inserting a standalone horizontal line involves a slightly different approach:
Step 1. Place your cursor in the blank paragraph where you want the line
If you select a paragraph while inserting a horizontal line, the selected paragraph will be replaced with the line.
Step 2. Apply Horizontal Line
Go to "Home" > "Borders" > "Horizontal Line".
Once inserted, the line behaves like a graphical object rather than a text decoration. It separates sections distinctly.

Format Horizontal Line
Double-click on the line to open the "Format Horizontal Line" dialog, and specify the settings.

Remove Horizontal Line
Click on the line and press "Backspace" or "Delete" key.
Office Tab Brings Tabbed interface to Office, and Make Your Work Much Easier
- Enable tabbed interfaces for editing and reading in Word, Excel, PowerPoint, Publisher, Access, Visio, and Project.
- Open and create multiple documents in new tabs of the same window, rather than in new windows.
- Increases your productivity by 50%, and reduces hundreds of mouse clicks for you every day!

Using Shapes: Insert flexible lines with the Shapes feature
Using shapes to insert horizontal lines in Microsoft Word allows for high customization and flexibility, making it an excellent choice for visually compelling documents. This guide will walk you through the process of using the Shapes tool to add horizontal lines that can be adjusted to fit any design requirement. Step-by-Step Guide to Inserting Lines Using Shapes:
Step 1. Access the Shapes Menu
Click on the "Insert" tab on the ribbon at the top of Word. In the "Illustrations" group, click on "Shapes".

Step 2. Select a Line Shape
From the drop-down menu, choose a line shape under the "Lines" group. The simplest option is the straight line, but you can select any line style that fits your needs.

Step 3. Draw the Line
Click and drag across the point in your document where you want the line to appear. Holding down the "Shift" key while dragging will help you draw a perfectly horizontal line.

You can select the line and drag the handles at either end to make it longer or shorter.
Format the Line
Click on the line, go to the "Shape Format" tab, and select the format you need in the "Shape Styles" group.

Remove the Line
Select the line and press the "Backspace" or "Delete" key.
Using Tables: Automatically insert lines by manipulating table borders
Using tables in Microsoft Word is an innovative way to insert horizontal lines, providing a unique way to integrate seamlessly with structured document formats. This guide will explore how to use table borders to create horizontal lines, perfect for delineating sections in a document or enhancing your layout design. Step-by-Step Process to Insert Lines Using Table Borders:
Step 1. Insert a Table
Navigate to the "Insert" tab on the ribbon and click on "Table". You can select the number of rows and columns based on your needs, but for a simple horizontal line, a one-row, one-column table will suffice.


Step 2. Remove Table Borders
Click the cross button beside the table to select the whole table.
Then click the "Table Design" tab.
Click the "Borders" menu, and choose "No Border".


Step 3. Add Inside Borders
Still, in the "Borders" drop-down menu, click "Inside Borders".

Now when you enter contents and press the "Tab" key to move to the next row of the table, a line is automatically added at the bottom of the content.


Format the Table Borders
Select the cross button to select the table, then go to the "Table Design" tab, and navigate to the "Borders" group to format them.

Remove the Table Borders
Select the cross button to select the table, then go to the "Table Design" tab, and navigate to "Borders" > "No Borders".
Insert a Vertical Line in Word
Vertical lines in Microsoft Word can serve a variety of purposes, from visually dividing sections of text to enhancing the overall layout of a document. This article will guide you through several methods to insert a vertical line in Word, ensuring you can choose the most appropriate one for your needs.
- Using Shapes: Draw precise lines with the Shapes tool
- Using Borders: Create vertical lines by customizing cell borders
- Using Line between Option: Insert vertical lines to separate columns
- Using the Pipe Character: Employ the "|" character for simple line insertion
Recommended Productivity Tools for Word
Kutools for Word: Integrating AI 🤖, over 100 advanced features save 50% of your document handling time.Free Download
Office Tab: Introduces the browser-like tabs to Word (and other Office tools), simplifying multi-document navigation.Free Download
Using Shapes: Draw precise lines with the Shapes tool
Adding vertical lines in Microsoft Word can enhance document structure and improve readability. Among various methods available, using the Shapes tool is one of the most effective ways to insert precise and customizable vertical lines.
Step 1. Access the Shapes Menu
Click on the "Insert" tab on the ribbon at the top of Word. In the "Illustrations" group, click on "Shapes".

Step 2. Select a Line Shape
From the drop-down menu, choose a line shape under the "Lines" group. The simplest option is the straight line, but you can select any line style that fits your needs.

Step 3. Draw the Line
Click and drag across the point in your document where you want the line to appear. Holding down the "Shift" key while dragging will help you draw a perfectly vertical line.

You can select the line and drag the handles at either end to make it longer or shorter.
Format the Line
Click on the line, go to the "Shape Format" tab, and select the format you need in the "Shape Styles" group.

Remove the Line
Select the line and press the "Backspace" or "Delete" key.
Using Borders: Create vertical lines on the most-left or most-right side
If you want to insert a vertical line in the front or the end of a paragraph, the Borders feature will be a good helper.
Step-by-Step Guide to Using Borders for Vertical Lines:
Step 1. Select the paragraph you want to underline with a border
Step 2. Navigate to the Left Border or Right Border
Click "Home" > "Borders" > "Left Border" or "Right Border".

Now a left border or right border is added to the paragraph.

Format the Bottom Border
If you want to change the color or width of the border, go to "Home" > "Borders" > "Borders and Shading", in the popping dialog, specify the "Style", "Color", and "Width", and remember to select Left border or Right border in the "Preview" section.


Remove Bottom Border
Click the "Border" button to remove it.

Using Line between Option: Insert vertical lines to separate columns
If you want to add lines between columns in Word, there is an option that can quickly help you.
Step 1. Place the cursor on the columns that you want to add vertical lines
Step 2. Navigate to the Layout tab, click Columns > More Columns

Step 3. Tick the Line between option in the Columns dialog and click OK

Now several vertical lines are inserted to separate the columns.

Remove the lines between columns
Place the cursor on the columns, go to the "Columns" dialog again, and untick the "Line between" option.
Using the Pipe Character: Employ the "|" character for simple line insertion
Sometimes, you may only want to insert a short vertical line like a separator between characters or words, you can use the pipe character.
Step 1. Place the cursor on where you want to insert a vertical line
Step 2. Hold the Shift key and type "|"

Then a pipe character is inserted.

Remove the pipe character
If you just want to remove one pipe character, select it and press the "Delete" key.
If you want to remove all pipe characters, select the range you want to remove pipe characters from, then press the "Ctrl" + "H" key to enable the "Find and Replace" dialog, then type a pipe character in the "Find what" textbox, leave empty in the "Replace with" textbox, click "Replace All".


Each method offers different advantages, depending on the complexity of your document's layout and the level of precision you require. Whether you're creating newsletters, resumes, or detailed reports, adding vertical lines can significantly boost the readability and aesthetic appeal of your documents.
For additional transformative Word strategies that can significantly enhance your data management, explore further here.
Best Office Productivity Tools
Kutools for Word - Elevate Your Word Experience
🤖 Kutools AI Features: AI Assistant / Real-Time Assistant / Super Polish (Preserve Format) / Super Translate (Preserve Format) / AI Redaction / AI Proofread...
📘 Document Mastery: Split Pages / Merge Documents / Export Selection in Various Formats (PDF/TXT/DOC/HTML...) / Batch Convert to PDF...
✏ Contents Editing: Batch Find and Replace across Multiple Files / Resize All Pictures / Transpose Table Rows and Columns / Convert Table to Text...
🧹 Effortless Clean: Sweap away Extra Spaces / Section Breaks / Text Boxes / Hyperlinks / For more removing tools, head to the Remove group...
➕ Creative Inserts: Insert Thousand Separators / Check Boxes / Radio Buttons / QR Code / Barcode / Multiple Pictures / Discover more in the Insert group...
🔍 Precision Selections: Pinpoint Specific Pages / Tables / Shapes / Heading Paragraphs / Enhance navigation with more Select features...
⭐ Star Enhancements: Navigate to Any Location / Auto-Insert Repetitive Text / Toggle Between Document Windows / 11 Conversion Tools...
🌍 Supports 40+ Languages: Use Kutools in your preferred language – supports English, Spanish, German, French, Chinese, and 40+ others!

Office Tab - Tabs for Office, Power for You
- Enable tabbed editing and reading in Word, Excel, PowerPoint, Publisher, Access, Visio and Project.
- Open and create multiple documents in new tabs of the same window, rather than in new windows.
- Increases your productivity by 50%, and reduces hundreds of mouse clicks for you every day!

✨ Kutools for Office – One Installation, Five Powerful Tools!
Includes Office Tab Pro · Kutools for Excel · Kutools for Outlook · Kutools for Word · Kutools for PowerPoint
📦 Get all 5 tools in one suite | 🔗 Seamless integration with Microsoft Office | ⚡ Save time and boost productivity instantly
Best Office Productivity Tools
Kutools for Word - 100+ Tools for Word
- 🤖 Kutools AI Features: AI Assistant / Real-Time Assistant / Super Polish / Super Translate / AI Redaction / AI Proofread
- 📘 Document Mastery: Split Pages / Merge Documents / Batch Convert to PDF
- ✏ Contents Editing: Batch Find and Replace / Resize All Pictures
- 🧹 Effortless Clean: Remove Extra Spaces / Remove Section Breaks
- ➕ Creative Inserts: Insert Thousand Separators / Insert Check Boxes / Create QR Codes
- 🌍 Supports 40+ Languages: Kutools speaks your language – 40+ languages supported!