Quickly insert current date and time in Word – (Easy tricks)
When creating and managing documents in Microsoft Word, the ability to insert the current date and time is particularly important. This feature not only ensures the accuracy of the records and the authenticity of the documents but also, with an auto-updating timestamp, reflects the most current information every time the document is opened or printed. The following guide will detail how to insert the current date and time, created date, and last saved date… in Word documents.
Insert current date and time in Word document
Whether you are working on business documents, personal letters, or academic papers, understanding how to automatically insert and update the date and time can enhance your productivity and ensure your documents are up-to-date. This section will guide you through several methods to insert the current date and time in Word, including keyboard shortcuts, using the ribbon, and formula field.
Insert current date and time by using shortcut keys
For those who prefer keyboard shortcuts for speed and convenience, Microsoft Word provides quick key combinations. The following shortcuts for inserting the date or time create dynamic fields that update automatically whenever the document is reopened.
● To insert the current date:
Press Alt + Shift + D keys. (Press the Alt key and the Shift key simultaneously, and then press the D key.)To update the date manually, click Update or press F9 key.
● To insert the current time:
Press Alt + Shift + T keys. (Press the Alt key and the Shift key simultaneously, and then press the T key.)To update the time, select the field and press F9 key.
Insert current date and time by using Date & time option
If you prefer using the graphical interface, the ribbon in Word offers an easy way to insert the date and time.
- Place your cursor where you want to insert the date or time.
- Go to the Insert tab on the ribbon. And then in the Text group, click on Date & Time, see screenshot:

- In the Date and Time dialog box:
- Select the desired date and time format from the Available format list box. (You can choose from a variety of formats, including those that display the date, the time, or both.)
- Check the Update automatically check box as you need. (When not selected, the date is inserted as static text and does not change. If selected, the date or time becomes a dynamic field that automatically updates to the current date or time each time the document is opened.)
- Then, click OK button.


Now, the date and time will be inserted in the location you specified.
Insert current date and time by using a formula field
For advanced users who require dynamic date or time based on specific conditions or need to perform calculations, using formula fields is ideal.
- Place your cursor where you want the date or time to appear.
- Press Ctrl + F9 to insert a pair of curley brackets, which is necessary for entering formula fields. You will see { } appear, indicating that you are in a field code. See screenshot:

- Inside the curly brackets, type the following codes you need:
- To insert the current date:
DATE \@ "dd-MMM-yyyy" - To insert the current time:
TIME \@ "hh:mm:ss" - To insert the current date and time:
DATE \@ "dd-MMM-yyyy hh:mm:ss am/pm"
- To insert the current date:
- Once you’ve entered the code, press F9 key to update the field and display the date or time.


- The formula field method provides enhanced flexibility. In the formula described earlier, "MMM" stands for the full name of the month, "dd" indicates the day of the month, and "yyyy" denotes the year in a four-digit format. You can modify date format to suit your need.
- The date or time generated using formula fields is dynamic. To update it, simply select the date or time displayed, and press the F9 key to refresh it.
Insert current date and time in header or footer
Another method is to add the current date to the header or footer of your Word document. This ensures that the date is displayed on every page, whether at the top or the bottom. Here are the steps to successfully insert the current date into the header or footer of your document:
- Open your Word document where you want to insert the current date or time into the header or footer.
- Navigate to the Insert tab on the Ribbon. Click on Header or Footer, then select Edit Header or Edit Footer, see screenshot:

- With the header or footer section open, position your cursor where you want the date or time to appear. Under the Header & Footer tab, click Date & Time, see screenshot:

- In the Date and Time dialog box:
- Select a format that suits your document’s needs. (You can choose from a variety of formats, including those that display the date, the time, or both.)
- Check the Update Automatically box as you need. (When not selected, the date is inserted as static text and does not change. If selected, the date or time becomes a dynamic field that automatically updates to the current date or time each time the document is opened.)
- At last, click OK button.

- After inserting and formatting the date and time, double-click outside the header or footer area to close it.


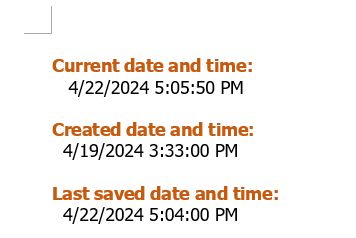
Insert a specific type of date field (Create date, Save date, Print date)
Incorporating specific date fields like the creation date, save date, and print date into your Word documents can significantly improve document management by providing clear, automatic updates on document history. This section will provide a comprehensive overview of how to insert these specific date fields into your Word documents.
- Place your cursor where you want to insert the date. Go to the Insert tab on the Ribbon, then click on Quick Parts > Field. See screenshot:

- In the Field dialog box, please do the following operations:
- In the Categories drop down, select Date and Time option.
- In the Field name list box, choose the type to date you want to insert.
- Then, choose the desired date format from the Date formats options.
- At last, click OK Button.

- The specific type of date will be inserted at once.
- Create Date: Insert the date the document was originally created.
- Save Date: Insert the date the document was last saved. The date updates each time when the document is saved.
- Print Date: Insert the date the document was printed. This date updates each time the document is printed.


This guide has explored various methods to insert dynamic and static date and time stamps, ranging from quick keyboard shortcuts and the ribbon interface to more sophisticated formula fields and specialized date fields like creation, save, and print dates. Each method serves different needs, from simple date stamps in personal letters to complex timestamp requirements in business documents and academic papers. To explore more tips and tricks for Microsoft Word, please click here to view additional options.
Transform Your Documents into Digital Portals with Kutools for Word
Streamlining document creation and adding a layer of digital interaction has never been easier with Kutools for Word. The QR Code feature of Kutools enables users to insert customizable QR codes into any part of a Word document effortlessly. Ideal for connecting your readers directly to websites, special offers, and more, this tool enhances your document's utility and interactivity. Don’t just share information; make it a portal to the wider world. Embrace the simplicity of Kutools for Word and elevate your professional documents today.
Related Articles:
- Insert line between columns in Word
- In a Word document, we can quickly set the text content into multiple columns, but sometimes, you may want to insert vertical line between the columns to make the content look neater as following screenshot shown. How could you finish this job in Word document?
- Insert multiple pictures with same size in Word
- Normally, you can insert multiple images at once in a Word document with their original size. Sometimes, you need to arrange these images to the same size when inserting. This article, I will talk about how to insert multiple pictures with the same size in a Word document.
- Insert or put a line over text in Word
- In Word document, we can quickly and easily insert an underline to a word or sentence, but, have you ever tried to insert a line over or above texts? This article, I will talk about how to put a bar or line over texts in Word document.
- Insert color coded drop down list in Word table
- Supposing, I have a table in my Word document, and now, I want to insert color coded drop down list in a column of the table. It means when I select one option from the drop down, the cell color becomes red, and when I select another option in the drop down, the cell color becomes green as following screenshot shown. How could you solve this job in Word document?
Best Office Productivity Tools
Kutools for Word - Elevate Your Word Experience
🤖 Kutools AI Features: AI Assistant / Real-Time Assistant / Super Polish (Preserve Format) / Super Translate (Preserve Format) / AI Redaction / AI Proofread...
📘 Document Mastery: Split Pages / Merge Documents / Export Selection in Various Formats (PDF/TXT/DOC/HTML...) / Batch Convert to PDF...
✏ Contents Editing: Batch Find and Replace across Multiple Files / Resize All Pictures / Transpose Table Rows and Columns / Convert Table to Text...
🧹 Effortless Clean: Sweap away Extra Spaces / Section Breaks / Text Boxes / Hyperlinks / For more removing tools, head to the Remove group...
➕ Creative Inserts: Insert Thousand Separators / Check Boxes / Radio Buttons / QR Code / Barcode / Multiple Pictures / Discover more in the Insert group...
🔍 Precision Selections: Pinpoint Specific Pages / Tables / Shapes / Heading Paragraphs / Enhance navigation with more Select features...
⭐ Star Enhancements: Navigate to Any Location / Auto-Insert Repetitive Text / Toggle Between Document Windows / 11 Conversion Tools...
🌍 Supports 40+ Languages: Use Kutools in your preferred language – supports English, Spanish, German, French, Chinese, and 40+ others!

Office Tab - Tabs for Office, Power for You
- Enable tabbed editing and reading in Word, Excel, PowerPoint, Publisher, Access, Visio and Project.
- Open and create multiple documents in new tabs of the same window, rather than in new windows.
- Increases your productivity by 50%, and reduces hundreds of mouse clicks for you every day!

✨ Kutools for Office – One Installation, Five Powerful Tools!
Includes Office Tab Pro · Kutools for Excel · Kutools for Outlook · Kutools for Word · Kutools for PowerPoint
📦 Get all 5 tools in one suite | 🔗 Seamless integration with Microsoft Office | ⚡ Save time and boost productivity instantly
Best Office Productivity Tools
Kutools for Word - 100+ Tools for Word
- 🤖 Kutools AI Features: AI Assistant / Real-Time Assistant / Super Polish / Super Translate / AI Redaction / AI Proofread
- 📘 Document Mastery: Split Pages / Merge Documents / Batch Convert to PDF
- ✏ Contents Editing: Batch Find and Replace / Resize All Pictures
- 🧹 Effortless Clean: Remove Extra Spaces / Remove Section Breaks
- ➕ Creative Inserts: Insert Thousand Separators / Insert Check Boxes / Create QR Codes
- 🌍 Supports 40+ Languages: Kutools speaks your language – 40+ languages supported!
Table of contents
- Video
- Insert current date and time in Word document
- By using shortcut keys
- By using Date & time option
- By using a formula field
- Insert current date and time in header or footer
- Insert a specific type of date field (Create date, Save date, Print date)
- Related Articles
- The Best Office Productivity Tools
- Comments