Change Inbox view
This tutorial is talking about changing folder (the Inbox folder) view in Outlook, including switching folder views between the auto preset folder views, customizing folder views (says adding columns, sorting, filtering, grouping, conditional formatting, etc.), and resetting folder views as well.
Table of Content
- 1. Change current folder view
- 1.1 Compact view
- 1.2 Single view
- 1.3 Preview view
- 2. Customize current view - add columns
- 3. Customize current view - arrange and group emails
- 4. Customize current view - sort emails
- 5. Customize current view - filter emails
- 6. Customize current view - other settings
- 7. Customize current view - conditional formatting
- 8. Customize current view - format columns
- 9. Reset Current View
Note: Methods introduced on this page apply to Microsoft Outlook 2019 desktop program in Windows 10. And the instructions may vary significantly or slightly depending on the version of Microsoft Outlook and the Windows environments.
1. Change current folder view
By default, the Inbox is displayed in the compact view in Outlook. There are three other preset views you can easily change to: Single and Preview. This tutorial will introduce these preset views, and show you how to display the Inbox folder in other preset views.
1.1 Compact view
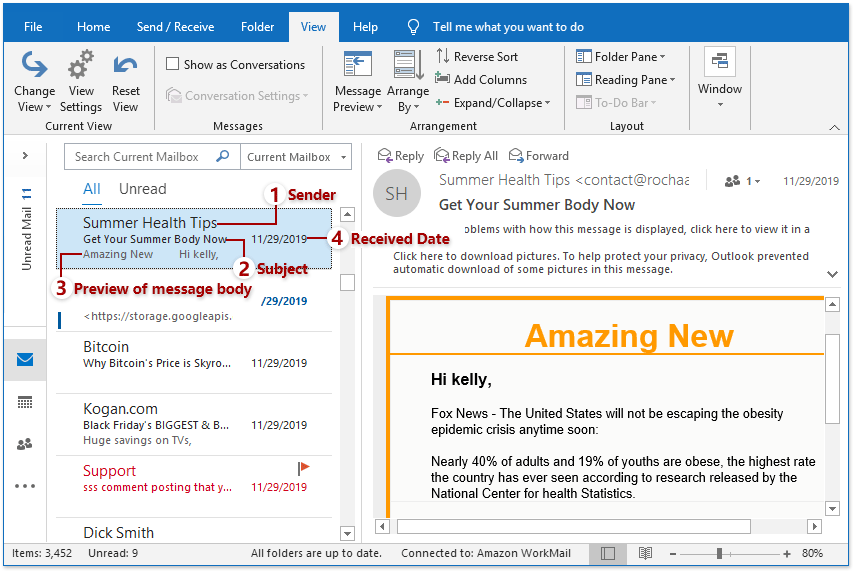
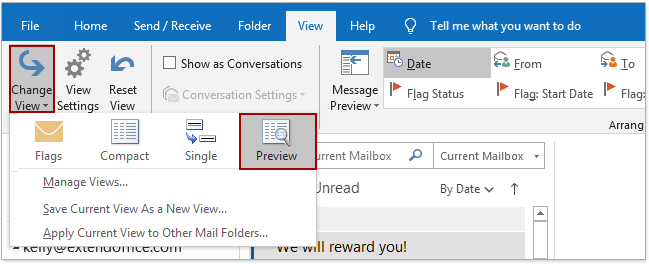
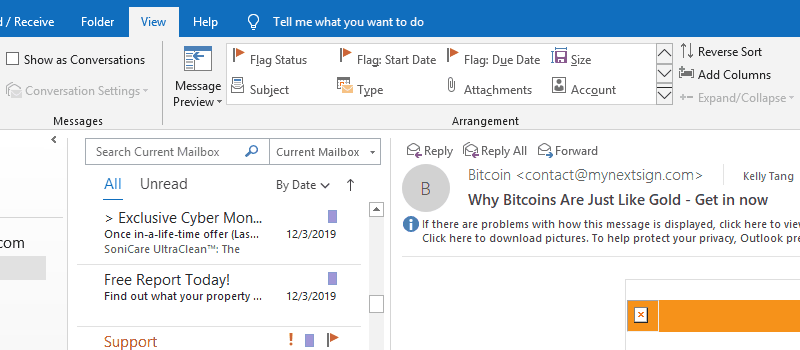
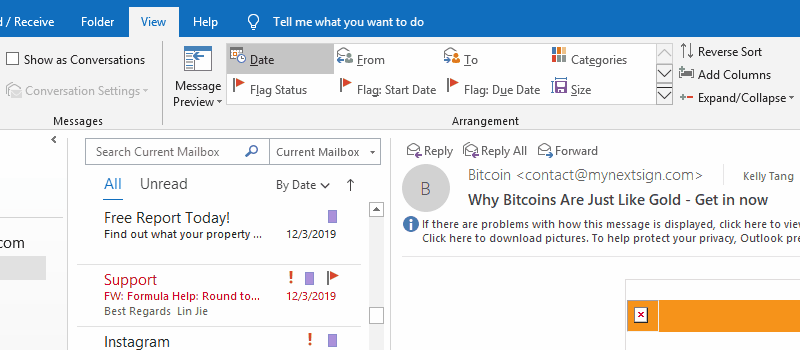
The Inbox folder is opening in the compact view by default. If the Inbox folder does not display in the compact view, you can click "View" > "Change View" > "Compact" to shift to this view.
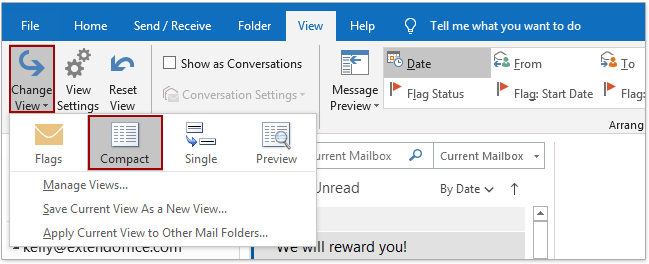
The compact view contains the message list and reading pane, and it changes the layout of the message list mainly.
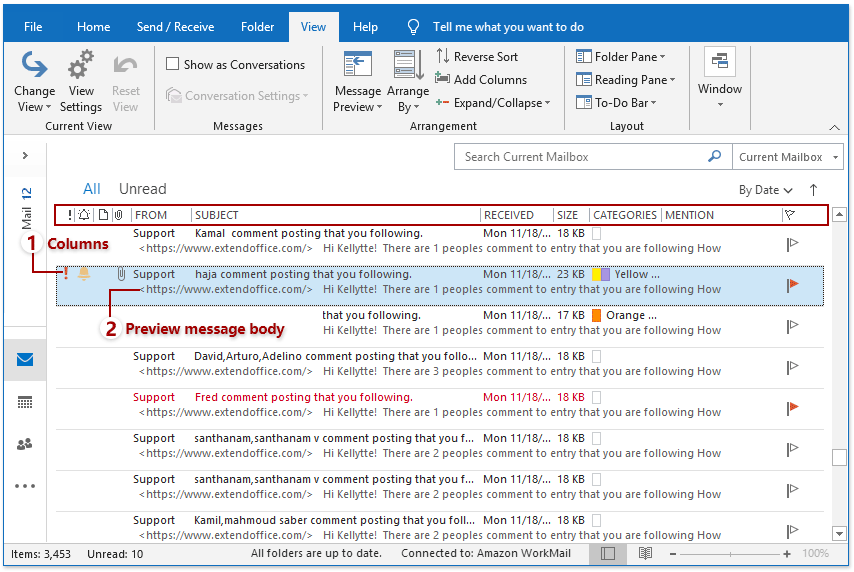
In the message list, you will see every email display in three lines:
(1) The first line shows the sender of the email;
(2) The second line indicates the subject and received date of the email;
(3) And you can preview the message body of the email in the third line. The wider the message list is, the longer content you can preview.
Notes:
(1) If the Outlook interface is too narrow, it will hide the message list automatically and display only the reading pane.
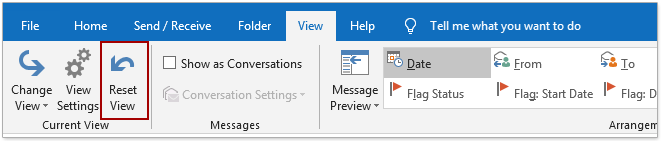
(2) If you modify the compact view, such as adding columns or changing the arrangement style, you can quickly restore the default compact view by clicking "View" > "Reset View".
1.2 Single view
After opening the Inbox folder, you can display it in the single view by clicking "View" > "Change View" > "Single".
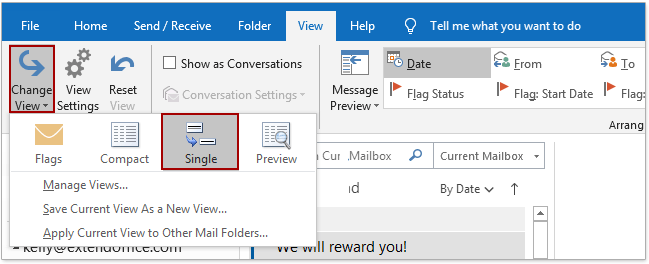
The single view also contains the message list and reading pane. In the single view, you will get more information about an email from the message list. This view is a good choice in wide screen mode.
In the message list, every email displays in two lines:
(1) The first line shows all kinds of information of an email via columns, including importance status, reminders, attachments, sender, subject, received date, etc. No matter how many columns you have added, they will display in the message list.
(2) The second line displays the message body of the email. The wider the message list, the more content you can preview.
Notes:
(1) The single view works well with a wide screen. If the Outlook interface is too narrow, it will hide the message list automatically and display only the reading pane.
(2) If you have changed the view settings in the single view, such as changing the sort order, filter, or arrangement styles, you can click "View" > "Reset View" to restore the default single view.
1.3 Preview view
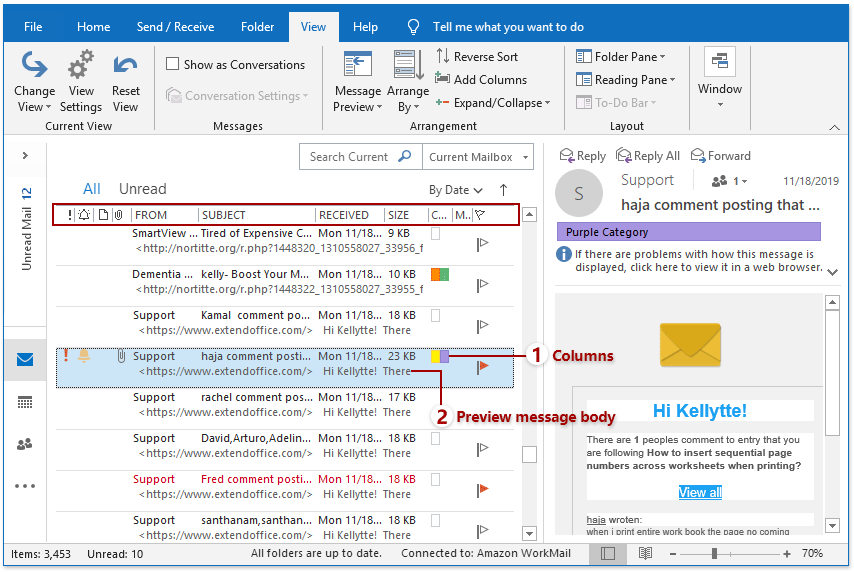
After opening the Inbox folder, you can change its view to preview by clicking "View" > "Change View" > "Preview".
The preview view is similar to the single view, except it turns off the reading pane. It displays the message list in a wide mode.
In the wide message list, every email contains two lines:
(1) The first line shows every field of an email in a column, such as from, subject, received, size, flag, etc. No matter how many columns you have added in this view, they will display in the message list.
(2) You can preview the message body of an email in the second line.
Notes:
(1) The preview view is fit for a wide screen. If you narrow the Outlook interface, the preview view will automatically change to the compact view without the reading pane.
(2) If you have changed the view settings in the preview view, such as changing the sort order, filter, or arrangement styles, you can click "View" > "Reset View" to restore the default preview view.
2. Customize current view - add columns
You can easily change the Inbox folder to the preset views: compact, single, and preview. However, if these preset views can’t meet your needs, you can customize the current view. This tutorial will show you how to add or remove columns from the current view.
2.1 Add a column in the current view
For example, if you want to add the "Cc" column in the current view, you can do as follows:
1. Open the specified mail folder (the Inbox folder in this case), and click "View" > "Add Columns".

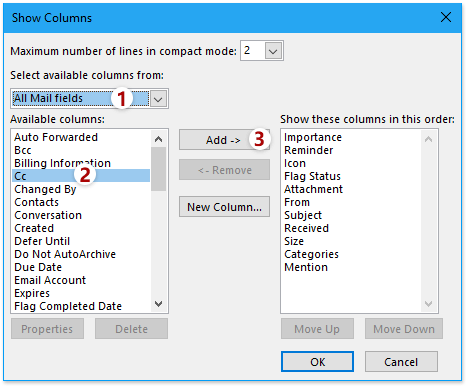
2. In the Show Columns dialog, please do as follows:
(1) Select the specified category containing the column from the "Select available columns from" drop-down list. In this case, choose "All Mail fields".
(2) In the "Available columns" list box, click to select the specified column you will add. In this case, select "Cc".
(3) Click the "Add" button.
3. Now the "Cc" column is added to the right list box. Please click to select "Cc" in the right list box, and click the "Move Up" button to move it to the proper position.
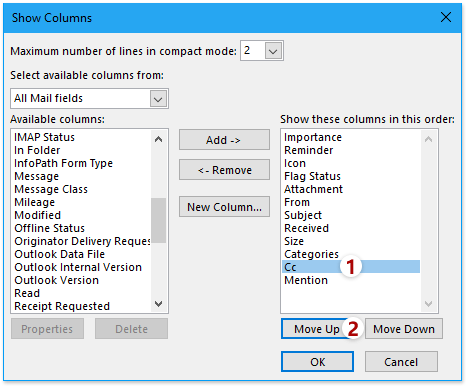
4. Click the "OK" button.
So far, the "Cc" column has been added to the current mail folder. See screenshot:
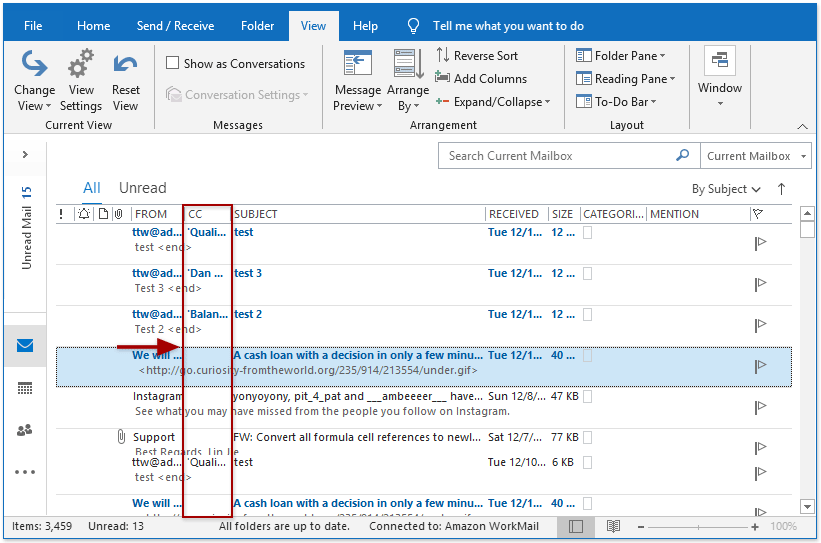
Notes:
(1) If the specified folder is in the compact view, you may not see the added column until turning off the reading pane or moving it to the bottom. You can click "View" > "Reading Pane" > "Off" or "Bottom" to adjust the reading pane.
(2) You can click "View" > "Reset View" to restore the default view settings.
2.2 Remove a column from the current view
There are several methods to remove a column from the current view.
2.2.1 Remove a column from the current view
Supposing the Inbox folder is displaying in the preview view at present, and you want to remove the "Subject" column from this view, you can do as follows:
1. Click "View" > "Add Columns" to open the Show Columns dialog.
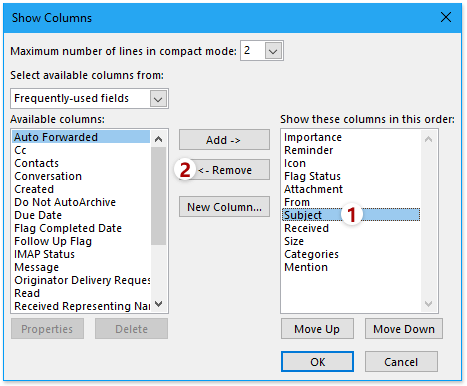
2. In the Show Columns dialog, click to select the column you want to remove in the "Show these columns in this order" list box, and click the "Remove" button.
3. Click the "OK" button.
Now the specified "Subject" column is removed from the current view.
2.2.2 Remove a column from the current view with right-clicking menu
If the Inbox folder is in the single view or preview view, you can remove a column from the view with the right-clicking menu easily.
In the message list, right-click the specified column header that you want to remove, and select "Remove This Column" from the right-clicking menu.
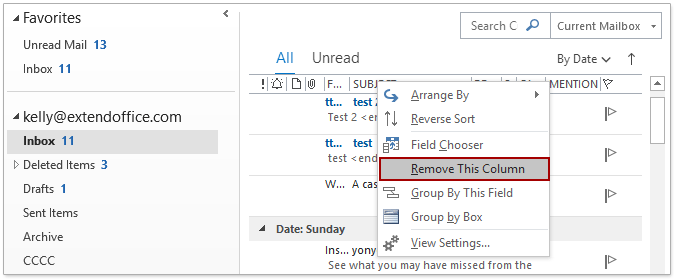
Now the specified column is removed from the current view at once.
Note: If the specified folder is in the compact view, you cannot right-click a column header until you turn off the reading pane or move it to the bottom. You can click "View" > "Reading Pane" > "Off" or "Bottom" to adjust the reading pane.
2.2.3 Remove a column from the current view with dragging and dropping
If the Inbox folder is in the single view or preview view, you can also easily remove a column with dragging and dropping.
At the top of the message list, click the specified column header that you want to remove, drag it and drop it out of the message list. Then the specified column is removed from the current view immediately.
Note: If the specified folder is in the compact view, you cannot drag a column header until you turn off the reading pane or move it to the bottom. You can click "View" > "Reading Pane" > "Off" or "Bottom" to adjust the reading pane.
3. Customize current view - arrange and group emails
If you have not customized the Inbox folder view or reset to the default view, the emails are grouped and sorted by the received date and time automatically in the message list. Here, this tutorial will show you the way to arrange or group emails by different criterion.
3.1 Quick arrange (group and sort) emails
You can quickly arrange emails (group and sort emails simultaneously) by the arrangement commands in the Ribbon and in the message list easily.
1. After opening the Inbox folder, please click "More" icon ![]() at the bottom-right corner of the "Arrangement" box on the "View" tab, and then click "Show in Groups" to enable this option.
at the bottom-right corner of the "Arrangement" box on the "View" tab, and then click "Show in Groups" to enable this option.
Tips: By default, this option is enabled. You’d better check whether it has been enabled before below operations.
2. Then you can quickly arrange emails with clicking the criteria in the "Arrangement" box on the "View" tab. 
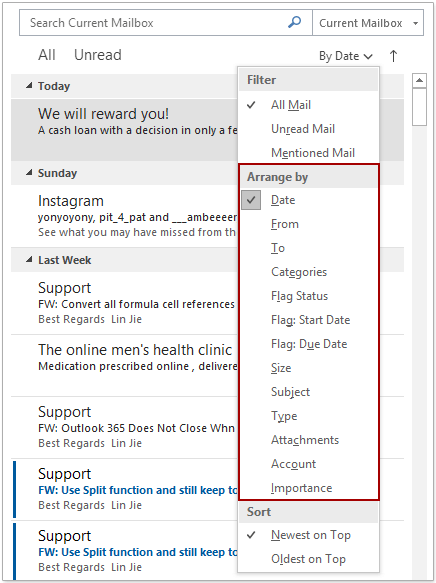
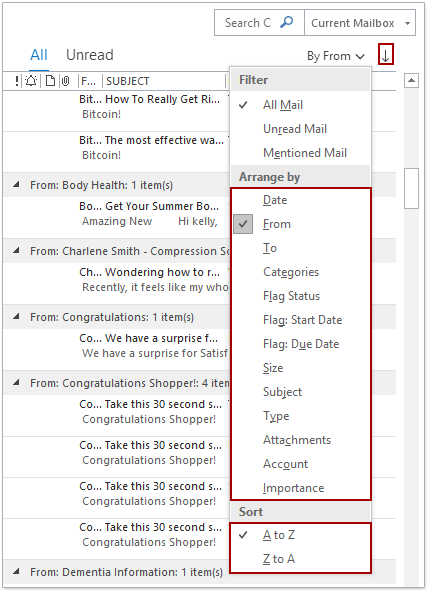
You can also quickly arrange emails in the message list with clicking ![]() at the top of the message list, and then select an arrange criteria in the "Arrange by" section in the drop-down list. See screenshot:
at the top of the message list, and then select an arrange criteria in the "Arrange by" section in the drop-down list. See screenshot:
3.2 Group emails with View Settings
You can also configure the view settings, and then group emails by one or more criteria easily in the current view.
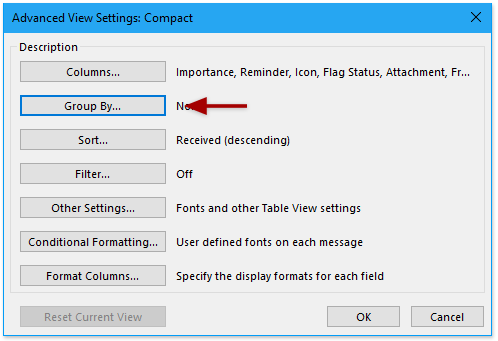
1. After opening the Inbox folder, please click "View" > "View Settings".

2. In the opening dialog, please click the "Group By" button.
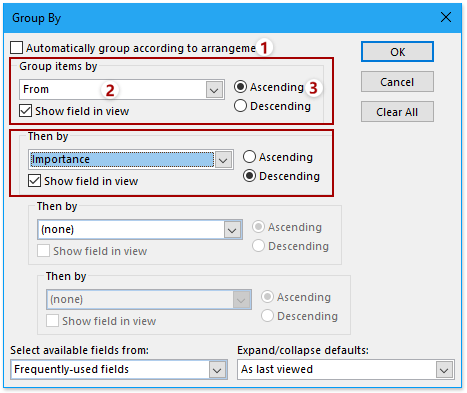
3. In the popping out Group By dialog box, please do as follows:
(1) Untick the "Automatically group according to arrangement" option;
(2) In the "Group items by" section, please select the criteria that you will group emails based on from the drop-down list;
(3) Please select and check the sort order as you need. In this case, I check "Ascending".
Tips:
(1) If you cannot find the specified group criteria in above step (2), you can change the field category from the "Select available fields from" drop-down list, and then select group criteria in the "Group items by" drop-down list again.
(2) If you need to group emails by multiple criteria, please go ahead to specify the group criteria and sort order in below "Then by" sections as much as you need.
4. Click the "OK" > "OK" successively.
Now the emails are grouped by the specified criteria in the message list.
3.3 Notes
(1) If you need to clear the customized group and group items by date again, please click "View" > "Date" in the "Arrangement" box on the Ribbon or ![]() > "Date" at the top of the message list.
> "Date" at the top of the message list.
(2) If you need to clear the customized view settings from the current view, please click "View" > "Reset View" on the Ribbon.
4. Customize current view - sort emails
After opening the Inbox mail folder, you will see the emails are automatically grouped and sorted by received date in the message list. In some cases, you may want to sort emails with one or more criteria. Here, this tutorial will show you the solution to sort emails in the message list.
4.1 Quick sort emails by arrangement commands
You can quickly sort emails by clicking commands in the "Arrangement" box in the "View" tab on the Ribbon.
1. For example, you want to sort emails by sender, you need to click the "More" icon ![]() at the bottom-right corner of the "Arrangement" box on the "View" tab, and then click "Show in Groups" to disable it.
at the bottom-right corner of the "Arrangement" box on the "View" tab, and then click "Show in Groups" to disable it.
2. Then click "From" in the "Arrangement" box to sort emails by sender, and click "Reverse Sort" to reverse the current sort order as you need.

Tips: You can also click the arrow ![]() at the top of the message list, and then specify sorting criteria in the "Arrange by" section of the drop-down list to sort emails in the message list. And click "A to Z" or "Z to A" in the drop-down list or
at the top of the message list, and then specify sorting criteria in the "Arrange by" section of the drop-down list to sort emails in the message list. And click "A to Z" or "Z to A" in the drop-down list or ![]() at the top of the message list to reverse the sort order.
at the top of the message list to reverse the sort order.
4.2 Quick sort emails by clicking column header
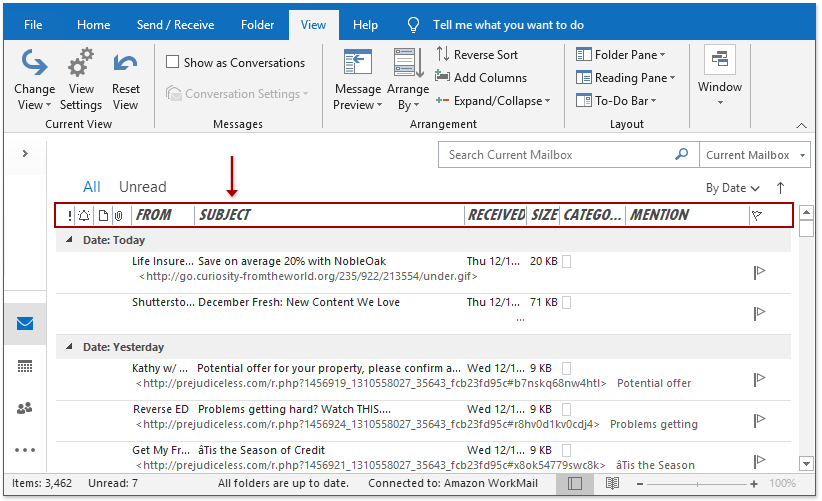
If the columns are displaying in the view, you can click a certain column header to quickly sort all emails by the field at ease.
Tips:
(1) If the Inbox folder is in the compact view, you can click "View" > "Reading Pane" > "Off" or "Bottom" to display all columns.
(2) If the Outlook interface is too narrow to display all columns, columns will disappear.
4.3 Sort emails by configuring view settings
You can configure the view settings and sort emails by one or multiple criteria as you need.
1. After opening the Inbox folder, please click "View" > "View Settings".
2. In the Advanced View Settings dialog, please click the "Sort" button.
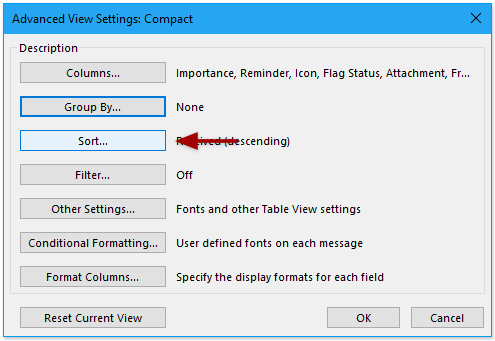
3. In the popping out Sort dialog, in the "Sort items by" section, select the primary sort criteria from the drop-down list, and check the proper sort order as you need.
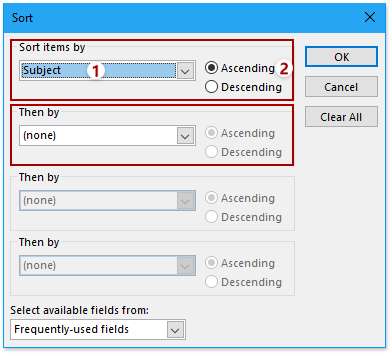
Tips:
(1) If you need to add secondary sort criteria, please go to the first "Then by" section, select the secondary sort criteria and sort order. So does the third and the fourth sort criteria.
(2) If you cannot find out the proper sort criteria from the drop-down list, you can change the field category from the "Select available fields from" drop-down list, and then specify the sort criteria.
4. Click the "OK" buttons successively to save the view settings.
Now all emails are sorted by the specified sort criteria in the message list.
4.4 Notes
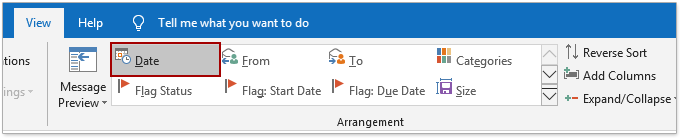
1. You can click "Date" in the "Arrangement" box in the "View" tab on the Ribbon to clear the customized sorting and restore the original sorting.
2. You can clear all customized view settings from the current view with clicking "View" > "Reset View".

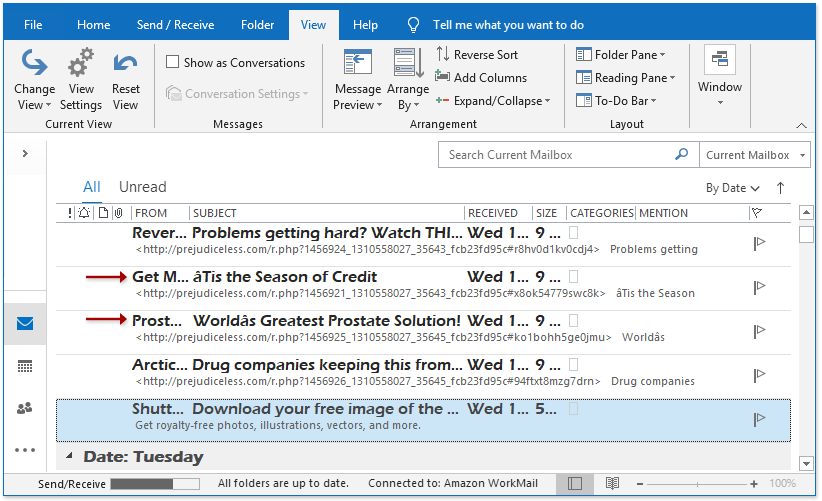
5. Customize current view - filter emails
Normally when you display the Inbox folder in the preset compact view, single view, or preview view, all emails are listed in the message list. In fact, you can filter emails and display emails meeting criteria only in the message list.
5.1 Quick filter unread emails
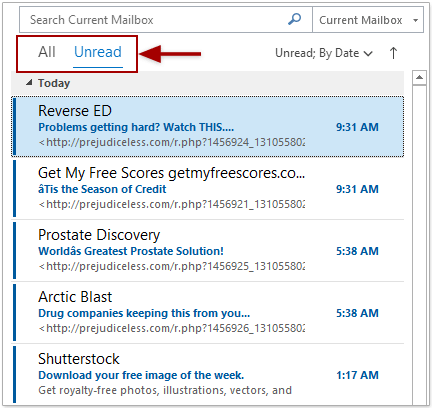
After opening the Inbox folder, you can click "Unread" at the top of the message list to filter out all unread emails immediately. And clear the filter by clicking "All" at the top of the message list.
You can also click the arrow ![]() at the top of the message list to activate the drop-down menu, and then click "Unread Mail" or "Mentioned Mail" from the drop-down menu to filter unread or mentioned emails, and click "All Mail" from the drop-down menu to clear the filter.
at the top of the message list to activate the drop-down menu, and then click "Unread Mail" or "Mentioned Mail" from the drop-down menu to filter unread or mentioned emails, and click "All Mail" from the drop-down menu to clear the filter.

5.2 Filter emails by configuring view settings
You can change the view settings to filter emails by specified criteria easily. Please do as follows:
1. After opening the Inbox folder, please click "View" > "View Settings".

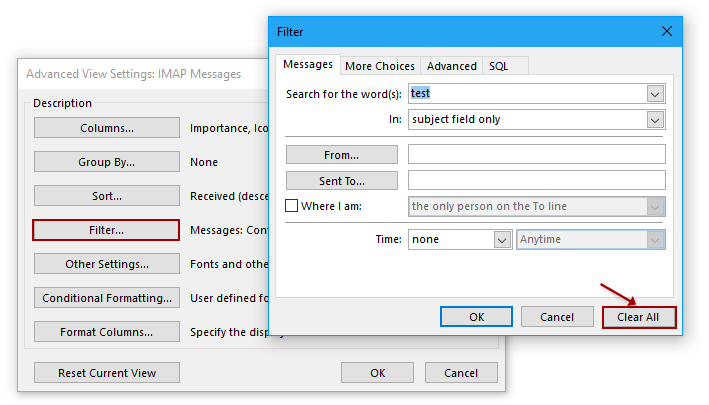
2. In the Advanced View Settings dialog, please click the "Filter" button.
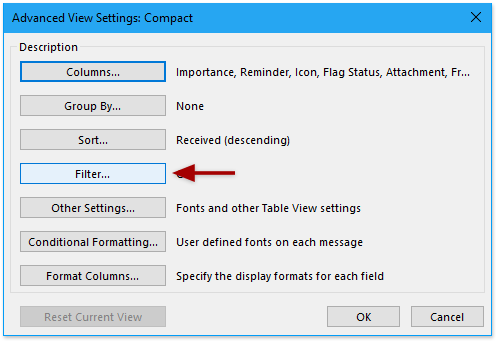
3. In the Filter dialog, you can add one or more filter criteria as you need.
(1) Under the Messages tab, you can add the following filter criteria:
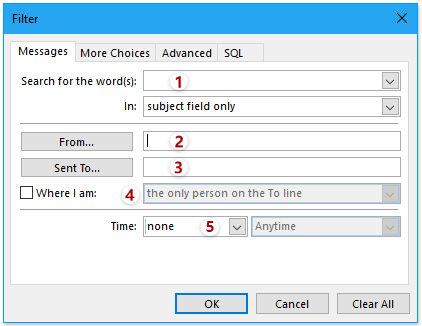
- "Search for the word(s)": filter emails by the specified keywords in the subject or message body;
- "From": filter emails by sender;
- "Send To": filter emails by recipients;
- "Where I am": filter emails that were sent to me only, filter emails that were Cc to multiple people including me, or filter emails that were sent to multiple people including me;
- "Time": filter emails by received time, sent time, due time, expiration time, created time, or modified time.
(2) Under the More Choices tab, you can add the following filter criteria:
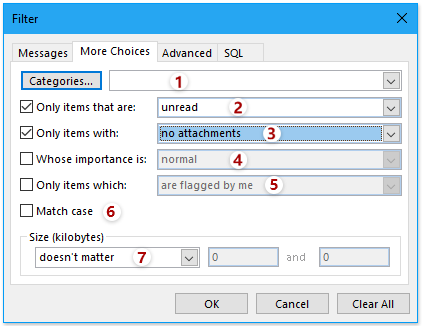
- "Categories": filter emails by one or multiple categories;
- "Only items that are": filter unread or read emails;
- "Only items with": filter emails with or without attachments;
- "Whose importance is": filter emails by importance status;
- "Only items which": filter emails by flag status;
- "Match case": filter emails with case sensitivity;
- "Size": filter emails by message size.
(3) Under the Advanced tab, you can add multiple custom filter criteria as you need.
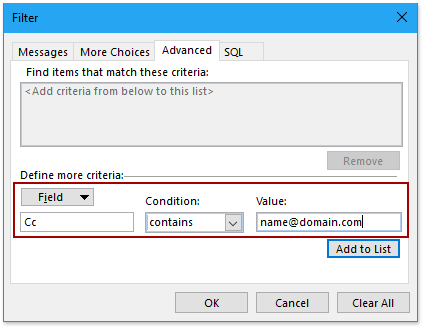
For example, if you want to filter emails by Cc recipient, you can specify the filter criteria as "Cc contains specified email address" in the "Define more criteria" section, and click the "Add to List" button to add this custom filter criterion to the "Find items that match these criteria" list box.
You can add as many filter criteria as you need here, and the logic relationship between these criteria is "AND".
4. Click the "OK" buttons successively to save the filter settings.
Now you will see the emails are filtered, and only emails meeting all specified filter criteria are listed in the message list.
Tip: If you filter emails by changing the view settings, you can clear the filter as follows: (1) Click "View" > "View Settings"; (2) In the Advanced View Settings dialog, click the "Filter" button; (3) In the Filter dialog, click the "Clear All" button first, and then click the "OK" button; (4) Finally, click the "OK" button to close the Advanced View Settings dialog.
5.3 Notes
You can clear all custom view settings and restore the default view by clicking "View" > "Reset View" easily.

6. Customize current view - other settings
After opening a mail folder, such as the Inbox folder, you can change the fonts and table view settings (rows and columns) in the message list. This tutorial will show you how to make other settings and customize the appearance of the message list in Outlook.
6.1 Configure other settings to change fonts and other Table view settings
Supposing the Inbox folder is in the preview view, and I will take the Inbox for example to configure other settings to change the font and other table view settings for the message list.
1. After opening the Inbox folder, please click "View" > "View Settings".

2. In the Advanced View Settings dialog, please click the "Other Settings" button.
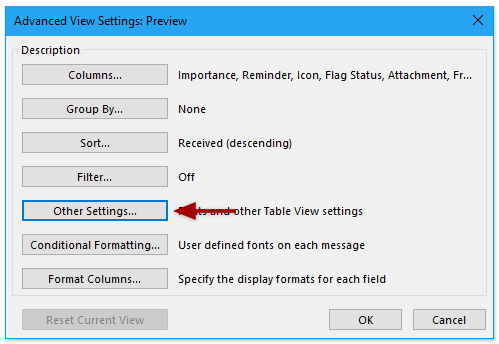
3. Now the Other Settings dialog comes out. You can configure the view settings as you need.
6.1.1 Column Font
This button will change the font, font style, and font size of the column headers.
In the Other Settings dialog, click the "Column Font" button. Then in the Font dialog, specify the font, font style, and font size as you need, and click the "OK" button to save the font settings.
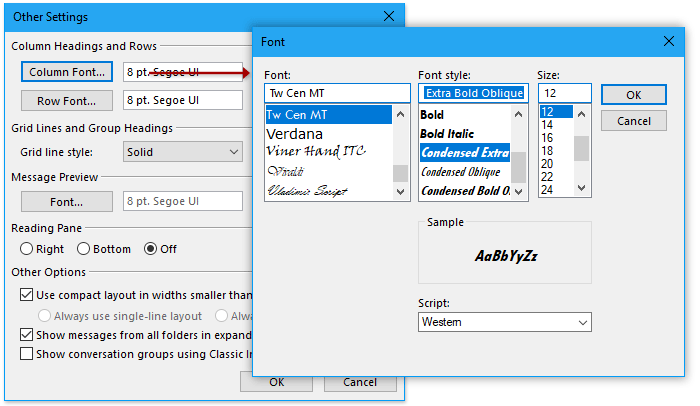
After saving the view settings, you will see the font of the column headers in the message list is changed as you specified.
6.1.2 Row Font
This button will change the font, font style, and font size of every email row in the message list.
In the Other Settings dialog, click the "Row Font" button. Then in the Font dialog, specify the font, font style, and font size as you need, and click the "OK" button.
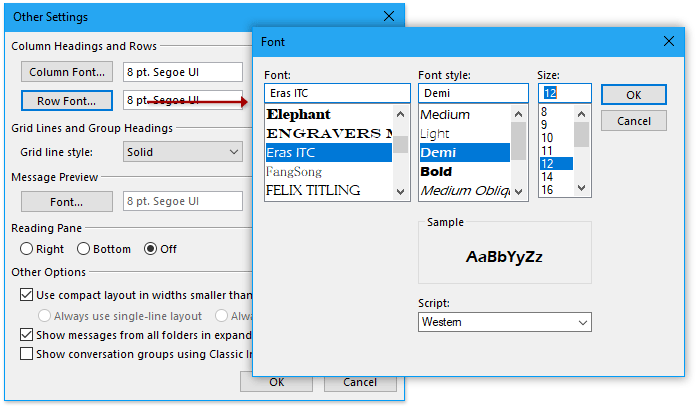
After saving the view settings, you will see every row in the message list is changed and displayed as the specified font, font style, and font size.
6.1.3 Allow in-cell editing

If you tick this "Allow in-cell editing" option in the Other Settings dialog and save the view changes, you will see every field of a certain email in the message list is editable. Just click the specified field, and you can add, remove, or edit the content directly.
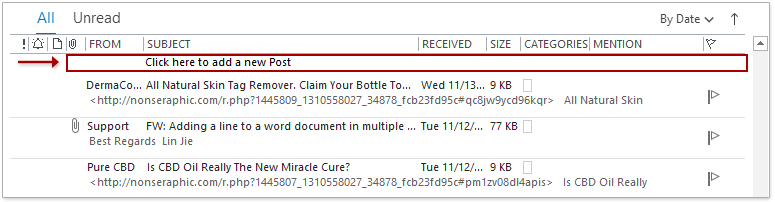
6.1.4 Show “new item” row
After ticking the "Allow in-cell editing" option, you will see the "Show “new item” row" option is checkable. If you enable this option, it will add a blank row at the top of the message list to easily add a new post.
6.1.5 Grid line style
By default, the grid lines among emails are solid. You can change the grid line style here.
In the Other Settings dialog, click the "Grid line style" box, and select a style from the drop-down list.
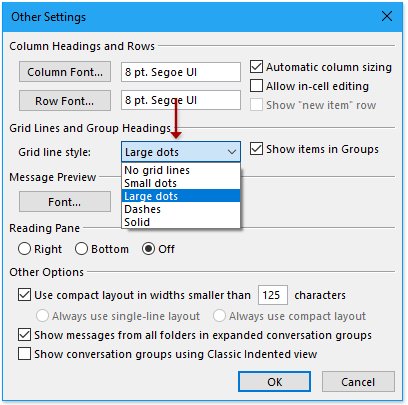
After saving, the grid lines between emails will change to the specified style.
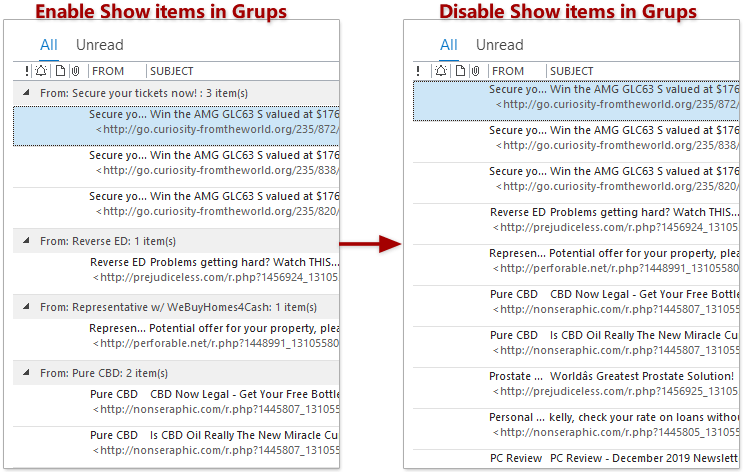
6.1.6 Show items in Groups
By default, this option is ticked. If you disable the "Show items in Groups" option, the group names will be removed from the message list.
6.1.7 Font (Message Preview)
This button will change the font, font style, and font size of the message preview.
Click the "Font" button in the "Message Preview" section. Then in the Font dialog, specify the font, font style, and font size as needed, and click "OK".
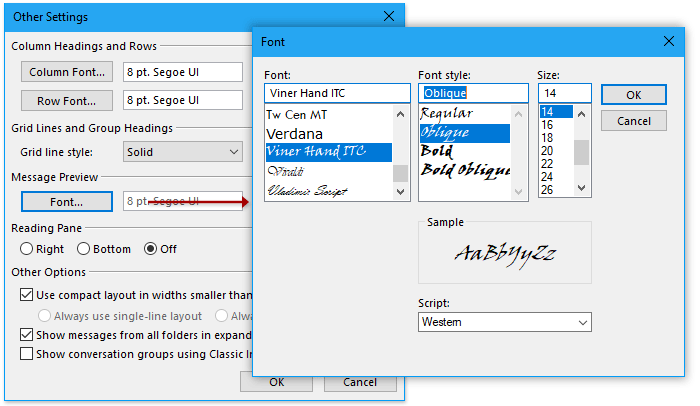
After saving, the texts in message preview will display with the new font settings.
6.1.8 Reading Pane
In the Other Settings dialog, checking "Right" displays the reading pane on the right side, checking "Bottom" places it at the bottom, and checking "Off" turns off the reading pane.
6.1.9 Use compact layout in widths smaller than n characters
This option is enabled by default. It automatically changes the view to compact when the Outlook interface is too narrow. If disabled, you can choose "Always use single-line layout" or "Always use compact layout".
6.1.10 Show messages from all folders in expanded conversation groups
If enabled, emails from other folders will display within expanded conversations if they belong to the conversation thread.
6.1.11 Show conversation groups using Classic Indented view
If enabled, replies are indented automatically under the emails you replied to in the conversations.
Notes
1. If the mail folder is in the compact view, some settings may not take effect until you move the reading pane to the bottom or turn it off.
2. No matter how many custom settings you have made, you can quickly clear all of them by clicking "View" > "Reset View".
7. heading one
It's common to use conditional formatting to highlight cells, rows, or columns automatically in Excel. Similar to that in Excel, we can also apply conditional formatting to highlight emails automatically in Outlook. This tutorial will show you how to use conditional formatting in Outlook.
7.1 Apply conditional formatting to highlight emails automatically
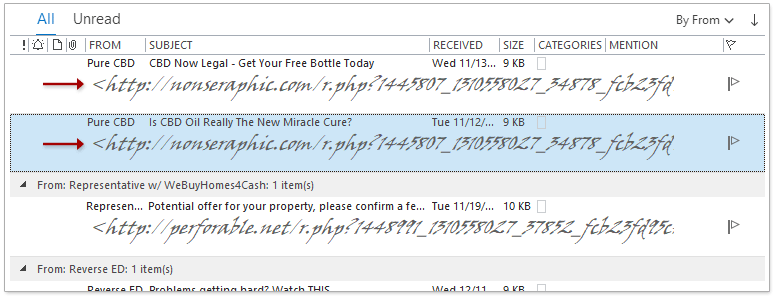
Supposing we need to automatically highlight all emails from a certain sender in the Inbox, we can apply conditional formatting to get it done as follows:
1. After opening the Inbox folder, please click "View" > "View Settings".

2. In the Advanced View Settings dialog, please click the "Conditional Formatting" button.
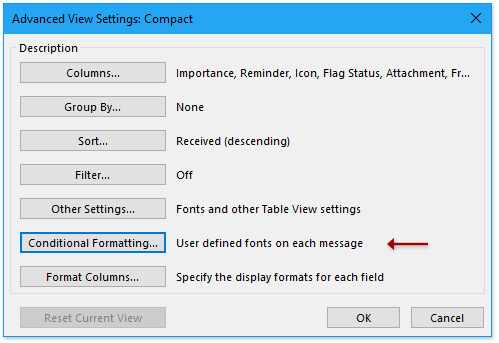
3. Now the Conditional Formatting dialog comes out. Please click the "Add" button, and then type a new conditional formatting rule name in the "Name" box.
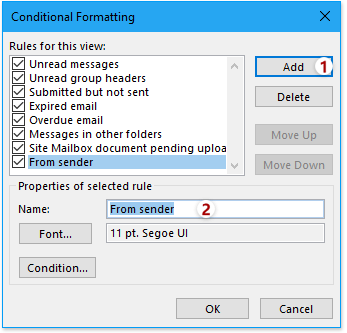
Tips: If you need to modify an existing rule, please click to highlight the rule in the "Rules for this view" list box.
4. Go ahead to click the "Font" button in the Conditional Formatting dialog. Then in the Font dialog, specify the font, font style, font size, font color, etc. as you need, and click the "OK" button.
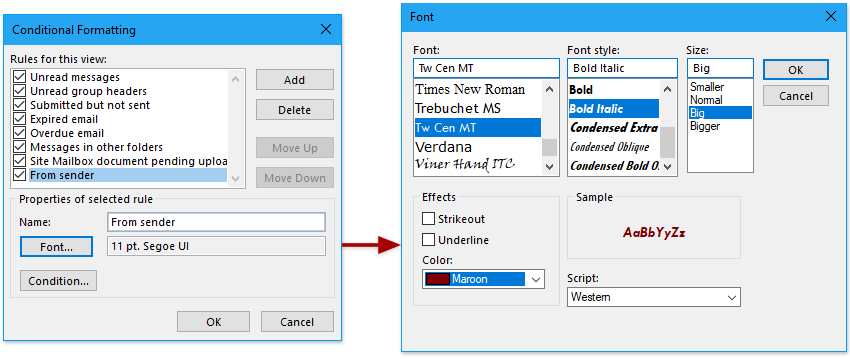
5. Go ahead to click the "Condition" button in the Conditional Formatting dialog. Then in the Filter dialog, specify the filter criteria as you need, and click the "OK" button.
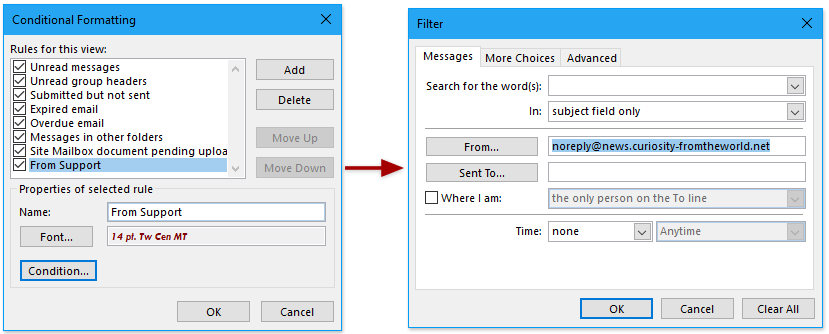
Tips: In my case, I type the specified sender’s email address in the "From" field in the Filter dialog.
6. Click the "OK" buttons successively to save the settings and close dialogs.
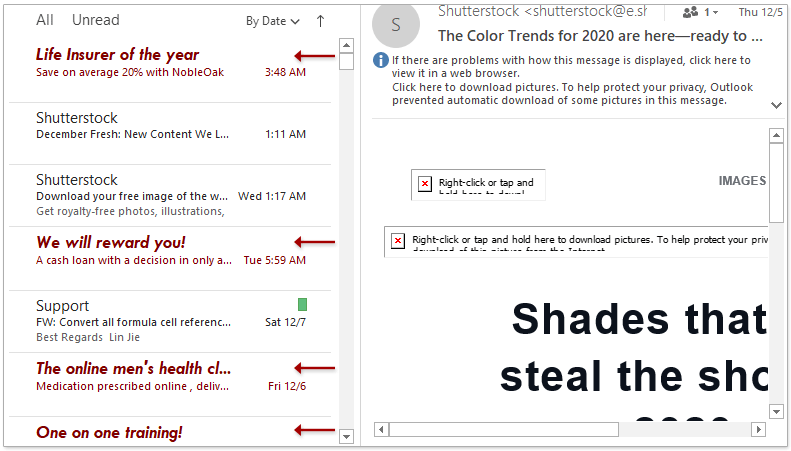
Now in the message list, you will see all emails meeting the specified criteria are highlighted automatically.
7.2 Notes
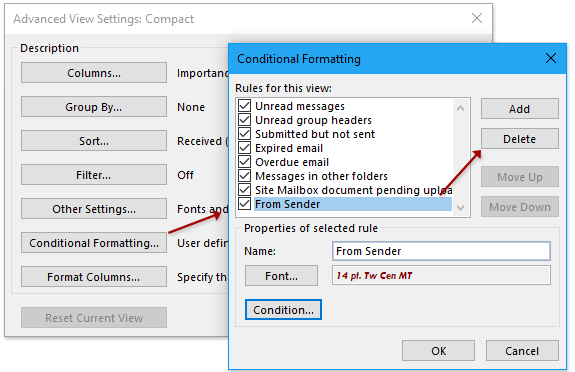
1. You can clear the specified conditional formatting rule as follows: (1) Click "View" > "View Settings"; (2) Click "Conditional Formatting" button in the Advanced View Settings dialog; (3) In the Conditional Formatting dialog, click to select the rule, and click the "Delete" button; (4) Click the "OK" buttons to save changes.
2. You can clear all custom view settings and restore to the default view by clicking "View" > "Reset View".

8. Customize current view - format columns
As you know, the emails are listing in a big table in the message list. You can configure the view settings to change the display format of columns, such as alignment, column width, label, etc. in the table.
8.1 Specify the display formats for each column (field)
Supposing the Inbox is in the preview view, you can specify the display formats for columns or fields in the message list as follows:
1. After opening the Inbox folder, please click "View" > "View Settings".
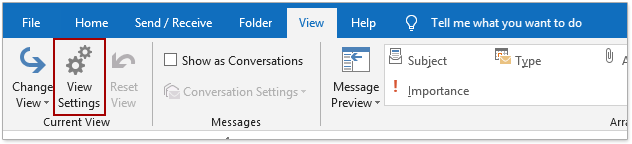
2. In the Advanced View Settings dialog, please click the "Format Columns" button.
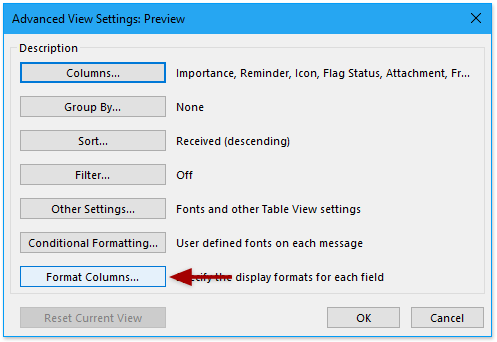
3. Now the Format Columns dialog comes out. Please configure and change the options as you need:

(1) In the "Available fields" list box, please click to select the column you will change.
(2) Click the "Format" box, and select the proper format style as you need from the drop-down list.
Tips: The options of the "Format" drop-down list vary significantly depending on the column you selected in the "Available fields" list box.
(3) If you need to rename the column, please type in a name in the "Label" box.
(4) In the "Width" section, you can configure to show the specified column in a fixed width, or in a dynamic width based on the content of this email field.
Tips: Even if you have specified the fixed width, the fixed value will change automatically when you change the width of Outlook interface, turn on or off other sections such as folder pane, to-do list, etc.
(5) In the "Alignment" section, change the alignment in the specified column. There are three alignment styles: Left, Center, and Right.
4. After finishing the settings, please click the "OK" buttons successively to save the settings and close dialogs.
Now in the message list you will see the specified column is displayed in the new format.
8.2 Notes
1. Some of above view settings may not take effect when the reading pane is displaying on the right of message list. In this situation, you can turn off the reading pane or move it to the bottom of the message list by clicking "View" > "Reading Pane" > "Off" or "Bottom".
2. You can quickly clear all custom view settings and formats by clicking "View" > "Reset View".

9. Reset Current View
If you have made custom view settings, such as add column, change group criteria, sorting criteria, or filter emails, etc. in a folder, you can quickly reset to the default view settings in Outlook.
9.1 Reset current view
1. Open the specified folder that you will reset to the default view settings, and click "View" > "Reset View".
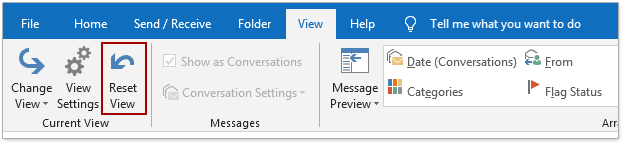
2. In the popping out Microsoft Outlook dialog, please click the "Yes" button.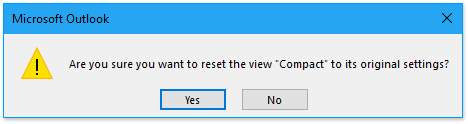
Now the opening folder is restored to the default view settings immediately.
Reset view of a certain view
You can also apply below steps to reset view settings of a certain view.
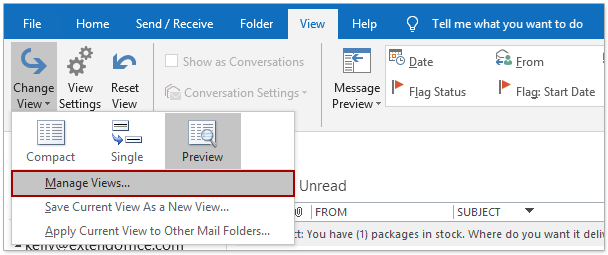
1. Open the specified folder, and click "View" > "Change View" > "Manage Views".
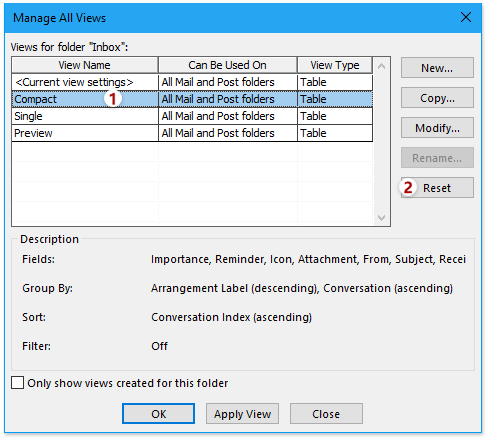
2. In the Manage All Views dialog, please click to select the specified view you will reset, and click the "Reset" button.
3. In the popping out Microsoft Outlook dialog, please click the "Yes" button.
So far, the specified view has been reset. Please close the Manage All Views dialog as you need.
More articles ...
Best Office Productivity Tools
Experience the all-new Kutools for Outlook with 100+ incredible features! Click to download now!
📧 Email Automation: Auto Reply (Available for POP and IMAP) / Schedule Send Emails / Auto CC/BCC by Rules When Sending Email / Auto Forward (Advanced Rules) / Auto Add Greeting / Automatically Split Multi-Recipient Emails into Individual Messages ...
📨 Email Management: Recall Emails / Block Scam Emails by Subjects and Others / Delete Duplicate Emails / Advanced Search / Consolidate Folders ...
📁 Attachments Pro: Batch Save / Batch Detach / Batch Compress / Auto Save / Auto Detach / Auto Compress ...
🌟 Interface Magic: 😊More Pretty and Cool Emojis / Remind you when important emails come / Minimize Outlook Instead of Closing ...
👍 One-click Wonders: Reply All with Attachments / Anti-Phishing Emails / 🕘Show Sender's Time Zone ...
👩🏼🤝👩🏻 Contacts & Calendar: Batch Add Contacts From Selected Emails / Split a Contact Group to Individual Groups / Remove Birthday Reminders ...
Use Kutools in your preferred language – supports English, Spanish, German, French, Chinese, and 40+ others!


🚀 One-Click Download — Get All Office Add-ins
Strongly Recommended: Kutools for Office (5-in-1)
One click to download five installers at once — Kutools for Excel, Outlook, Word, PowerPoint and Office Tab Pro. Click to download now!
- ✅ One-click convenience: Download all five setup packages in a single action.
- 🚀 Ready for any Office task: Install the add-ins you need, when you need them.
- 🧰 Included: Kutools for Excel / Kutools for Outlook / Kutools for Word / Office Tab Pro / Kutools for PowerPoint