Insert attachments in an Outlook email
We might receive emails with attachments frequently. In Outlook, we can insert these kinds of attachments: individual files, and outlook items (including emails, contacts, calendars, appointments, tasks, etc.).
Table of Content
- 1. Insert file attachments in Outlook
- 2. Attach Outlook Items as Attachment
- 3. Attach Business Card in an Email
- 4. Attach Calendar in an Email
Note: Methods introduced on this page apply to Microsoft Outlook 2019 desktop program in Windows 10. And the instructions may vary significantly or slightly depending on the version of Microsoft Outlook and the Windows environments.
1. Insert file attachments in Outlook
The first paragraph. When composing an email in Outlook, you may need to attach some files, says Word documents, workbooks, etc. in the email. Now, this tutorial will show you the steps of inserting files as attachments in the Outlook email.
1.1 Attach files as attachments by Attach File feature
The most common way to attach files is to create an email, and then apply the Attach File feature to insert file attachments in the message composing window.
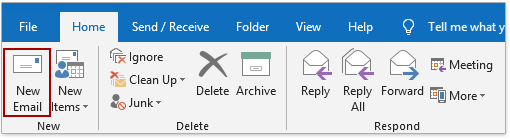
1. In the mail view, click Home > New Email to create a new email.

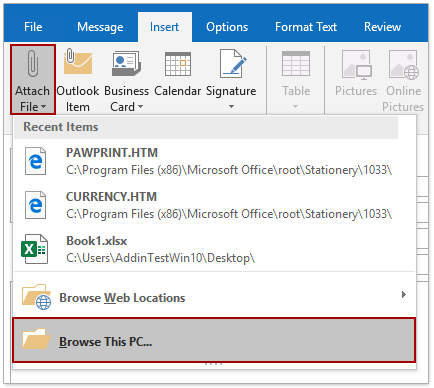
2. In the message composing window, please click Insert > Attach File > Browse This PC.
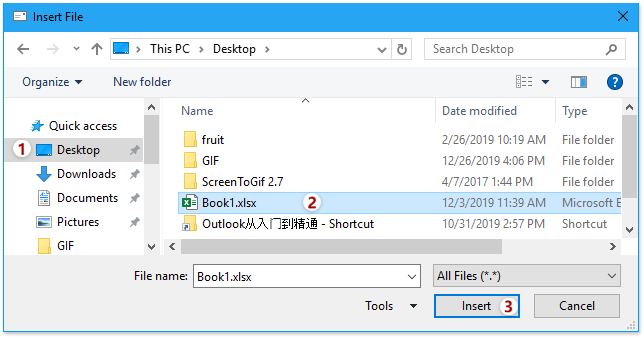
3. Now in the opening Insert File dialog, please open the specified folder containing files you will attach, select the specified files, and click the Insert button.
Tips: If you need to attach multiple files from the same hard folder, you can open the folder in the Insert File dialog, click to select multiple files simultaneously with holding Ctrl or Shift key, and then click the Insert button.
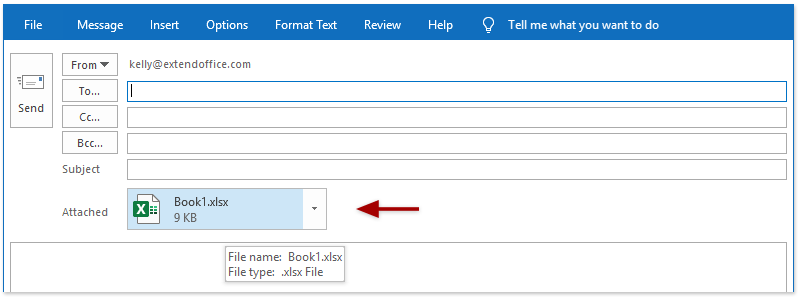
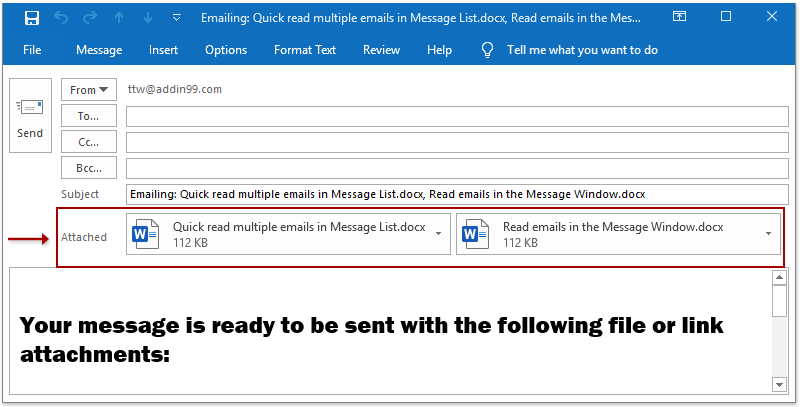
Now the specified file has been attached in the current message composing window.
4. Please go ahead to add message header information, compose the message body, and send it as you need.
1.2 Attach files as attachments by copying and pasting
Alternatively, you can quickly attach files as attachments in a composing email by copying and pasting.
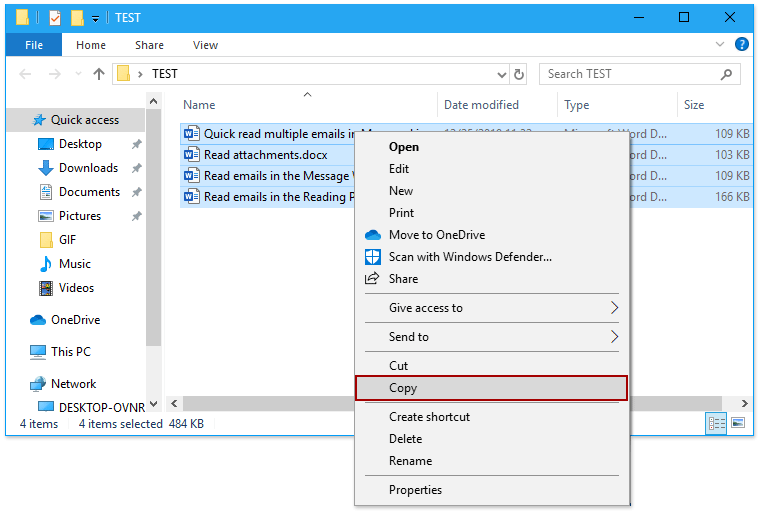
1. Open the folder containing files you will attach as attachment.
2. Select the files you will attach as attachments, right click, and select Copy from the context menu.
Tips:
(1) Holding Ctrl key, you can select multiple nonadjacent emails by clicking them one by one; holding Shift key, you can select multiple adjacent emails by clicking the first file and the last one.
(2) After selecting the files, you can press Ctrl + C keys to copy them directly.
3. Launch Outlook, and click Home > New Email in the mail view to create a new email.
4. In the message composing window, put cursor in the message body, right click, and select Paste in the context menu (alternatively press Ctrl + V keys).
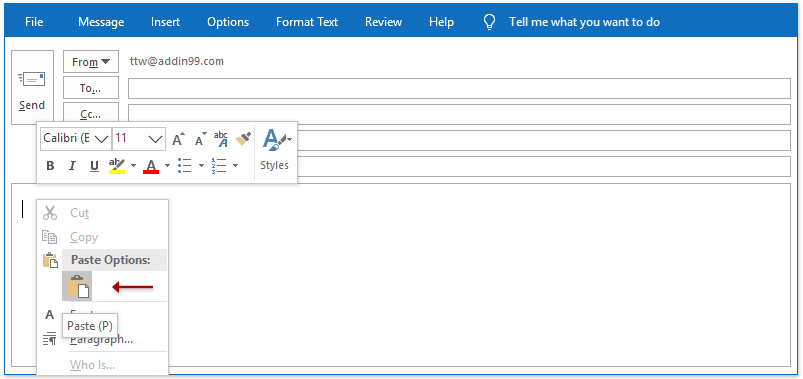
Now all copied files are attached as attachments in the message composing window at once.
5. Please go ahead to add message header information, compose the message body, and send it as you need.
1.3 Attach files as attachments by Send to feature
You can also apply the Send to feature in the Windows to attach files as attachments in a new email quickly.
1. Open the folder containing the files you will attach as attachments.
2. In the folder, select the files you will attach as attachments, right click, and select Send to > Mail recipient in the context menu.

Tips: Holding Ctrl key, you can select multiple nonadjacent emails by clicking them one by one; holding Shift key, you can select multiple adjacent emails by clicking the first file and the last one.
Now a new message composing window is opening, and the selected files are attached as attachments automatically.
3. Please go ahead to add message header information, compose the message body, and send it as you need.
2. Attach Outlook Items as Attachment
Sometimes, you need to attach some Outlook items, says emails, appointments, tasks, notes, etc. as attachments in an email. And this tutorial will show you how to attach Outlook items as attachments in an Outlook email.
2.1 Attach Outlook items as attachment with Attach Items feature
The most common way to attach outlook items in an email is to apply the Outlook Items feature in the message composing window. Please do as follows:
1. In the mail view, click Home > New Email to create a new email.
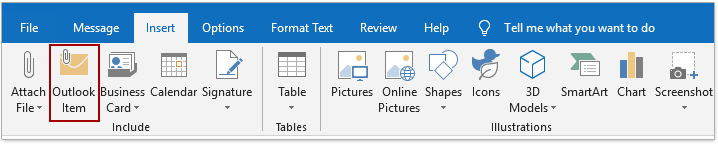
2. In the new message composing window, please click Insert > Outlook Items.
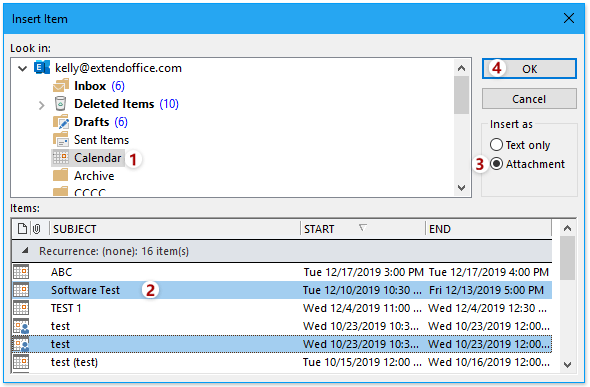
3. In the Insert Items dialog, please do as follows:
(1) In the Look in section, click to open the folder that contains the Outlook items you will attach as attachments;
(2) In the Items section, select the Outlook items you will attach.
Tips: Holding Ctrl key, you can select multiple nonadjacent items by clicking them one by one; holding Shift key, you can select multiple adjacent items by clicking the first item and the last one.
(3) In the Insert as section, check the Attachment option;
(4) Click the OK button.
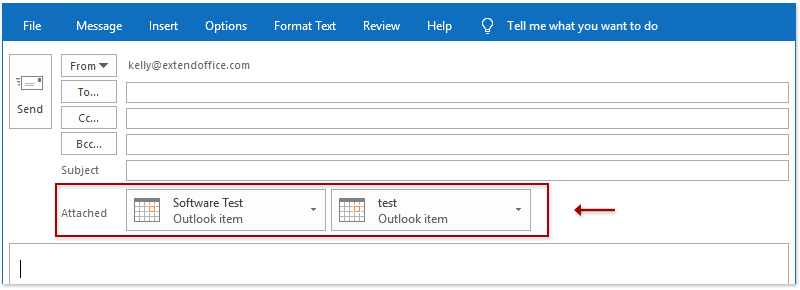
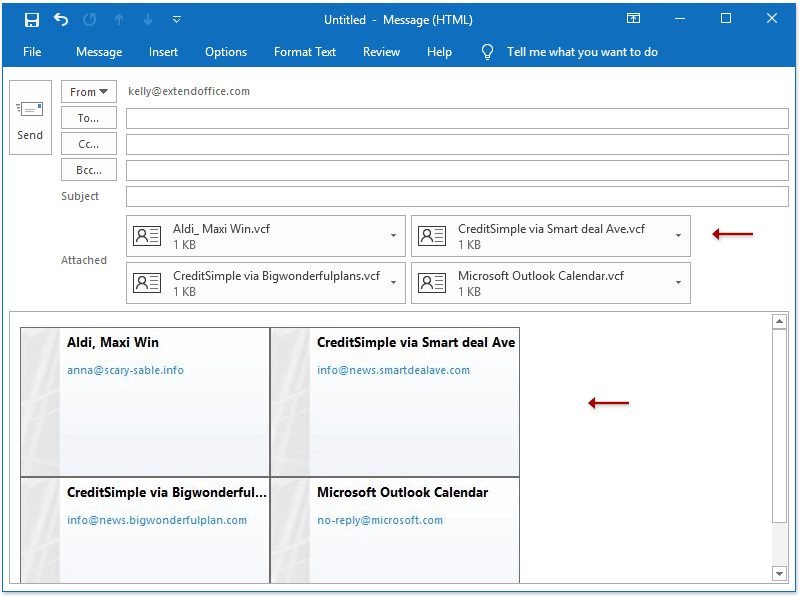
Now the selected Outlook items are attached in the current message composing window. See screenshot:
4. Please add message header information, compose the message body, and click the Send button as you need.
2.2 Attach Outlook items as attachment via forwarding
You can also attach one or multiple Outlook items as attachments via forwarding in Outlook.
2.2.1 Forward emails as attachments
Select one or multiple emails in a mail folder, and click Home > More (in the Respond group) > Forward as Attachment.
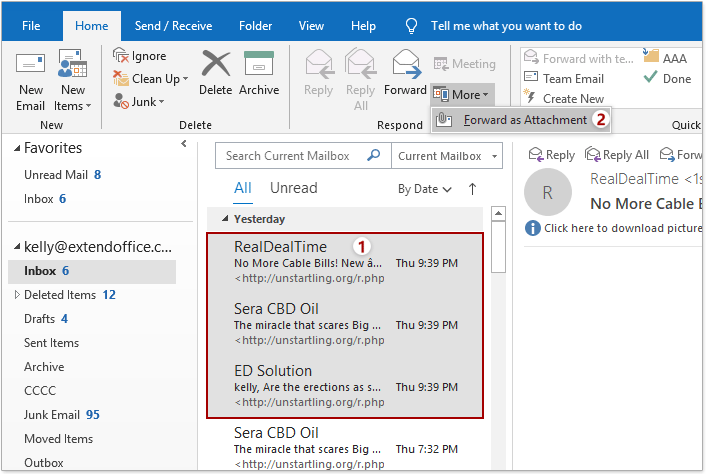
Now all selected emails are attached as attachments in a message composing/forwarding window immediately. Please compose and send the forwarding email as you need.
2.2.2 Forward a calendar item as attachment
Shift to the calendar view, select the appointment, event, or meeting you will forward as attachment, and then click Appointment (or Meeting) > Forward > Forward.
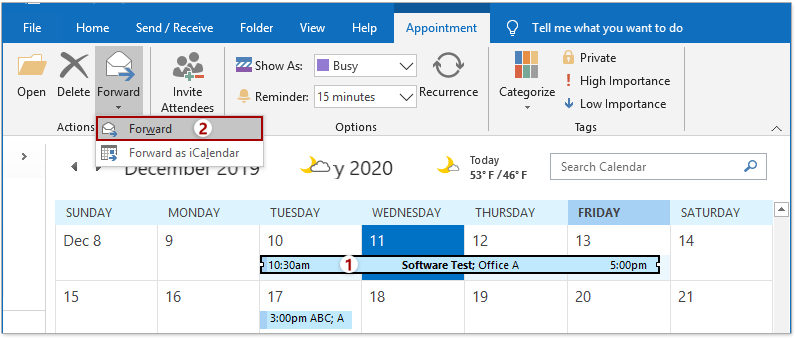
Now the selected calendar item is added in a new message forwarding window. Please compose and send the forwarding email as you need.
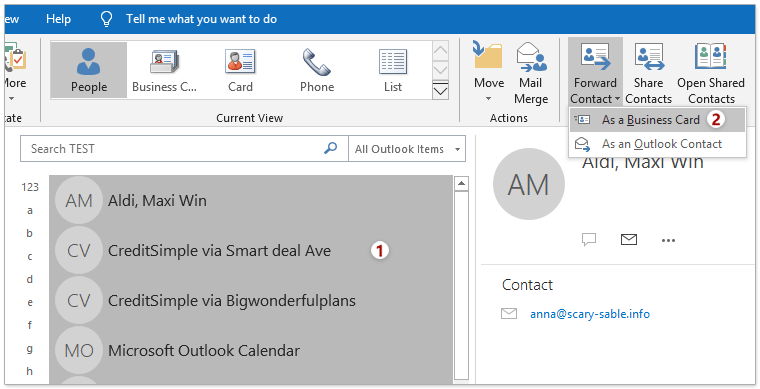
2.2.3 Forward contacts or contact groups as attachment
You can easily forward one or multiple contacts or contact groups as an attachment easily as follows:
1. Shift to the people view, and double click to open the specified contact you will forward as an attachment.
2. Click to select contacts or contact groups you will forward as attachments, and click Home > Forward Contact > As an Outlook Contact.
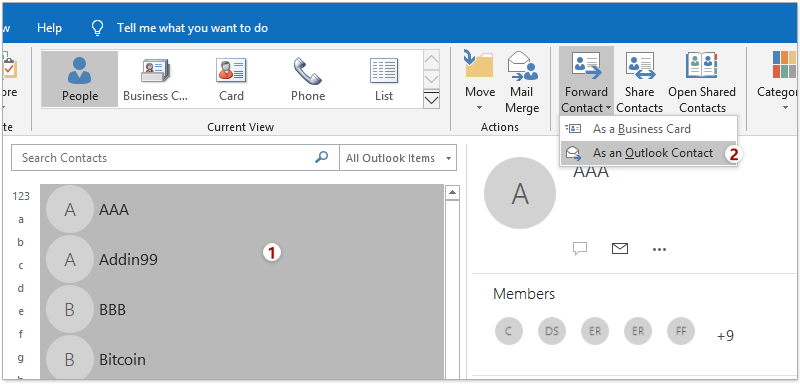
Now the selected contacts and contact groups are attached in a message forwarding window. Please compose and send the email as you need.
2.2.4 Forward tasks as attachments
Shift to the task view, select one or multiple tasks you will forward as attachments, and click Home > More (in the Respond group) > Forward as Attachment.
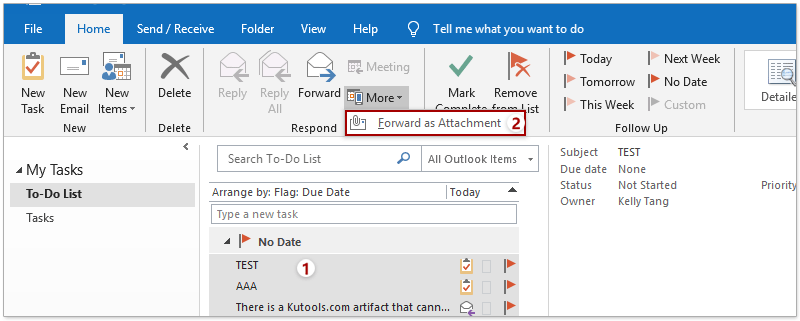
Now all selected tasks are attached as attachments in a message composing/forwarding window immediately. Please compose and send the forwarding email as you need.
2.3 Automatically attach original email when replying or forwarding
You can also configure the Outlook options, and force the original email to be attached as an attachment when you reply or forward it in Outlook.
1. Click File > Options.
2. In the Outlook Options dialog, click Mail in the left bar, and select Attachment original message option from the drop-down lists beside When replying to a message or When forwarding a message in the Replies and forwards section.

3. Click the OK button.
From now on, the email will be automatically attached as an attachment when you reply, reply all, or forward it in Outlook.
3. Attach Business Card in an Email
You can not only share contacts as attachments, but also attach the electronic business cards of the contacts in an Outlook email. This tutorial will introduce the guidance of attaching business cards in an email.
3.1 Attach business cards by Insert Business Card feature
You can directly attach business cards of multiple contacts by the Insert Business Card feature when composing an email in Outlook. Please do as follows:
1. Open the editing message window in Outlook with one of below methods:
- In the mail view, click Home > New Email to create a new email
- Click Home > Reply or Reply All to reply an email
- Click Home > Forward to forward an email.
2. In the editing message window, please click Insert > Business Card > Other Business Cards.
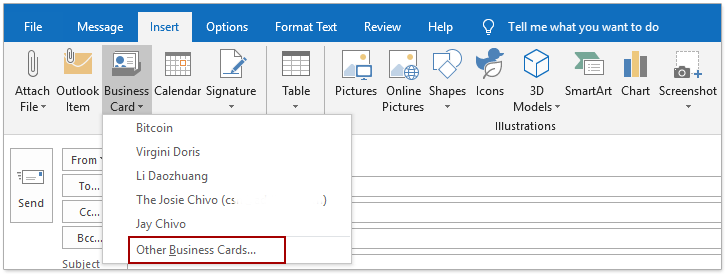
Tips: If the contact that you will attach as a business card is listing in the Business Card drop-down menu, you can select the contact to attach its business card directly.
3. In the Insert Business Card dialog, select the specific contact folder in the Look in drop-down list, and click to select one or multiple contacts as you need in the middle section.
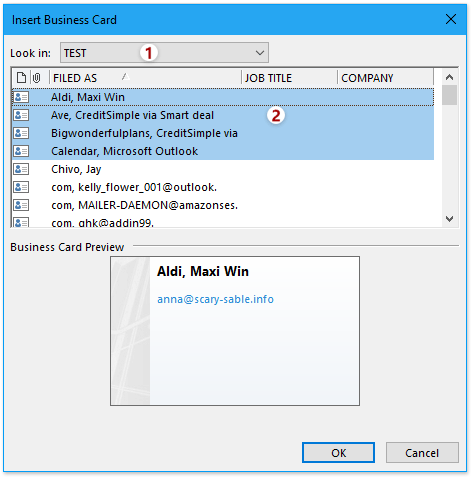
4. Click the OK button.
Now all specified contacts are attached as business cards in the current editing message window.
3.2 Attach business cards by Forward Contact feature
When you are viewing contacts in a contact folder, you can also add multiple contacts as business card attachments in a new email.
1. Shift to the people view, and open the specified contact folder that you will attach business cards from.
2. Click to select one or multiple contacts that you will attach as business cards, and click Home > Forward Contact > As a Business Card.
Now all selected contacts are attached as business cards in a new message composing window.
3. Please compose the new email and send it as you need.
Note: Contact groups can not be attached as business cards in emails.
3.3 Attach a business card by Forward feature
You can also attach a contact as business card in a new email when you are adding or editing this contact in Outlook. Please do as follows:
1. Shift to the people view, and double click the specified contact to open it in the contact window.
2. In the contact window, please click Contact > Forward > As a Business Card.
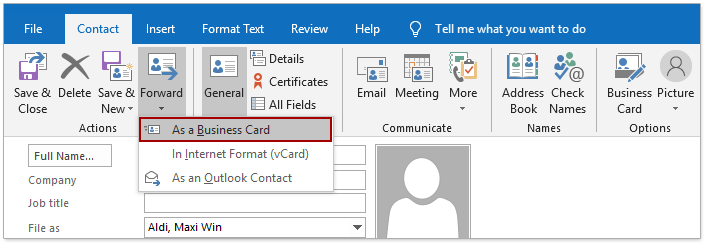
Now the contact is attached as a business card in a new message composing window.
3. Please compose the new email and send it as you need.
4. Attach Calendar in an Email
Sometimes, you may want to share your calendar information to others via emails in Outlook. You can attach the specified calendar as an attachment in an email easily. This tutorial will show two solutions to achieve it.
4.1 Attach calendar with Insert Calendar feature
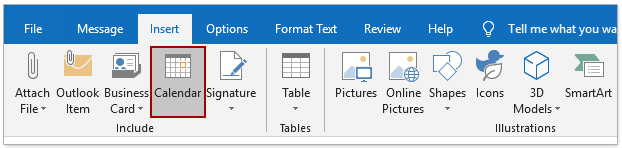
You can attach a calendar as attachment directly in a composing message directly with the Insert Calendar feature in Outlook. Please do as follows:
1. Open the message editing window with one of below methods:
- In the mail view, click Home > New Email to create a new email
- Click Home > Reply or Reply All to reply an email
- Click Home > Forward to forward an email.
2. Now in the message editing window, please click Insert > Calendar.
3. Now the Send a Calendar via Email dialog pops out. Please configure it as follows:
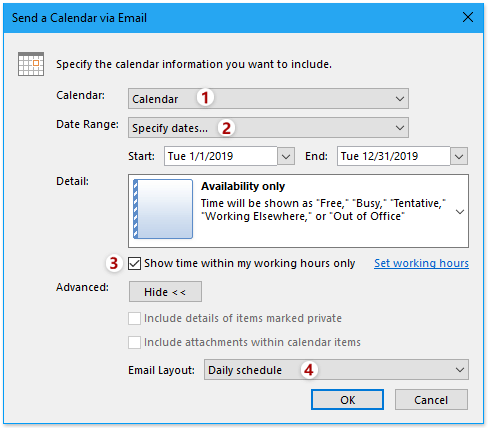
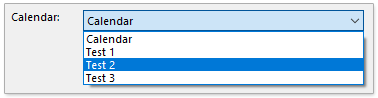
(1) Click the Calendar drop-down list, and select the specified calendar you will attach as an attachment.
(2) Specify the date range you will share the calendar within. You can click Date Range box and select the listing date ranges in the drop-down list, such as Today, Next 30 days, Whole calendar, etc.

Alternatively, you can also specify a custom date range that you will share the calendar within: click the Date Range box, select Specify Dates in the drop-down list, and then specify the date range in below Start and End boxes.

(3) If you need to share the calendar within your working hours, says from 8:00 AM to 5:00 PM every working day, please tick the Show time within my working hours only option.
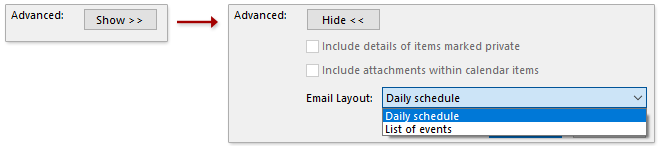
(4) Specify the layout of calendar items in the current email: click the Show button to expand the advanced options, and then specify one layout style from the Email Layout drop-down list.
4. Click the OK button to save the configuring.
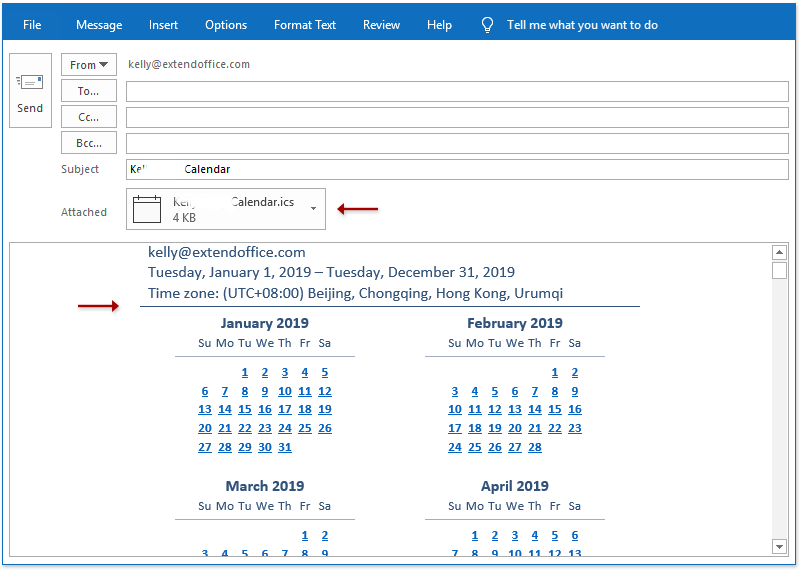
Now the calendar is attached as a .ics attachment in the current composing email. Meanwhile, the calendar items are also listed in the message body.
5. Please compose the email, and send it as you need.
4.2 Attach calendar with E-mail Calendar feature
You can also attach a calendar to an email when you are viewing the calendar in the calendar view in Outlook. Please do as follows:
1. Shift to the calendar view, and open the specified calendar you will attach as an attachment.
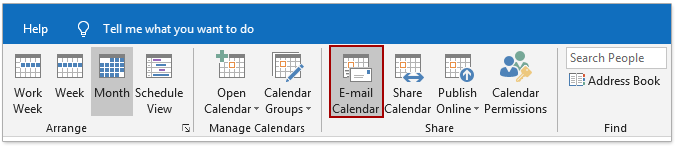
2. Click Home > E-mail Calendar.
Now a new message composing window and the Send a Calendar via Email dialog come out. You can follow the same steps I introduced in the first solution to attach the calendar in the new email.
More articles ...
Best Office Productivity Tools
Experience the all-new Kutools for Outlook with 100+ incredible features! Click to download now!
📧 Email Automation: Auto Reply (Available for POP and IMAP) / Schedule Send Emails / Auto CC/BCC by Rules When Sending Email / Auto Forward (Advanced Rules) / Auto Add Greeting / Automatically Split Multi-Recipient Emails into Individual Messages ...
📨 Email Management: Recall Emails / Block Scam Emails by Subjects and Others / Delete Duplicate Emails / Advanced Search / Consolidate Folders ...
📁 Attachments Pro: Batch Save / Batch Detach / Batch Compress / Auto Save / Auto Detach / Auto Compress ...
🌟 Interface Magic: 😊More Pretty and Cool Emojis / Remind you when important emails come / Minimize Outlook Instead of Closing ...
👍 One-click Wonders: Reply All with Attachments / Anti-Phishing Emails / 🕘Show Sender's Time Zone ...
👩🏼🤝👩🏻 Contacts & Calendar: Batch Add Contacts From Selected Emails / Split a Contact Group to Individual Groups / Remove Birthday Reminders ...
Use Kutools in your preferred language – supports English, Spanish, German, French, Chinese, and 40+ others!


🚀 One-Click Download — Get All Office Add-ins
Strongly Recommended: Kutools for Office (5-in-1)
One click to download five installers at once — Kutools for Excel, Outlook, Word, PowerPoint and Office Tab Pro. Click to download now!
- ✅ One-click convenience: Download all five setup packages in a single action.
- 🚀 Ready for any Office task: Install the add-ins you need, when you need them.
- 🧰 Included: Kutools for Excel / Kutools for Outlook / Kutools for Word / Office Tab Pro / Kutools for PowerPoint