Lock and protect cells in Excel – (Easy step by step tutorial)
In Excel, it's common to protect all cells from being modified by others. Sometimes, you may only need to protect specific cells or formula cells that shouldn't be changed, while allowing other cells to be edited or modified, as shown in the screenshot below. In this tutorial, we'll introduce quick methods for tackling these tasks in Excel.

Lock and protect all cells in a worksheet
Lock and protect specific cells in a worksheet
- By using Format Cells and Protect Sheet features
- By uisng Kutools for Excel - with only several clicks
Lock and protect formula cells
Unlock all cells / Unprotect sheet
Unlock specific cells to be edited on a protected sheet
- By uisng Format Cells and Protect Sheet features
- By uisng Kutools for Excel - with only several clicks
- By uisng Allow Users to Edit Ranges features
Kutools for Excel to highlight the unlocked cells for editing
Lock and protect all cells in a worksheet
To lock and protect all cells in a worksheet, since all cells are locked by default, you just need to protect the worksheet. Follow these steps:
Step 1: Enable the Protect Sheet feature
Activate the worksheet that you want to protect, and then click "Review" > "Protect Sheet", see screenshot:

Step 2: Set password for protecting all cells
In the pop-up "Protect Sheet" dialog box, type a password into the textbox, and then click OK. In the following dialog box, reenter the password to confirm it, and click OK to close the dialogs. See screenshots:

Result:
Now, all cells in the current worksheet are protected. When you try to edit or change any of the locked cells, a warning message will appear.

- All cells are now locked. To edit the cells, you have to unprotect the sheet.
- If you want to protect multiple worksheets at once, the Kutools for Excel's Protect Worksheets feature can help you to complete this job in just 5 seconds.
Lock and protect specific cells in a worksheet
Sometimes, you just want to protect particular cells in a worksheet. In this case, the following 3 ways can do you a favor.
Lock and protect certain cells with Format Cells and Protect Sheet features
In Excel, to lock and protect specific cells, you should unlock all cells, then lock specific cells, finally, protect the sheet. Follow these step-by-step instructions:
Step 1: Select all cells and unlock them
- Select all cells in the worksheet by pressing Ctrl + A. (Or clicking the Select All
 button, the gray triangle in the top left corner of the worksheet)
 - Then, right click and choose "Format Cells" from the context menu (or press Ctr + 1) to open the "Format Cells" dialog box.
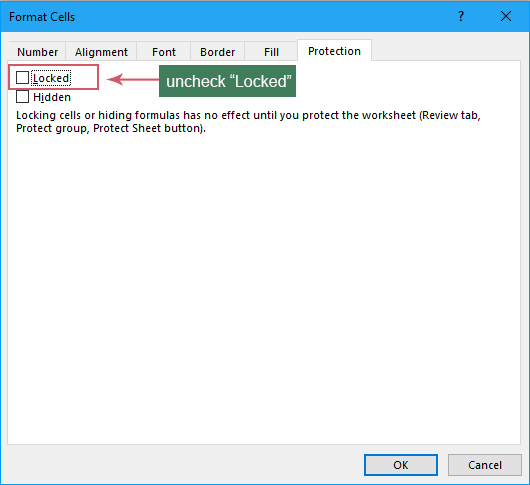
- In the "Format Cells" dialog box, under the "Protection" tab, uncheck the "Locked" option, and then, click OK button. See screenshot:

Step 2: Select the specific cells and lock them
- Now, select the cells that you want to lock and protect. (If multiple ranges need to be locked, please press Ctrl key to select the ranges.)
- Then, press Ctr + 1 to open the "Format Cells" dialog box.
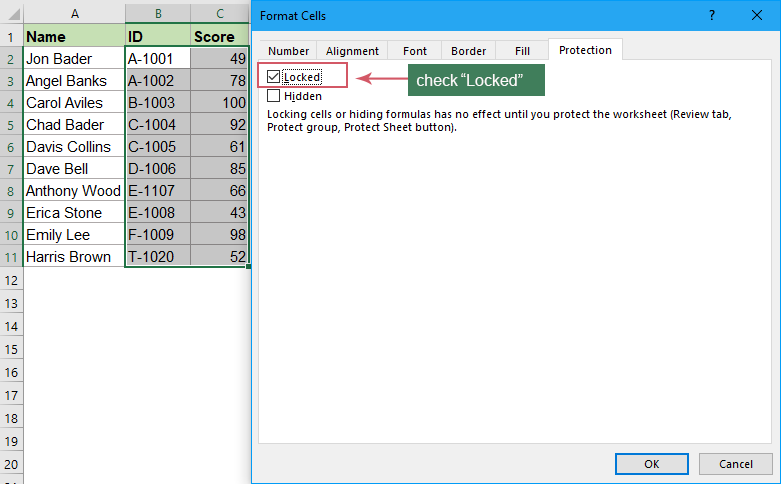
- In the "Format Cells" dialog box, check the "Locked" option, and click OK. See screenshot:

Step 3: Protect the worksheet
- Go to the "Review" tab, and click "Protect Sheet". See screenshot:

- In the pop-up "Protect Sheet" dialog box, type a password and confirm it in the following dialog box, and click OK to close the dialogs. See screenshots:

Result:
Now, only the selected cells are protected. If you attempt to edit these specific cells, a warning box will appear as below screenshot shown:
Lock and protect certain cells with only few clicks
If you have Kutools for Excel, you can complete this task by only a few clicks in the Kutools Design ribbon.
Please click "Kutools Plus" > "Design View" to show the "Kutools Design" tab. Then follow the steps below:

Lock and protect formula cells in a worksheet
Suppose most of the time, you need to share your worksheet with other people, and wouldn’t want anyone to change or mess up the formulas but leave other cells to be editable. Fortunately, Excel makes it simple to lock and protect the formula cells. Please follow these step-by-step instructions:
Step 1: Unlock all cells in the worksheet
- Select all cells in the worksheet by pressing Ctrl +A. (Or clicking the Select All button , the gray triangle in the top left corner of the worksheet)
- Then, press Ctr + 1 to open the "Format Cells" dialog box.
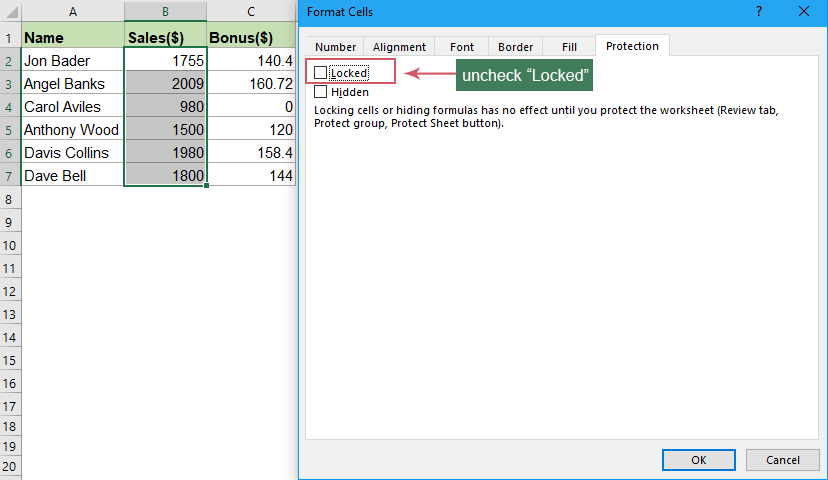
- In the "Format Cells" dialog box, under the "Protection" tab, uncheck the "Locked" option, and then, click OK button. See screenshot:
Step 2: Select all formula cells
Now that all cells have been unlocked. In this step, we should select all cells with a formula.
- Under the "Home" tab, click "Find & Select" > "Go To Special". See screenshot:

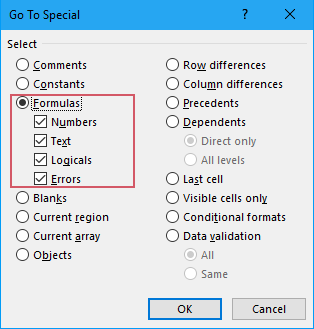
- In the "Go To Special" dialog box, check the "Formulas" radio button and all formula types will be selected. See screenshot:
- Then, click OK button, and all
- the cells with formula are selected at once.


Step 3: Lock the formula cells
Now, go to lock the selected formula cells. Please press Ctrl + 1 to open the "Format Cells" dialog again, switch to the "Protection" tab, and check the "Locked" checkbox. At last, click OK button. See screenshot:

Step 4: Protect the worksheet
After locking the formulas, you should protect the sheet:
- Please go to the "Review" tab, and click "Protect Sheet".
- In the popped-out dialog box, type a password and confirm it. And then, click OK to close the dialogs. See screenshots:
Result:
Now, only the formula cells are protected. If you delete or edit these formulas, you will see a warning box, but, you can edit other cells you need.

Unlock all cells / Unprotect sheet
To unprotect all cells, follow these steps:
Step 1: Enable the Unprotect Sheet feature
Click "Review" > "Unprotect Sheet", see screenshot:

Step 2: Enter the password to unprotect the sheet
In the popped-out "Unprotect Sheet" dialog box, type the password into the textbox to cancel the protection. And then, click OK to close the dialogs. See screenshot:

Unlock specific cells to be edited on a protected sheet
If you want to allow users to change or edit data in certain cells and keep other cells locked, you can unprotect the specific cells or require other users to enter a password before editing these cells, or limit editing to certain users. This section will introduce some useful ways for accomplishing this in Excel.
Unlock specific cells with Format Cells and Protect Sheet features
To do this, you can use the Format Cells and Protect Sheet features. Follow these steps:
Step 1: Select and unlock the specific cells
- Select the cells that you want to unlock, and then press Ctrl + 1 to open the "Format Cells" dialog box.
- In the "Format Cells" dialog box, under the "Protection" tab, uncheck the "Locked" option, and then, click OK button. See screenshot:

Step 2: Protect the worksheet
After unlocking the specific cells, you should protect the sheet:
- Please go to the "Review" tab, and click "Protect Sheet".
- In the popped-out dialog box, type a password and confirm it, and then, click OK to close the dialogs. See screenshots:
Now, all other cells are protected, but the cells you specified can be edited.
Unlock specific cells with only few clicks by Kutools for Excel
With Kutools for Excel's "Kutools Design" tab, you can quickly solve this job by only a few clicks.
Please click "Kutools Plus" > "Design View" to show the "Kutools Design" tab. Then apply the below steps:

Unlock specific cells with Allow Users to Edit Ranges feature
In Excel, the "Allow Users to Edit Ranges" feature also can help to unlock specific ranges. With this feature, you can allow only certain people to edit certain cells or ranges with different passwords.
Step 1: Go to enable the Allow Users to Edit Ranges feature
Click "Review" > "Allow Edit Ranges", see screenshot:
Step 2: Specify unlocked ranges and set passwords
- In the popped out "Allow Users to Edit Ranges" dialog box, click "New" button, see screenshot:

- In the "New Range" dialog box, do the following operations:
- In the "Title" box, type a name for the range that you want to unlock;
- In the "Refers to" cells box, click the
 button to select the data range that you want to unlock;
 - In the "Range password" box, enter a password, or, leave this box empty to allow others to edit the range without password.

- Then, click OK button, and another "Confirm Password" dialog will appear. please retype the password again, see screenshot:

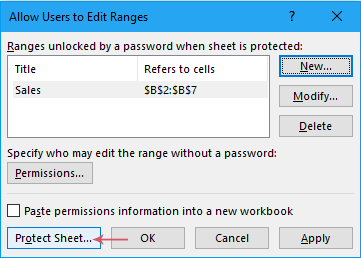
- Click OK to go back to the "Allow Users to Edit Ranges" dialog box. The new range is listed into the list box. If you want to add more ranges with different passowrds, please repeat steps 1- 3 of Step 2.
- Still in the "Allow Users to Edit Ranges" dialog box, click "Protect Sheet" button to protect the whole sheet. See screenshot:
- In the following dialog boxes, type a password and confirm it.(Here, you’d better type a different password than you used to unlock the ranges.) And then, click OK to close the dialogs. See screenshots:


Result:
Now, when you need to edit the unlocked cells, you should type the password you supplied for that range. (If you didn't set a password for the range, this dialog will not appear, and you can edit the cells directly.)

Kutools to highlight the unlocked cells quickly for editing
If a protected worksheet contains both locked and unlocked cells, you can quickly identify which cells can be modified and which are off-limits by highlighting the unlocked cells. Kutools for Excel’s Highlight Unlocked feature can help to highlight all the unlocked (editable) cell with a specific color.
- In a protected sheet, click "Kutools Plus" > "Design View" to show the "Kutools Design" tab.
- Under the "Kutools Design" tab, please click "Highlight Unlocked" option, all unlocked cells are covered by a color temporarily, you can modify or edit them freely as you need. (If close this Kutools Design tab, the color will disappear.)

Related Articles:
- Protect multiple worksheets at once
- Supposing you have a workbook which contains multiple worksheets, and now you need to protect all of the worksheets or some specific worksheets, normally in Excel, you only can protect the sheet one by one with the Protect Sheet function, but this method is tedious and time-consuming if there are numerous sheets need to be protected. How do you protect multiple sheets at once in Excel quickly and easily?
- Set password to protect hidden sheet
- If you have a workbook which contains some important hidden worksheets, and do not allow others to unhide them. Now, you need to set a password to protect the hidden worksheets completely, when other users unhide them, they must enter the password. Do you have any ways to deal with this task quickly and easily in Excel?
- Set passwords to protect individual worksheets by users
- In Excel, you can set different passwords for different sheets, this means that one user could make changes to one worksheet using one password, and another could use a different password to make changes to another worksheet. But, sometimes, you just only want each user to be able to view and access their own sheet. Is this possible to be solved in Excel?
- Lock or protect cells after data entry
- Supposing you have a worksheet and just a certain range of blank cells needs data entry, and after finishing inputting data, you need the cells to be locked automatically in order to prevent changes again. How can you do to achieve it? This article can help you.
Best Office Productivity Tools
Supercharge Your Excel Skills with Kutools for Excel, and Experience Efficiency Like Never Before. Kutools for Excel Offers Over 300 Advanced Features to Boost Productivity and Save Time. Click Here to Get The Feature You Need The Most...
Office Tab Brings Tabbed interface to Office, and Make Your Work Much Easier
- Enable tabbed editing and reading in Word, Excel, PowerPoint, Publisher, Access, Visio and Project.
- Open and create multiple documents in new tabs of the same window, rather than in new windows.
- Increases your productivity by 50%, and reduces hundreds of mouse clicks for you every day!
Table of contents
- Video
- Lock and protect all cells in a worksheet
- Lock and protect specific cells in a worksheet
- By using Format Cells and Protect Sheet features
- By uisng Kutools for Excel - with only several clicks
- Lock and protect formula cells
- Unlock all cells / Unprotect sheet
- Unlock specific cells to be edited
- By uisng Format Cells and Protect Sheet features
- By uisng Kutools for Excel - with only several clicks
- By uisng Allow Users to Edit Ranges feature
- Kutools for Excel to highlight the unlocked cells for editing
- Related Articles
- The Best Office Productivity Tools
- Comments