Quickly convert multiple XLSX files to XLS or PDF files from local disk or OneDrive
Kutools for Excel
Boosts Excel With 300+
Powerful Features
Under certain circumstance, you need to convert multiple Excel files from xlsx format to xls format or convert lots of workbooks to PDF files. Normally in Excel, you can use the Save As function to save the Excel format as other formats as you want. If you have hundreds of Excel files need to be converted, this way will be tedious and time-consuming. But with the Format Converter of Kutools for Excel, you can quickly do the following options:
Convert multiple XLSX files to XLS files in Excel
Convert multiple XLS files to XLSX files in Excel
Convert multiple excel workbooks to PDF files in Excel
Click Kutools Plus >> Workbook >> Format Converter. See screenshots:
Convert multiple XLSX files to XLS files in Excel
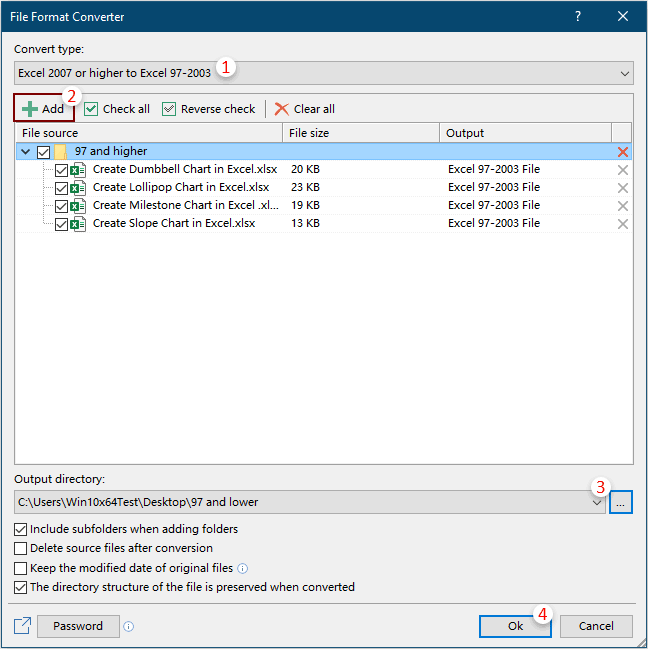
For Excel, the XLSX format stands for the Excel 2007 and later versions, while the XLS format stands for the Excel 97-03 versions. With this Format Converter feature, you can quickly convert multiple XLSX files to XLS files in Excel with following steps:
1. Click Kutools Plus > Workbook > Format Converter to enable the feature.
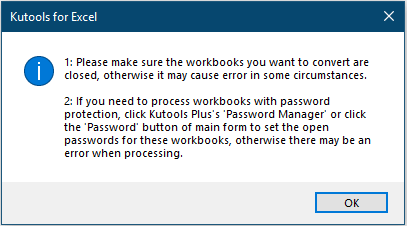
2. Then a prompt box pops up, please browse the reminder carefully and then click OK.
3. In the File Format Converter dialog box, you need to configure as follows.
3.1) Select Excel 2007 or higher to Excel 97-2003 in the Convert type drop-down list;
3.2) Add XLSX format files you will convert to XLS format.
1. Click the Add button;
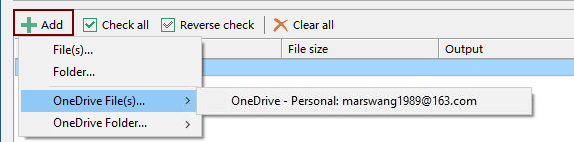
2. Click File(s) to add the XLSX format files, or click Folder to add a folder (all XLSX format files in the selected folder will be added to the dialog).
Tips: It supports converting files stored in OneDrive. Just click the OneDrive File(s) or OneDrive Folder, and then get into an OneDrive account to select the files.
3.3) In the
Output directory section, click the

button, you can select a local disk folder or a OneDrive folder to save the XLS format files after converting;
Note: If you did not add an OneDrive service to Excel, the submenu will not display. You can only save the converted files to a local disk folder.

3.4) Click the OK button to start converting the workbooks. See screenshot:
Tips:
1. By default, all added files are checked in the File source box, for the files you don’t want to convert, please uncheck them manually;
2. Click the

button will check all files at the same time in the File source box;
3. Click the

button will reverse the checking in the File source box;
4. Click the

button to remove all added files from the File source box;
5. If you want to convert files in subfolder, please check the Include subfolders when adding folders box;
6. If you don’t want to retain the original files after converting, please check the Delete source files after conversion box;
7. If you want to retain the modified date of original files, please check the Keep modified date of original files box;
Note: This option is unavailable when saving the converted files into OneDrive folders.
8. The directory structure of the file can be retained by checking the The directory structure of the file is preserved when converted box;
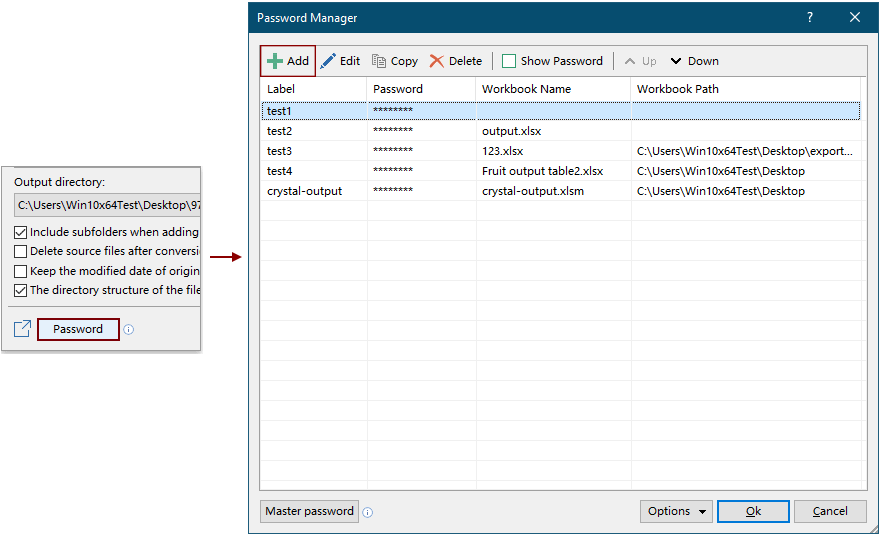
9. It supports converting the workbooks which have been encrypted by password.
Please click the Password button, in the Password manager dialog box, click the Add button to add the workbook’s password one by one, and then click the OK button. See screenshot:
Convert multiple XLS files to XLSX files in Excel
This feature can help to convert multiple XLS format files to XLSX format files at the same time in Excel.
1. Apply this feature by clicking Kutools Plus > Workbook > Format Converter.
2. Then a prompt box pops up, please browse the reminder carefully and then click OK.
3. In the File Format Converter dialog box, you need to configure as follows.
3.1) Select Excel 97-2003 to Excel 2007 or higher in the Convert type drop-down list;
3.2) Add XLS format files you will convert to XLSX format.
1. Click the Add button;
2. Click File(s) to add the XLS format files, or click Folder to add a folder (all XLS format files in the selected folder will be added to the dialog).
Tips: It supports converting files stored in OneDrive. Just click the OneDrive File(s) or OneDrive Folder, and then get into an OneDrive account to select the files.
3.3) In the
Output directory section, click the
button, you can select a local disk folder or a OneDrive folder to save the XLSX format files after converting;
Note: If you did not add an OneDrive service to Excel, the submenu will not display. You can only save the converted files to a local disk folder.
3.4) Click the OK button to start converting. See screenshot:

Tips:
1. By default, all added files are checked in the File source box, for the files you don’t want to convert, please uncheck them manually;
2. Click the
button will check all files at the same time in the File source box;
3. Click the
button will reverse the checking in the File source box;
4. Click the
button to remove all added files from the File source box;
5. If you want to convert files in subfolder, please check the Include subfolders when adding folders box;
6. If you don’t want to retain the original files after converting, please check the Delete source files after conversion box;
7. If you want to retain the modified date of original files, please check the Keep modified date of original files box;
Note: This option is unavailable when saving the converted files into OneDrive folders.
8. The directory structure of the file can be retained by checking the The directory structure of the file is preserved when converted box;
9. It supports converting the workbooks which have been encrypted by password.
Please click the Password button, in the Password manager dialog box, click the Add button to add the workbook’s password one by one, and then click the OK button. See screenshot:
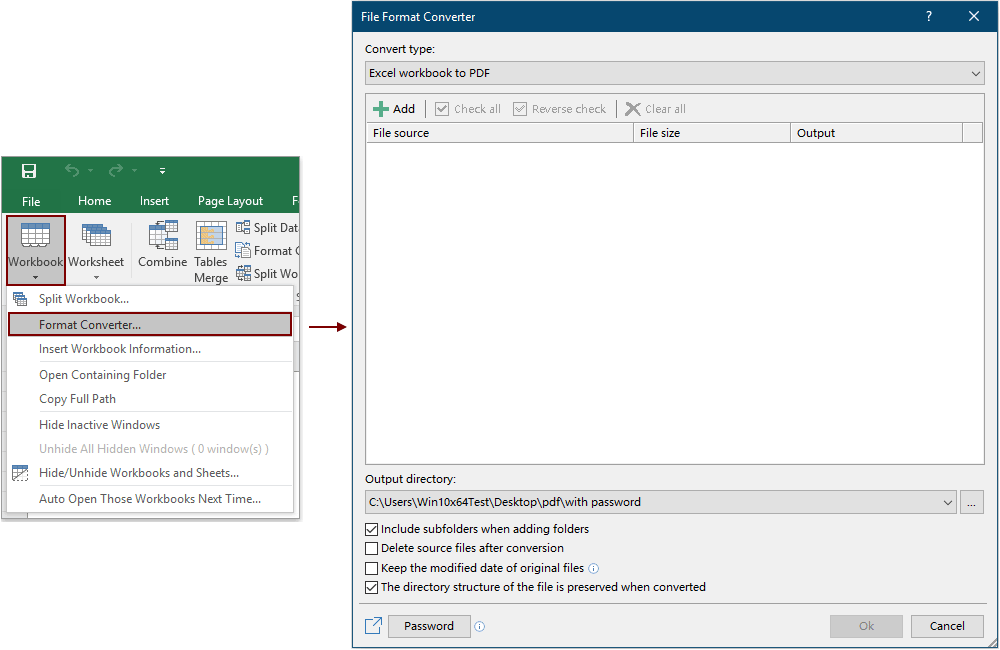
Convert multiple excel workbooks to PDF files in Excel
This section will show you how to apply the Format Converter feature to batch convert multiple workbooks to PDF files in Excel.
1. Click Kutools Plus > Workbook > Format Converter to enable the feature.
2. Then a prompt box pops up, please browse the reminder carefully and then click OK.
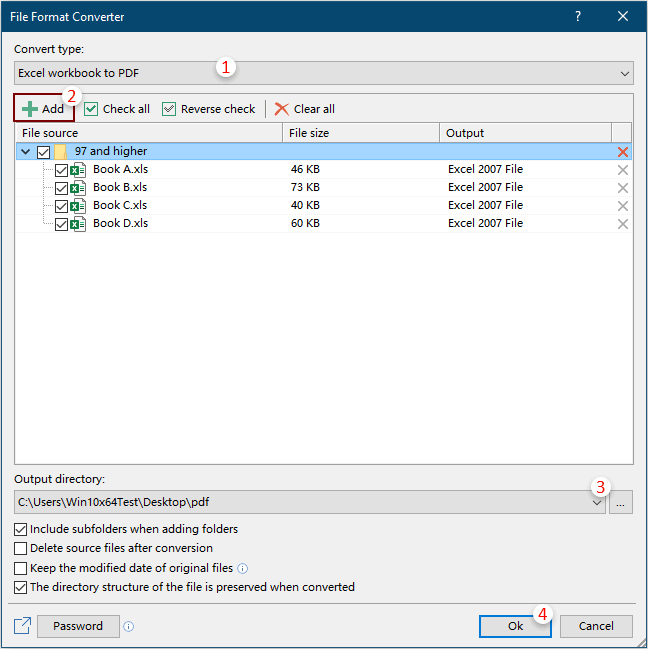
3. In the File Format Converter dialog box, please configure as follows.
3.1) In the Convert type drop-down list, select Excel workbook to PDF;
3.2) Add the workbooks you want to convert to PDF files.
1. Click the Add button;
2. In the submenu, you can click File(s) to add workbooks, or click Folder to add a folder (all workbooks in this selected folder will be added to the dialog).
Tips: It supports converting files stored in OneDrive. Just click the OneDrive File(s) or OneDrive Folder, and then get into an OneDrive account to select the files.
3.3) In the
Output directory section, click the
button, you can select a local disk folder or a OneDrive folder for saving the PDF files;
Note: If you did not add an OneDrive service to Excel, the submenu will not display. You can only save the converted files to a local disk folder.
3.4) Click the OK button to start converting. See screenshot:
Tips:
1. By default, all added files are checked in the File source box, for the files you don’t want to convert, please uncheck them manually;
2. Click the
button will check all files at the same time in the File source box;
3. Click the
button will reverse the checking in the File source box;
4. Click the
button to remove all added files from the File source box;
5. If you want to convert files in subfolder, please check the Include subfolders when adding folders box;
6. If you don’t want to retain the original files after converting, please check the Delete source files after conversion box;
7. If you want to retain the modified date of original files, please check the Keep modified date of original files box;
Note: This option is unavailable when saving the converted files into OneDrive folders.
8. The directory structure of the file can be retained by checking the The directory structure of the file is preserved when converted box;
9. It supports converting the workbooks which have been encrypted by password.
Please click the Password button, in the Password manager dialog box, click the Add button to add the workbook’s password one by one, and then click the OK button. See screenshot:
Notes:
1. After converting, a new workbook will be displayed to show the details of the conversion. You can save this workbook for reference or just close it without saving based on your need.

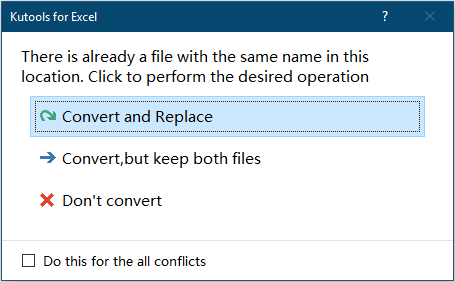
2. If there is same name file exist in the destination folder, you will get the below dialog box, please choose an operation as you need.
3. OneDrive in this feature can only be applied in Excel 2013 and the later versions.
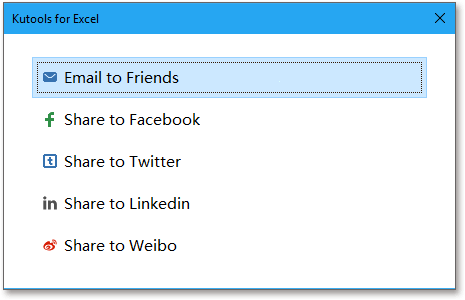
2. Click

button to share this utility to your friends through email or social medias if you like it.
Demo: Quickly convert multiple XLSX files to XLS or PDF files from local disk or OneDrive
Kutools for Excel: Over 300 handy tools at your fingertips! Enjoy AI-powered features for smarter and faster work!
Download Now!
Productivity Tools Recommended
Office Tab: Use handy tabs in Microsoft Office, just like Chrome, Firefox, and the new Edge browser. Easily switch between documents with tabs — no more cluttered windows. Know more...
Kutools for Outlook: Kutools for Outlook offers 100+ powerful features for Microsoft Outlook 2010–2024 (and later versions), as well as Microsoft 365, helping you simplify email management and boost productivity. Know more...
Kutools for Excel offers 300+ advanced features to streamline your work in Excel 2010 – 2024 and Microsoft 365. The feature above is just one of many time-saving tools included.
🌍 Supports 40+ interface languages
✅ Trusted by 500,000+ users and 80,000+ businesses worldwide
🚀 Compatible with all modern Excel versions
🎁 30-day full-featured trial — no registration, no limitations


 button, you can select a local disk folder or a OneDrive folder to save the XLS format files after converting;

 button will check all files at the same time in the File source box;
 button will reverse the checking in the File source box;
 button to remove all added files from the File source box;


 button to share this utility to your friends through email or social medias if you like it.
