Create Rules Like a Pro: Master Email Management with Kutools Advanced Rules in Outlook
In the bustling world of professional communication, managing an inbox efficiently can be as crucial as any strategic decision. Microsoft Outlook is a staple for email handling in many businesses, but with Kutools for Outlook's Advanced Rules, users can transcend typical limitations and optimize their email processes. This guide delves into the distinct advantages of Advanced Rules over standard Outlook Rules, demonstrates how to set them up, and explores practical applications that can help you master your email environment effectively.
Kutools Advanced Rules VS Outlook Rules
While Microsoft Outlook's native rules provide foundational email management capabilities, Kutools for Outlook's Advanced Rules feature takes your productivity to the next level. The Advanced Rules feature offers several distinct advantages over standard Outlook Rules. Here’s a detailed look at these benefits:
🌐 Multi-Account Application:
Unlike Outlook’s native rules which apply only to the email account for which they are set up, Kutools Advanced Rules can be applied across multiple email accounts within Outlook. This feature allows users to easily implement a single rule to all or specified accounts, streamlining the process and ensuring consistency across various email communications.
🚀 More Conditions for Rule Creation:
Kutools Advanced Rules offer a broader range of condition options. For instance, users can set conditions based on the language of the email, whether the attachment name includes specific words, or the type of attachment. These newly added conditions greatly enhance the organization and management of your inbox.
⚙️ Enhanced Customization:
While Outlook Rules are limited to predefined actions and conditions, Kutools Advanced Rules offer extensive customization options, allowing for complex rules with nested conditions. For example, Outlook Rules can only check if the subject or body contains specific words. In contrast, Advanced Rules can specify conditions like 'contain', 'does not contain', 'is (exactly)', 'is not', 'begins with', 'does not begin with', 'ends with', and 'does not end with'. Additionally, when handling the text of specific words, Outlook Rules can only combine conditions using 'or' (meaning any one condition can trigger the rule), Advanced Rules allows for more complex logic by enabling both 'and' (all conditions must be met) and 'or' relations among text conditions. This allows for more precise email filtering.
📂 Classified Categories:
When setting up conditions, Outlook Rules mix all conditions together. In contrast, Kutools Advanced Rules enhance organization by neatly categorizing conditions into distinct rule types, simplifying the setup process.
🔍 Clearer Overview:
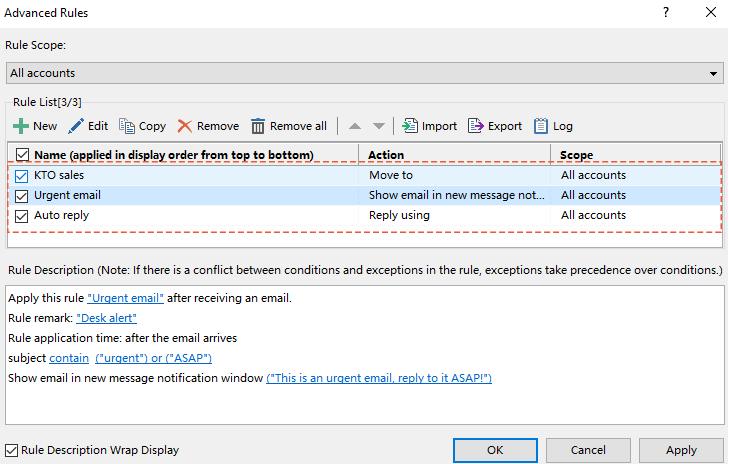
The Advanced Rules feature offers a comprehensive overview of all your rules, providing clear visibility into the actions each rule will execute. For instance, if a rule is set to move an email to a specific folder upon meeting certain conditions, the interface will distinctly display the action as 'Move to'. This clarity not only simplifies rule management but also aids significantly in troubleshooting.
🌟 User-Friendly Interface:
While Outlook Rules interface can be complex for new users, the intuitive interface of Advanced Rules makes it easy to set up and manage rules.
🤝 Seamless Integration:
Kutools Advanced Rules integrate seamlessly with Outlook, ensuring that all your existing emails and settings are compatible and that you can continue using Outlook without any disruption.
Examples of Creating Rules with Advanced Rules in Outlook
Creating and managing email rules doesn't have to be daunting. Kutools for Outlook's Advanced Rules feature simplifies this process with a robust and intuitive interface that caters to both novice users and power users alike. In this section, we will explore how you can leverage Advanced Rules to streamline your email workflow, showcasing three popular examples of rules in Outlook.
Example 1: Automatically Moving Emails to Specific Folders
This rule is essential for users who handle a high volume of incoming emails from various sources. It automatically sorts emails into designated folders, enabling users to prioritize and respond more efficiently. For instance, emails containing specific keywords are moved to respective folders. This organization helps maintain a clean and orderly inbox, allowing users to quickly locate emails related to specific topics or projects without having to sift through a cluttered inbox.
Step 1. Enable the Advanced Rules feature and start to create a new rule
1. Go to the Kutools tab and click Advanced Rules.

2. In the Advanced Rules dialog box, click the  New button to start the creation of a new rule.

Step 2: Set up conditions for the rule
In this scenario, we aim to move emails that contain the phrases 'Kutools for Outlook' and 'sales' or 'KTO' and 'sales' in either the subject or body, to a designated folder.
1. In the Create New Rule – Step 1 of 4 dialog box, check the Subject or body contain specific words option.
2. The Text Contains dialog box pops up. Click the New button.

3. In the Search Text dialog box, please do as follows.
3.1 Type 'Kutools for Outlook' and 'sales' in the New Search Text textbox.
3.2 Click Add.
3.3 Click OK.

By doing so, it specifies the condition that emails must contain both words.
4. Then it goes back to the Text Contains dialog box. To add an alternative set of phrases, please click the New button again.

5. In the Search Text dialog box, repeat the routine.
5.1 Type ‘KTO' and 'sales' in the New Search Text textbox.
5.2 Click Add.
5.3 Click OK.

6. Now the condition is set up successfully. This condition will be applied to emails that contain either 'Kutools for Outlook' and 'sales' or 'KTO' and 'sales'. Click OK.

7. Click Next to move to the Action settings.

- Apart from checking if the subject or body 'contains' specific words, Advanced Rules can also specify conditions like 'does not contain', 'is (exactly)', 'is not', 'begins with', 'does not begin with', 'ends with', and 'does not end with'.
Simply click the underlined contain text in the Create New Rule – Step 1 of 4 dialog box and choose from the drop-down menu in the popping-up Create New Rule dialog box. 

Step 3: Set up actions for the rule
1. In the Create New Rule – Step 2 of 4 dialog box, check the Move to specified folder option.
2. In the popping-up Select Folder dialog box, choose the designated folder.
3. Click OK.

4. Click Next to move to Exceptions settings.

Step 4: Set up exceptions for the rule
In the Create New Rule – Step 3 of 4 dialog box, specify the exceptions. In this example, we don’t have exceptions, so we click Next.

Step 5: Finish rule setup
1. In the Create New Rule – Step 4 of 4 dialog box, input the name of the rule in the Rule Name textbox.
2. (optional) Input the remarks of the rule in the Rule Remarks textbox.
3. Click OK.

- If you want to apply this rule to specific accounts, instead of all accounts, please select the accounts from the Rule Scope drop-down list.

- By default, the Enable This Rule box is checked. If you don’t want to enable the rule, uncheck the box.

Result
Now the rule is successfully created. Click OK to finish the settings. From now on, if the arriving emails contain the words 'Kutools for Outlook' and 'sales' or 'KTO' and 'sales' in either the subject or body, they will be moved to the designated folder.

Example 2: Setting Alerts for High-Priority Communications
It's crucial for users such as managers to respond promptly to communications from upper management or critical clients to ensure effective decision-making and client satisfaction. To facilitate this, they can configure a rule to trigger a desktop alert whenever an email containing words like "urgent" or "ASAP" is received in the subject line. Implementing this rule ensures that managers are immediately notified about important emails, enabling them to swiftly address critical issues and maintain high levels of responsiveness and professionalism.
Step 1. Enable the Advanced Rules feature and start to create a new rule
1. Go to the Kutools tab and click Advanced Rules.
2. In the Advanced Rules dialog box, click the New button to start the creation of a new rule.

Step 2: Set up conditions for the rule
In this scenario, we aim to trigger a desktop alert whenever an email is received that contains words like "urgent" or "ASAP" in the subject line.
1. In the Create New Rule – Step 1 of 4 dialog box, check the Subject contain specific words option.
2. The Text Contains dialog box pops up. Click the New button.

3. In the Search Text dialog box, please do as follows.
3.1 Type 'urgent' in the New Search Text textbox.
3.2 Click Add.
3.3 Click OK.

By doing so, it specifies the condition that emails must contain the word ‘urgent’.
4. Then it goes back to the Text Contains dialog box. To add an alternative text, , please click the New button again.

5. In the Search Text dialog box, repeat the routine.
5.1 Type ‘ASAP' in the New Search Text textbox.
5.2 Click Add.
5.3 Click OK.

6. Now the condition is set up successfully. This condition will be applied to emails that contain either ‘urgent' or ‘ASAP’. Click OK.

7. Click Next to move to the Action settings.

- Apart from checking if the subject or body 'contains' specific words, Advanced Rules can also specify conditions like 'does not contain', 'is (exactly)', 'is not', 'begins with', 'does not begin with', 'ends with', and 'does not end with'.
Simply click the underlined contain text in the Create New Rule – Step 1 of 4 dialog box and choose from the drop-down menu in the popping-up Create New Rule dialog box. 

Step 3: Set up actions for the rule
1. In the Create New Rule – Step 2 of 4 dialog box, check the Show email in new message notification window with specific message option.
2.In the Create New Rule dialog box that appears, enter the specific message as shown below for the desktop alert.
"This is an urgent email, reply to it ASAP! "
3. Click OK.

4. Click Next to move to Exceptions settings.

Step 4: Set up exceptions for the rule
In the Create New Rule – Step 3 of 4 dialog box, specify the exceptions. In this example, we don’t have exceptions, so we click Next.

Step 5: Finish rule setup
1. In the Create New Rule – Step 4 of 4 dialog box, input the name of the rule in the Rule Name textbox.
2. (optional) Input the remarks of the rule in the Rule Remarks textbox.
3. Click OK.

- If you want to apply this rule to specific accounts, instead of all accounts, please select the accounts from the Rule Scope drop-down list.
- By default, the Enable This Rule box is checked. If you don’t want to enable the rule, uncheck the box.
Result
Now the rule is successfully created. Click OK to finish the settings. From now on, whenever an email arrives that contains words like "urgent" or "ASAP" in the subject line, a desktop alert displaying the message "This is an urgent email, reply to it ASAP!" will appear.

Example 3: Automating Responses to Common Inquiries
This rule is ideal for customer service roles where many received emails contain similar questions. Kutools Advanced Rules allows setting up rules to automatically respond to common inquiries, such as requests for product information or pricing, with a pre-written template. By automating responses, teams can focus more on complex queries, improving overall efficiency and customer satisfaction.
Step 1. Enable the Advanced Rules feature and start to create a new rule
1. Go to the Kutools tab and click Advanced Rules.
2. In the Advanced Rules dialog box, click the New button to start the creation of a new rule.

Step 2: Set up conditions for the rule
In this scenario, we aim to automatically reply to an email with a pre-written template whenever an email containing 'information' or 'product details' in the subject line is received.
1. In the Create New Rule – Step 1 of 4 dialog box, check the Subject contain specific words option.
2. The Text Contains dialog box pops up. Click the New button.
3. In the Search Text dialog box, please do as follows.
3.1 Type 'information' in the New Search Text textbox.
3.2 Click Add.
3.3 Click OK.

By doing so, it specifies the condition that emails must contain the word ‘information’.
4. Then it goes back to the Text Contains dialog box. To add an alternative text, , please click the New button again.

5. In the Search Text dialog box, repeat the routine.
5.1 Type ‘product details' in the New Search Text textbox.
5.2 Click Add.
5.3 Click OK.

6. Now the condition is set up successfully. This condition will be applied to emails that contain either ‘information' or ‘product details’’. Click OK.

7. Click Next to move to the Action settings.

- Apart from checking if the subject or body 'contains' specific words, Advanced Rules can also specify conditions like 'does not contain', 'is (exactly)', 'is not', 'begins with', 'does not begin with', 'ends with', and 'does not end with'.
Simply click the underlined contain text in the Create New Rule – Step 1 of 4 dialog box and choose from the drop-down menu in the popping-up Create New Rule dialog box.
Step 3: Set up actions for the rule
1. In the Create New Rule – Step 2 of 4 dialog box, check the Reply with specific template option.
2.In the Reply Template dialog box that appears, enter the subject prefix in the Subject Prefix textbox.
3. Continue to input the body of your reply in the Text textbox.
4. Click OK.

4. Click Next to move to Exceptions settings.

Step 4: Set up exceptions for the rule
In the Create New Rule – Step 3 of 4 dialog box, specify the exceptions. In this example, we don’t have exceptions, so we click Next.

Step 5: Finish rule setup
1. In the Create New Rule – Step 4 of 4 dialog box, input the name of the rule in the Rule Name textbox.
2. (optional) Input the remarks of the rule in the Rule Remarks textbox.
3. Click OK.

- If you want to apply this rule to specific accounts, instead of all accounts, please select the accounts from the Rule Scope drop-down list.
- By default, the Enable This Rule box is checked. If you don’t want to enable the rule, uncheck the box.
Result
Now the rule is successfully created. Click OK to finish the settings. From now on, any incoming email that includes 'information' or 'product details' in the subject line will automatically be responded to with the reply template you configured earlier.

In the Advanced Rules dialog box, there are buttons in the toolbar.
 : Click this button to create a new rule.
 : Select a rule, and then click this button to edit it.
 : Select a rule, and then click this button to copy it.
 : Select a rule, and then click this button to remove it.
 : Click this button to remove all rules.
 : Select a rule, and click this button to move it up.
 : Select a rule, and click this button to move it down.
 : Click this button to import rules into the Rule list.
 : Click this button to export all rules.
 : Click this button to view the operation
 : If you tick this option, the rule description in above Rule description box will be automatically wrapped based on the width of the Advanced Rules dialog box.
- In the Advanced Rules dialog box, check the checkbox beside Name to enable or disenable all rules.
- In the Advanced Rules dialog box, you can use right-click menu to perform more operations.

- If you have created multiple rules into the Advanced Rules dialog, these rules will be executed from the top down.
 : If you tick this option, the rule description in above Rule description box will be automatically wrapped based on the width of the Advanced Rules dialog box.
Best Office Productivity Tools
Experience the all-new Kutools for Outlook with 100+ incredible features! Click to download now!
📧 Email Automation: Auto Reply (Available for POP and IMAP) / Schedule Send Emails / Auto CC/BCC by Rules When Sending Email / Auto Forward (Advanced Rules) / Auto Add Greeting / Automatically Split Multi-Recipient Emails into Individual Messages ...
📨 Email Management: Recall Emails / Block Scam Emails by Subjects and Others / Delete Duplicate Emails / Advanced Search / Consolidate Folders ...
📁 Attachments Pro: Batch Save / Batch Detach / Batch Compress / Auto Save / Auto Detach / Auto Compress ...
🌟 Interface Magic: 😊More Pretty and Cool Emojis / Remind you when important emails come / Minimize Outlook Instead of Closing ...
👍 One-click Wonders: Reply All with Attachments / Anti-Phishing Emails / 🕘Show Sender's Time Zone ...
👩🏼🤝👩🏻 Contacts & Calendar: Batch Add Contacts From Selected Emails / Split a Contact Group to Individual Groups / Remove Birthday Reminders ...
Use Kutools in your preferred language – supports English, Spanish, German, French, Chinese, and 40+ others!


🚀 One-Click Download — Get All Office Add-ins
Strongly Recommended: Kutools for Office (5-in-1)
One click to download five installers at once — Kutools for Excel, Outlook, Word, PowerPoint and Office Tab Pro. Click to download now!
- ✅ One-click convenience: Download all five setup packages in a single action.
- 🚀 Ready for any Office task: Install the add-ins you need, when you need them.
- 🧰 Included: Kutools for Excel / Kutools for Outlook / Kutools for Word / Office Tab Pro / Kutools for PowerPoint
Table of contents
- Kutools Advanced Rules VS Outlook Rules
- Examples of creating rules with Advanced Rules in Outlook
- Automatically moving emails to specific folders
- Setting alerts for high-priority communications
- Automating responses to common inquiries
- Best Office Productivity Tools
- Comments