Never block emails by message content in Outlook
Kutools for Outlook
You might have experienced the frustration of emails being inaccurately marked as spam, resulting in important and relevant emails not accurately reaching your inbox. This article aims to introduce the Never Block Body feature of Kutools for Outlook. This feature assists you in quickly creating a Never Block List using the email body, helping users filter out the actual spam, and ensuring the smooth receipt of important emails, so that you won't miss any important information.
- One click to add body of selected emails to the Never Block Body rule
- Manually create a rule containing the body that you never want to block
- Easily manage the never blocked body rules
One click to add body of selected emails to the Never Block Body rule
With the Never Block Body feature of Kutools for Outlook, you can easily add the body text of multiple selected emails to a never block body rule. Then emails containing the same body text will never be considered spam.
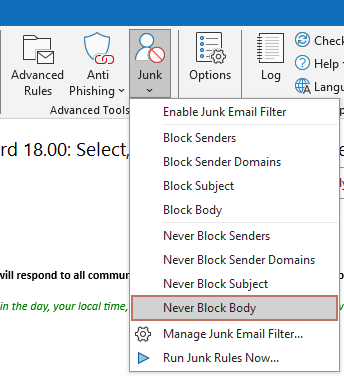
- Hold down the Ctrl key and select the emails you want to add the body text to the never-block list. Go to select Kutools > Junk > Never Block Body.
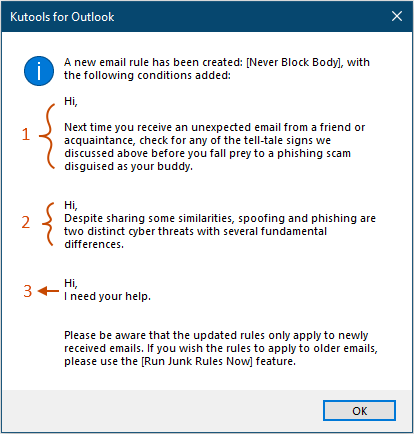
- A Kutools for Outlook dialog box pops up telling you that a new email rule has been created. Click the OK button. Tip: You can see the body text of the selected emails listed in the dialog box. In this case, as I select three emails, there are three body texts listed in the dialog box.
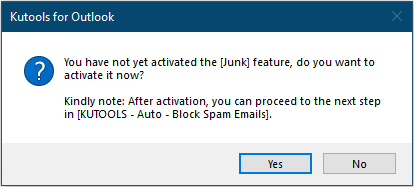
- If the Junk Email Filter feature is not enabled, the following dialog box will appear. You can:
- Click the Yes button: Clicking this button will enable the Junk Email Filter, and the emails you receive in the future will be automatically detected and never blocked.
- Click the No button: Clicking this button will only add the body text of the currently selected emails to the Never Block Body rule and end the operation.
Now you have created a rule named Never Block Body.
- The relationship between the body texts in this Never Block Body rule is "or", which means that incoming emails that match any of the body texts in the rule will be treated as legitimate emails.
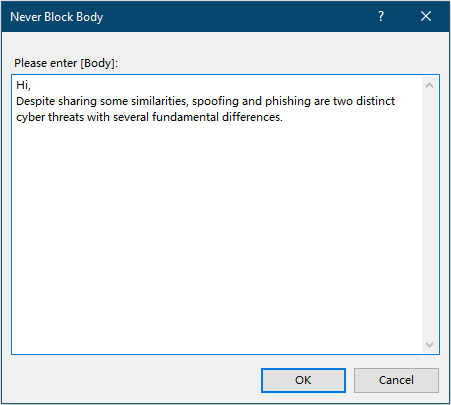
- If you select only one email and apply the Never Block Body feature, the following Never Block Body dialog box will pop up. The text box lists the body text of the selected email, which you can change as needed, and then click OK to create this rule.
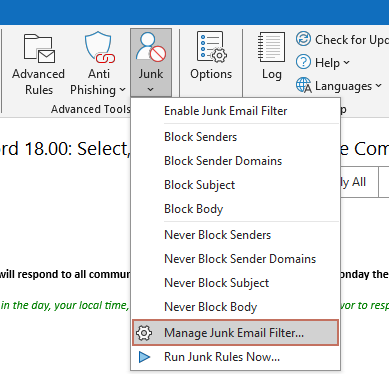
- If you keep adding the body text of selected emails, the body texts will be added to the same rule named Never Block Body in Kutools for Outlook. You can view and edit this rule by clicking Kutools > Junk > Manage Junk Email Filter.
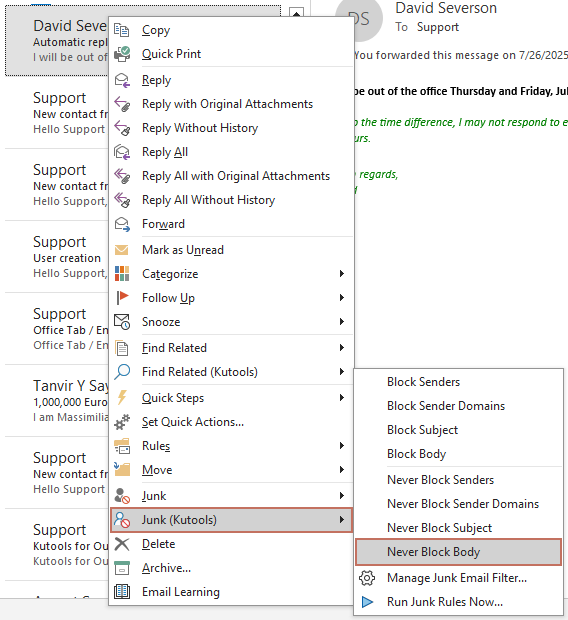
- You can also access the Never Block Body feature by right-clicking the selected emails in the mailing list and then selecting Junk (Kutools) > Never Block Body.
Manually create a rule containing the body that you never want to block
For example, you don't want to block incoming emails whose body text contains the text "Super Low Discount", but there is no matching body text in existing emails. In this case, you can manually add this body text to a new Never Block Body rule. Please do as follows.
- Select Kutools > Junk > Manage Junk Email Filter to open the Junk management window.
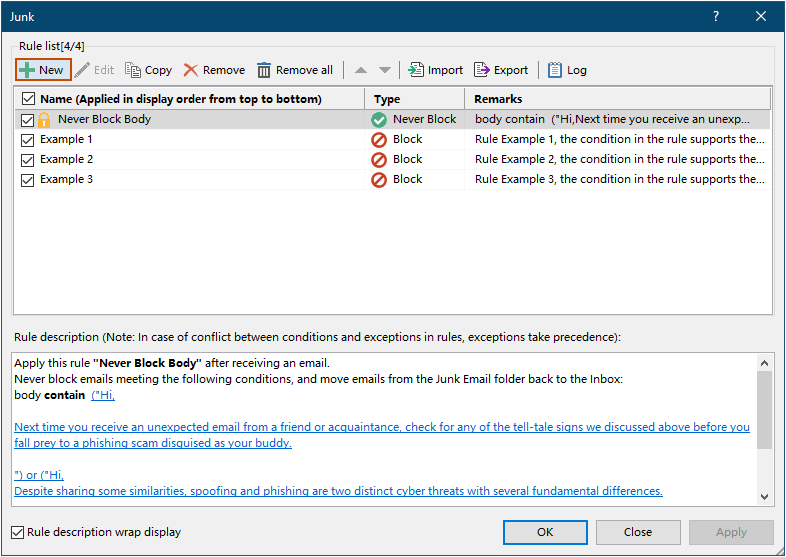
- In the Junk window, click the New button.
- In the Create New Rule – Step 1 of 3 wizard, please do the following operations: 3.1) Select Never Block from the Rule type drop-down list.3.2) Tick the checkbox before Body in the condition list;3.3) Then a Text Contains dialog box pops up, click the New button. See screenshot:

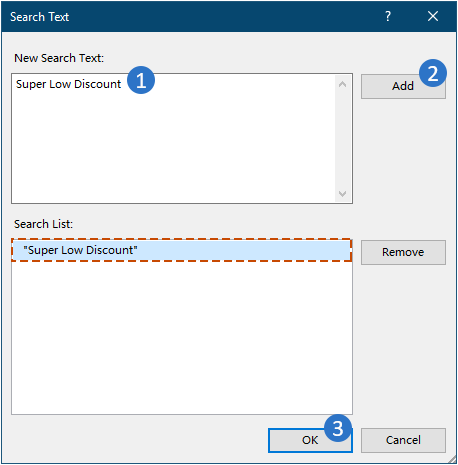
- In the Search Text dialog box, you need to: 4.1) Enter the body text in the New Search Text textbox.4.2) Click the Add button to add the body text to the Search List.4.3) Click OK to save the changes.
- Then it returns to the Text Contains dialog box. You can see the newly added body text is listed in the Text box, click the OK button. Tip: You can repeat the above steps to continue adding new body texts in this dialog box if you need to. And the relationship between the subjects will be "or".

- Now it returns to the Create New Rule – Step 1 of 3 dialog box. By default, the condition for this rule is "contain", you can change the condition by clicking the underlined text "contain", and in the popping-up Create New Rule dialog box, choose the condition you need from the Body drop-down list and then click OK > OK to save the changes.

- Finally, it returns to the Junk window, you can see that the newly created rule named "Rule" is listed in the rule list, click the OK button to save the rule. Tip: In the Rule description section, you can modify the rule such as change the rule name, change the rule condition, and change the body text by clicking on the corresponding underlined text.

Easily manage the never-blocked body rules
After creating junk email rules using the above methods, you can easily manage these rules with the following steps.
- Select Kutools > Junk > Manage Junk Email Filter to open the Junk management window.

- In the Junk management window, you can edit the rule you created above. 2.1) In the rule list, select the rule named Never Block Body or the never block body rule you created manually.2.2) Click the underlined text in the Rule description box.
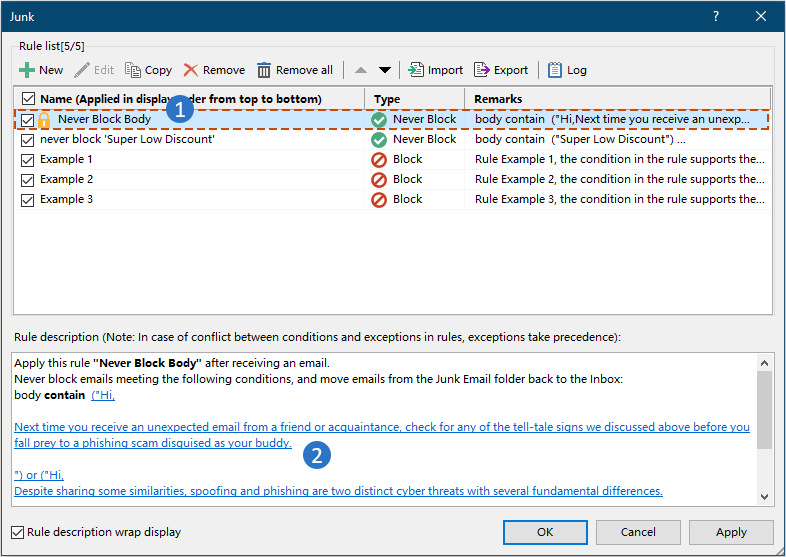 2.3) In the opening Text Contains dialog box, you can add new body text, edit a body text, remove a body text, or clear all body texts as you need.Here are the steps for adding new body texts to the Never Block Body rule.1) Click the New button in the Text Contains dialog box.2) In the Search Text dialog box, enter the body text you need in the New Search Text textbox.3) Click the Add button to add the new body text to the Search List.4) Click OK to save the changes.
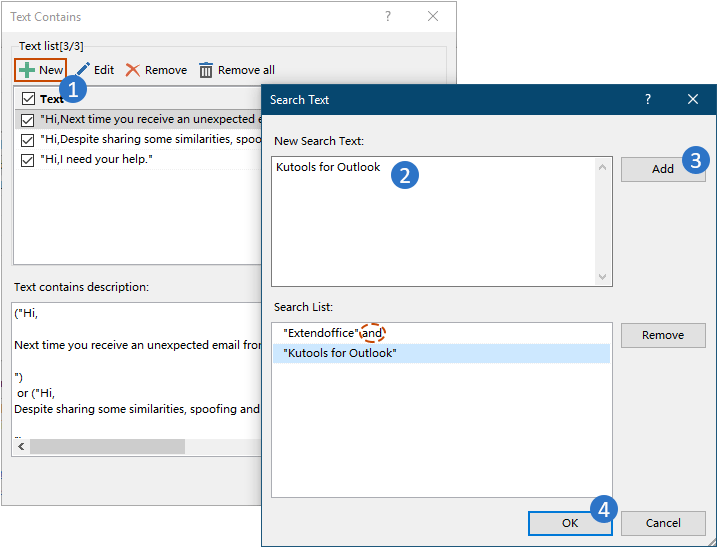 Note: If you keep adding body texts in the Search Text dialog box before saving, the relationship between these new body texts will be "and", which means that the body of the incoming email containing all these texts will never be blocked.2.4) Now it returns to the Text Contains dialog box. You can see the newly created body text is listed in the Text section. Click OK to save the changes.
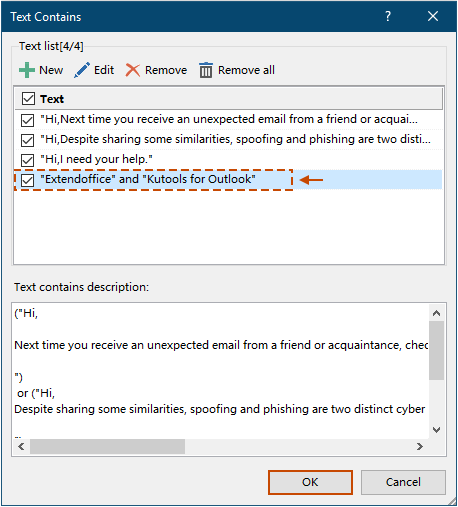 Tip: If you want to temporarily disable a subject, just untick the checkbox before it.2.5) Then it returns to the Junk window, you can see the specified rule is updated. Click OK to save the changes.
- To turn off the Junk Email Filter, go to select Kutools > Junk > Enable Junk Email Filter. Make sure that the tick symbol disappears before it.
- To temporarily turn off a rule, go to select Kutools > Junk > Manage Junk Email Filter. In the Junk window, untick the checkbox before the rule and then click OK to save the changes.
- The Example rules provided in the Junk window help to better understand the junk rules of this feature. You can delete them if you no longer need them.
- A context menu is provided in the Junk window. You can right-click on a rule and choose the option you need from the context menu.
 Select all: Selecting this option will check all rules listed in the Junk window.
 Unselect all: Selecting this option will uncheck all rules listed in the Junk window.
 Inverse: Selecting this option will reverse the selection status of multiple rules within the rule list.
 Select up: Selecting this option will check the currently selected rule and all rules above it.
 Select down: Selecting this option will check the currently selected rule and all rules below it.
- If there are multiple created rules in the Junk window, the rules will be executed in order from top to bottom (never block rules are always at the top).
- In the Junk window, you can edit, copy, remove rules, clear, import, or export all rules if you need.

- In the Junk window, you can check the Rule description wrap display box to wrap the long rule description for a better preview.
Best Office Productivity Tools
Experience the all-new Kutools for Outlook with 100+ incredible features! Click to download now!
📧 Email Automation: Auto Reply (Available for POP and IMAP) / Schedule Send Emails / Auto CC/BCC by Rules When Sending Email / Auto Forward (Advanced Rules) / Auto Add Greeting / Automatically Split Multi-Recipient Emails into Individual Messages ...
📨 Email Management: Recall Emails / Block Scam Emails by Subjects and Others / Delete Duplicate Emails / Advanced Search / Consolidate Folders ...
📁 Attachments Pro: Batch Save / Batch Detach / Batch Compress / Auto Save / Auto Detach / Auto Compress ...
🌟 Interface Magic: 😊More Pretty and Cool Emojis / Remind you when important emails come / Minimize Outlook Instead of Closing ...
👍 One-click Wonders: Reply All with Attachments / Anti-Phishing Emails / 🕘Show Sender's Time Zone ...
👩🏼🤝👩🏻 Contacts & Calendar: Batch Add Contacts From Selected Emails / Split a Contact Group to Individual Groups / Remove Birthday Reminders ...
Use Kutools in your preferred language – supports English, Spanish, German, French, Chinese, and 40+ others!


🚀 One-Click Download — Get All Office Add-ins
Strongly Recommended: Kutools for Office (5-in-1)
One click to download five installers at once — Kutools for Excel, Outlook, Word, PowerPoint and Office Tab Pro. Click to download now!
- ✅ One-click convenience: Download all five setup packages in a single action.
- 🚀 Ready for any Office task: Install the add-ins you need, when you need them.
- 🧰 Included: Kutools for Excel / Kutools for Outlook / Kutools for Word / Office Tab Pro / Kutools for PowerPoint


 Select all: Selecting this option will check all rules listed in the Junk window.
 Unselect all: Selecting this option will uncheck all rules listed in the Junk window.
 Inverse: Selecting this option will reverse the selection status of multiple rules within the rule list.
 Select up: Selecting this option will check the currently selected rule and all rules above it.
 Select down: Selecting this option will check the currently selected rule and all rules below it.
