Proofreading, instantly refining text, extending writing, and summarizing content seamlessly in Word document
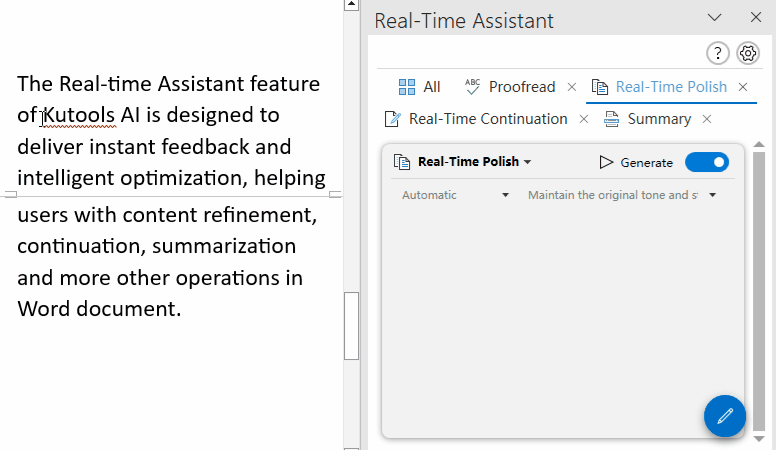
The Real-time Assistant feature of Kutools AI is designed to deliver instant feedback and intelligent optimization, helping users with proofreading, content refinement, continuation, summarization, and more operations in Word documents.
This powerful tool allows users to see language enhancements and content extensions in real-time while editing documents, eliminating the need for tedious manual revisions. With dynamic, real-time operations, users can instantly improve document quality, saving significant time while ensuring accuracy and logical coherence.
Why choose Real-time Assistant of Kutools AI?
Examples for using Real-time Assistant of Kutools AI
- Example 1: Real-time proofreading of written or the entire document
- Example 2: Real-time refinement of written or selected content
- Example 3: Real-time continuation of written or selected content
- Example 4: Real-time summarization of written or selected content
- Other Examples: Real-time content review, information extraction, and more features
- Create custom role prompts and information for your own
- Some tips for using Real-time Assistant
Why choose Real-time Assistant of Kutools AI?
Here are a few compelling reasons to choose the Real-time Assistant feature of Kutools AI:
- ✍️ Instant Feedback and Refinement: Get immediate suggestions to enhance your writing quality and clarity without any delays.
- 📝 Dynamic Continuation and Summarization: Effortlessly extend your ideas or generate concise summaries, helping you create content seamlessly.
- ⚙️ Switch between Auto-mode and Manual-mode: Easily toggle between automatic assistance and manual control to suit your specific writing needs.
- ⏱️ Improved Efficiency: Streamline your workflow with quick editing and real-time updates, saving you time and effort.
- ✅ Accuracy and Coherence: Ensure your content is not only accurate but also logically coherent, resulting in high-quality writing.
- 🎛️ Customizable Functionality: Tailor the functions and prompts to match your preferences and get the exact level of assistance you need.
Examples for using Real-time Assistant of Kutools AI
Before using this feature, please download and install Kutools for Word. Then, configure the AI server's API key and model. For instructions on how to set this up, refer to How to Setup Real-time Assistant of Kutools AI section.
Whether you're drafting a report, writing an article, or working on a creative project, the Real-time Assistant offers functionality to help you proofread, refine, continue, and summarize content, as well as perform other operations such as content advising, information extraction, and more. Here are a few practical examples of how you can make the most of this feature to improve productivity and writing quality.
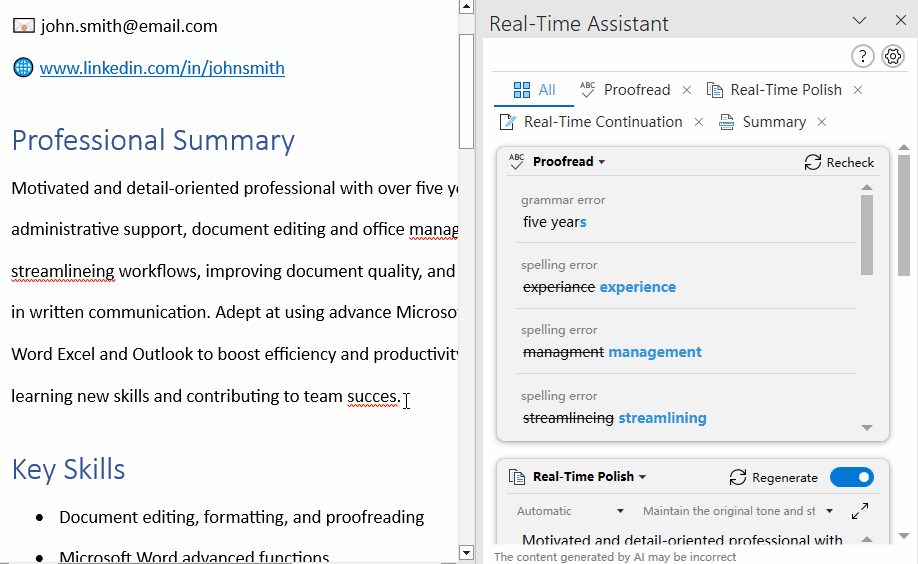
Example 1: Real-time proofreading of written or the entire document
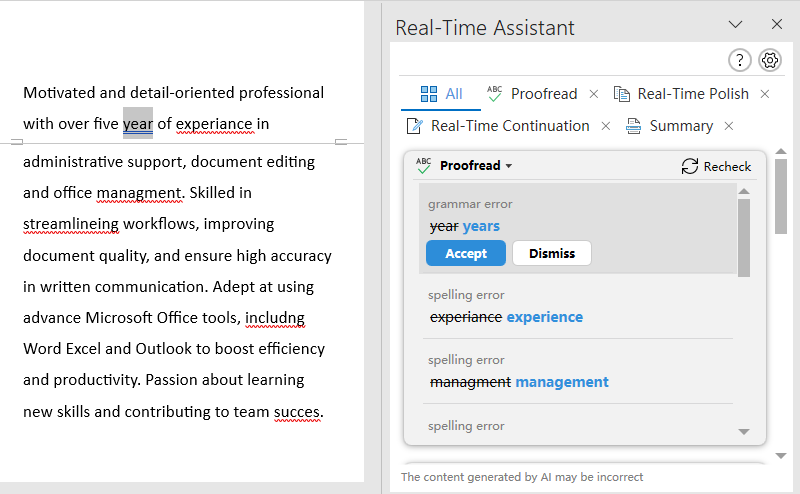
The Proofread tab in the Real-time Assistant of Kutools for Word enables you to quickly check your document for grammar, spelling, punctuation, and word choice issues. It can automatically scan the paragraph you are currently typing or the entire document, and then provide suggested corrections to help you improve accuracy and readability with minimal effort.
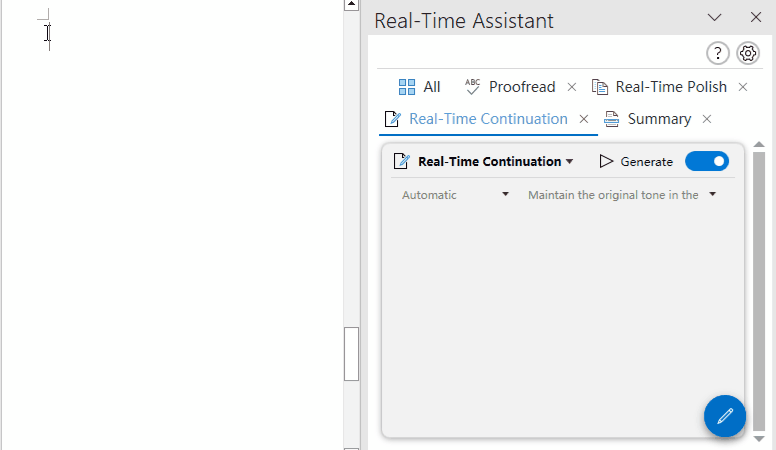
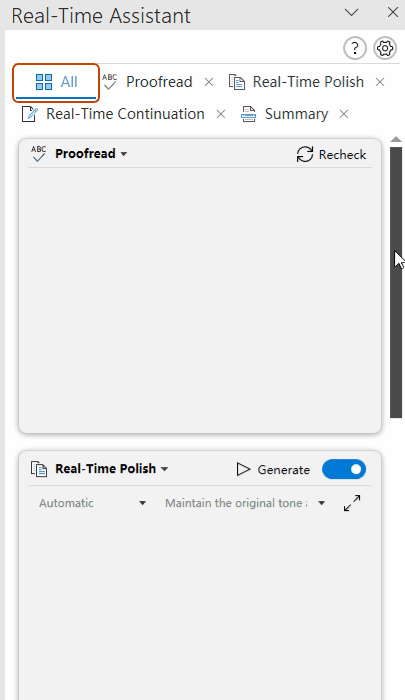
- Open your Word document and go to Kutools AI > RT Assist > RT Assist to open the RT Assist pane.
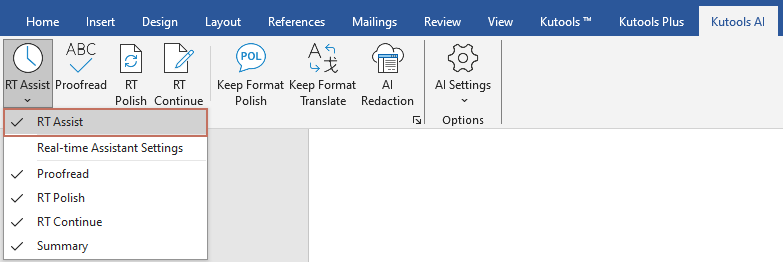
- If the document contains content, Kutools AI will automatically scan the entire document and list all detected errors in the Proofread box of the Real-time Assistant pane.
 For detailed usage instructions and examples of this Proofread feature, click the corresponding hyperlinks below:


Example 2: Real-time refinement of written or selected content
Real-time refinement of written or selected content is a feature that allows users to instantly improve the quality of their writing. For example, if you're drafting a business proposal and want to ensure a professional tone, simply select the relevant text, and the Real-time Assistant will provide immediate feedback to refine and polish your content, making it clearer, more concise, and effective.
- Click Kutools AI > RT Assist > RT Assist, and the RT Assist pane is displayed at the right of the Word document.
If you want to display only the Real-Time Polish box in the pane, navigate to the RT Polish tab.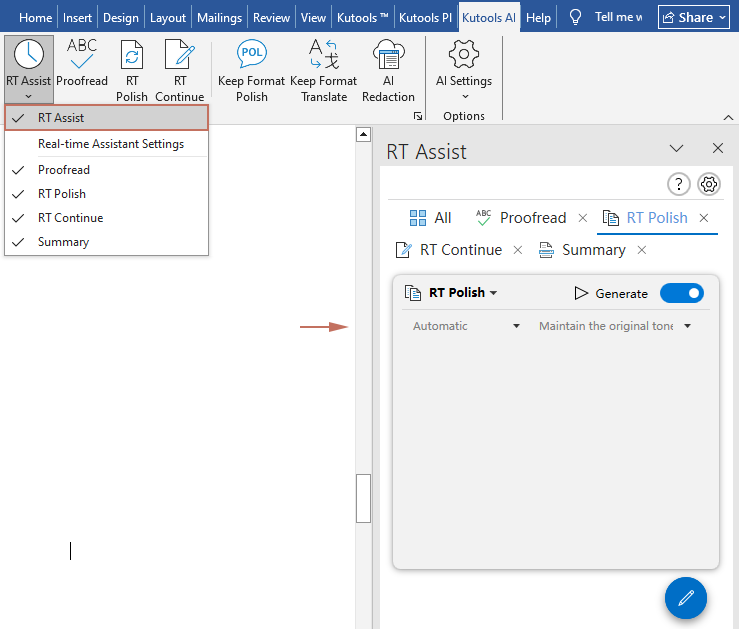
- Now, when you select the content in the Word, the AI will automatically enhance and refine the selected content. (The Real time Polish feature is auto-enabled by default.)
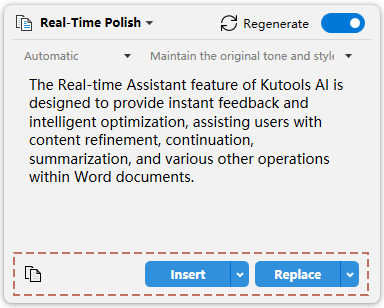
- After generating the refined text, you can either insert the new content or replace the original text directly by clicking the Insert or Replace button, depending on your needs. Alternatively, you can copy the content and paste it anywhere you need by clicking the Copy button.


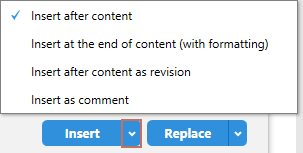
- 1. Insert button - By default, clicking Insert will add the AI-generated content immediately after the existing content. You can click the small arrow to choose a different insertion method, such as inserting at the end of the document, inserting as a revision, or inserting as a comment. Once you select an option, that method will be applied the next time you click Insert.
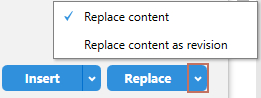
- 2. Replace button - By default, clicking Replace will overwrite the selected content with the AI-generated result. You can click the small arrow to choose other replacement methods, such as replacing the content as a revision. Once you select an option, it will be applied the next time you click Replace.
- 1. If you're in the process of writing, the AI will automatically optimize the content based on what you've written so far.
- 2. If no text is selected (with the cursor placed between words), the AI will optimize the current paragraph based on its content.
- 3. If you are not satisfied with the refined content, you can click the Regenerate
 button to generate again.


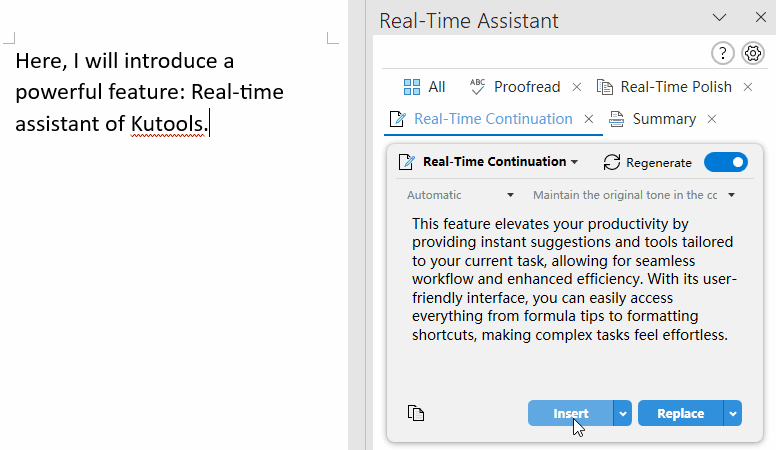
Example 2: Real-time continuation of written or selected content
If you're writing a report and unsure how to continue a particular section, the real-time continuation feature will instantly generate relevant content to seamlessly extend your ideas, saving you time and effort while maintaining a coherent flow in your writing.
- As you type in the Word document, Kutools AI will automatically continue writing based on the content you've entered. See the demo below: (The Real time continuation feature is auto-enabled by default.)
- After generating the continued text, you can insert it after your original content by clicking the Insert button. Alternatively, you can copy the content and paste it anywhere you need by clicking the Copy button. (Note: Please avoid clicking the Replace button, as it will overwrite your original text.


- 1. Insert button - By default, clicking Insert will add the AI-generated content immediately after the existing content. You can click the small arrow to choose a different insertion method, such as inserting at the end of the document, inserting as a revision, or inserting as a comment. Once you select an option, that method will be applied the next time you click Insert.
- 2. You can also select the unfinished text, and the AI will generate the continuation based on the selected content.
- 3. If you are not satisfied with the generated content, you can click the Regenerate button to create a new one.
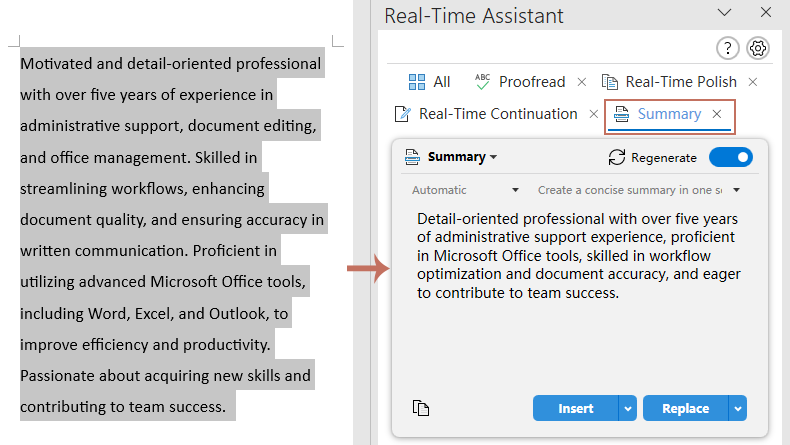
Example 3: Real-time summarization of written or selected content
Imagine you’ve written a lengthy report and need to quickly summarize the key points. With the real-time summarization feature, you can either highlight specific sections or let the AI review the entire document.
Select the portion of the content or the entire document you want summarized, the AI will analyze the selected text and produce a concise summary. You can navigate to the Summary tab to view only the Summary content. (The Summary feature's auto-mode is enabled by default.)
- If you are not satisfied with the generated content, you can click the Regenerate button to create a new one.
Other Examples: Real-time content review, information extraction, and more features
In addition to real-time refinement and continuation features, Kutools AI also offers powerful tools such as real-time translation, content review, information extraction and more. These features help users efficiently manage document content and enhance productivity. For example, users can quickly translate text, review the overall structure of a document, or extract key information from large amounts of data, making Kutools AI a comprehensive intelligent document processing assistant.
By default, these functions are not displayed in the pane. You need to check and enable them according to your needs.
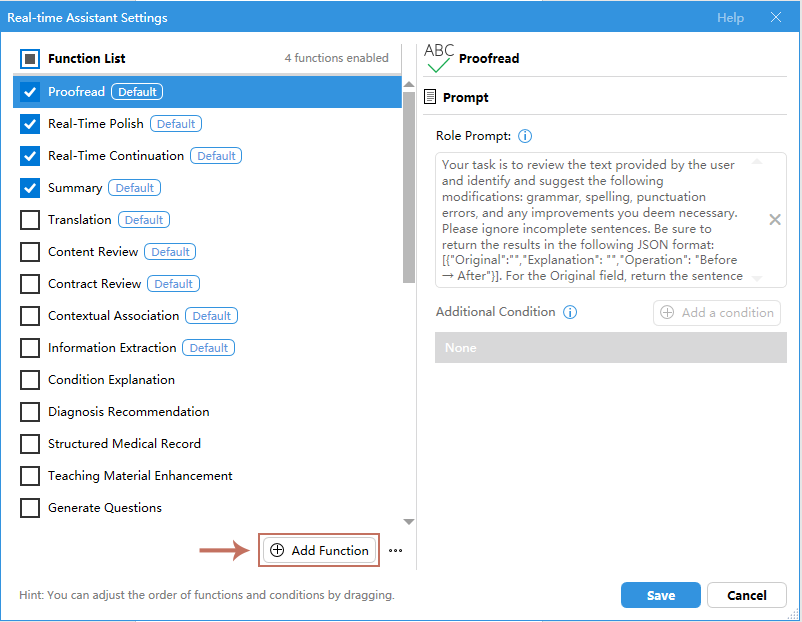
- Please click Kutools AI > RT Assist > Real-time Assistant Settings to open the Real-time Assistant Settings dialog box.
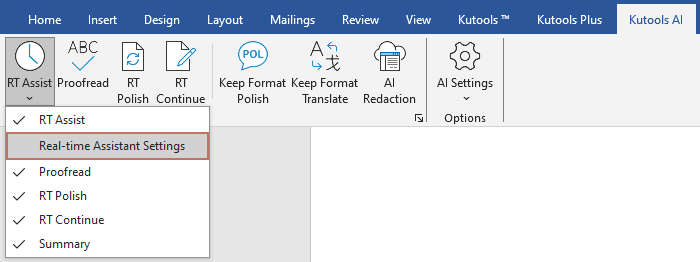
- In the Real-time Assistant Settings dialog box. In addition to the default four options, there are other features available. Simply check the ones you need. And then click Save to close the dialog box.
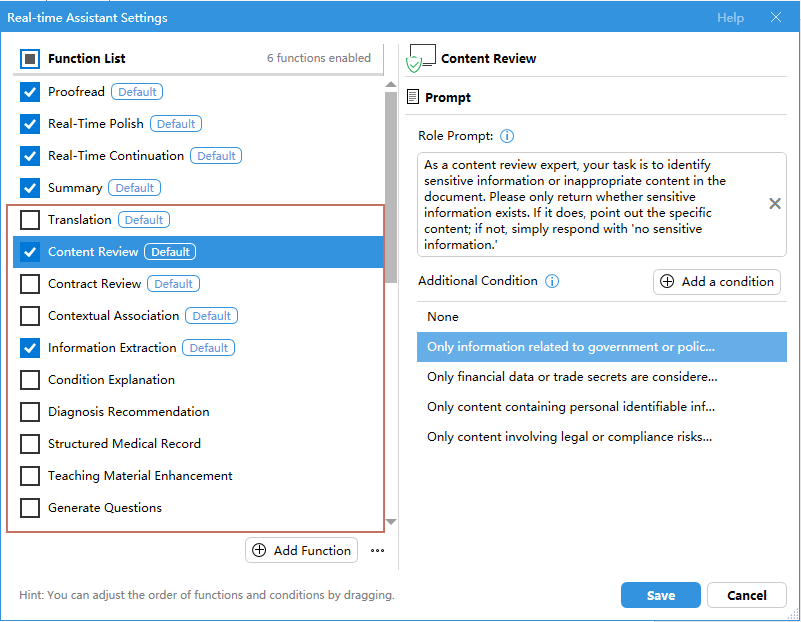
- The added options are now displayed on the RT Assist drop-down menu rather than directly in the RT Assist pane. To display the added function in the pane, you need to expand the RT Assist drop-down menu on the ribbon and check the corresponding option. This will add the selected function to the RT Assist pane for easier access.
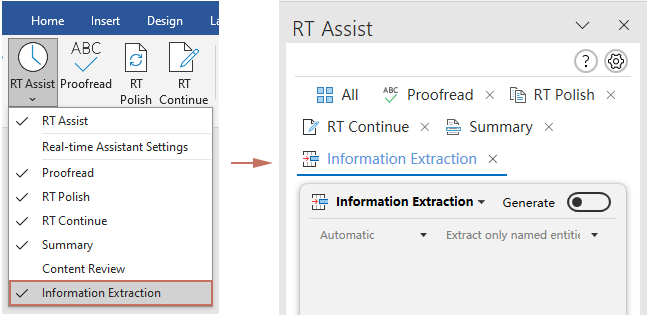


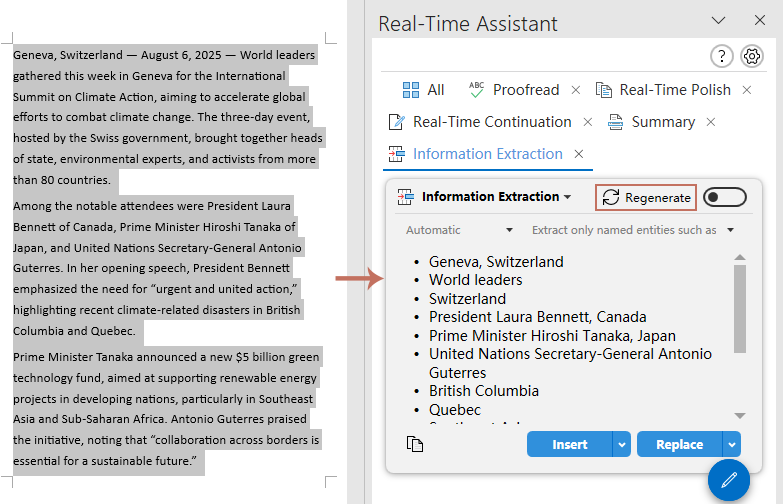
You can now use the new added AI function. Supposing, if you want to extract key information such as names and locations from a news report, Kutools AI’s Information extraction function can quickly filter out these details, saving you the time of manual searching. Through intelligent analysis, the AI can accurately identify important information within the text.
- Navigate to the Information extraction tab in the Real-Time Assistant pane.
- Select the option you want to extract from the drop-down box, or you can create and customize your own prompt for extraction.
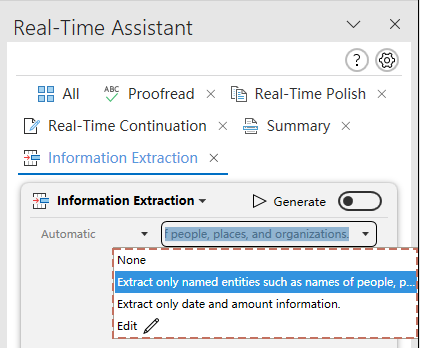
- Then, select the content, and corresponding information, such as names and locations, will be automatically extracted, see screenshot:


Create custom role prompts and information for your own
With this Kutools AI, you have the flexibility to create custom prompts tailored to your specific needs. Whether you're drafting a report, summarizing an article, or extracting specific details from a document, you can define your own prompts to guide the AI in delivering the exact information you need. This feature allows for a more personalized and efficient workflow, ensuring that the AI-generated content aligns with your unique requirements.
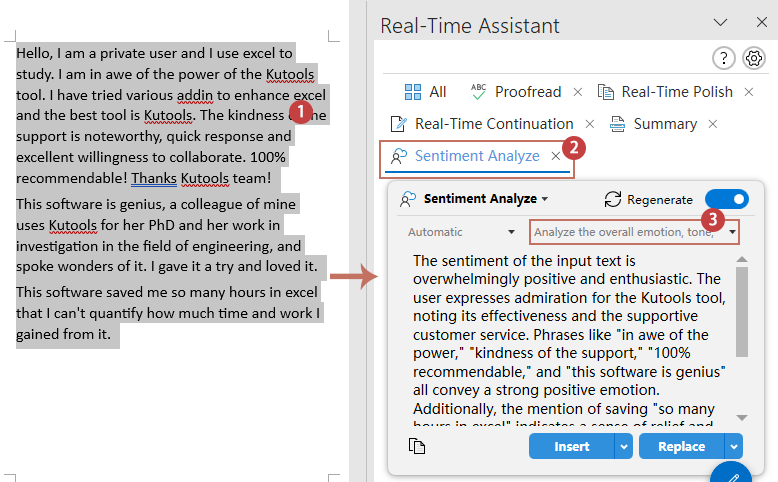
For example, you may need to perform sentiment analysis on the content of an article to determine whether the overall emotion, tone, or sentiment of the text is negative and serious, or positive and enthusiastic. In such cases, you can create custom prompts to better meet your specific needs.
- Click Kutools AI > RT Assist > Real-time Assistant Settings to open the Real-time Assistant Settings dialog box.
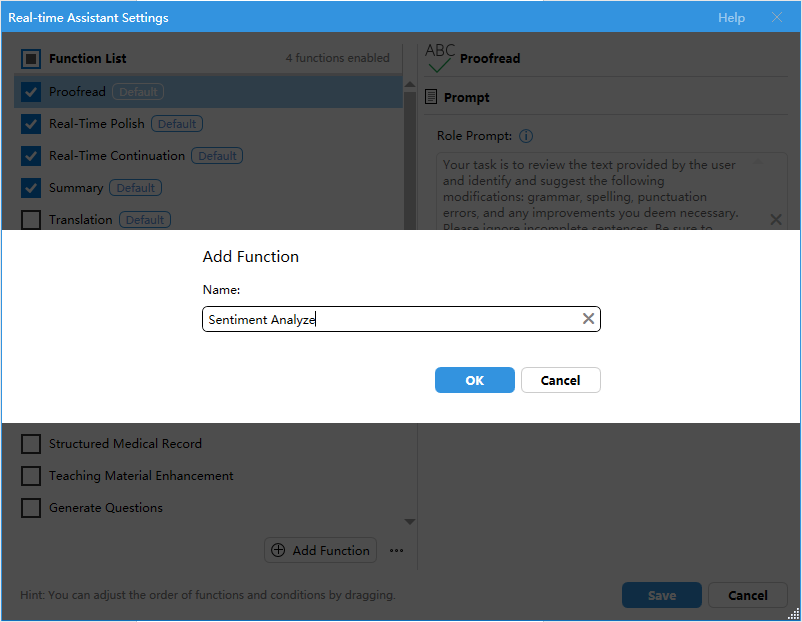
- In the Real-time Assistant Settings dialog box, click the Add Function button, see screenshot:
- Then, enter a name in the Name text box, click OK.
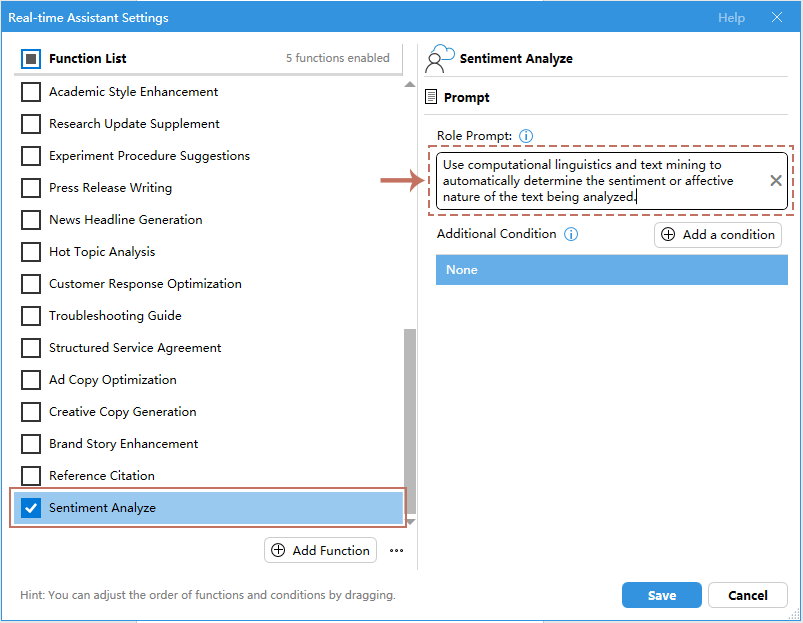
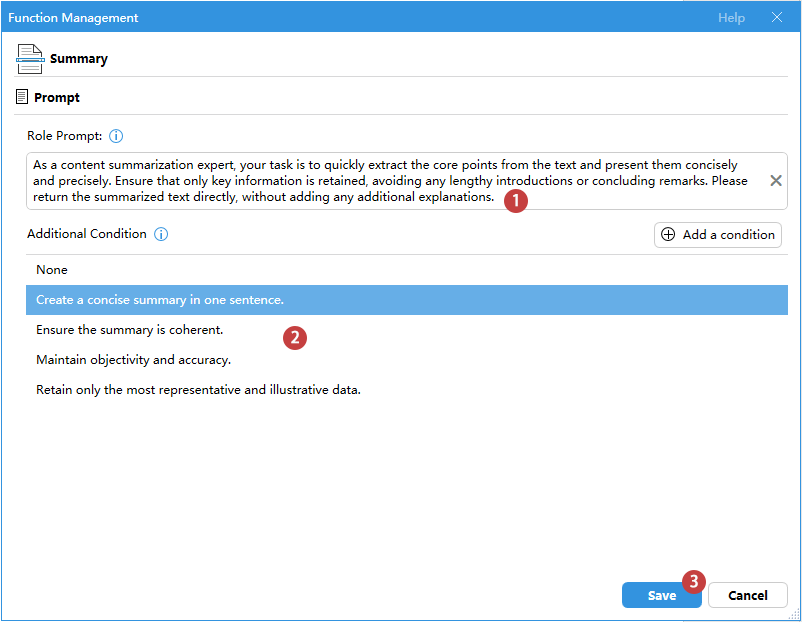
- Next, specify the role prompt in the Role Prompt box and ensure that the prompt you define aligns with your specific requirements. After that, click the Add a condition button. See screenshot:
- Then, add conditions for this function by specifying the prompt text into the textbox. Click OK.
Note: If you don't specify a custom prompt, the AI will default to None and generate results based on the primary role prompt.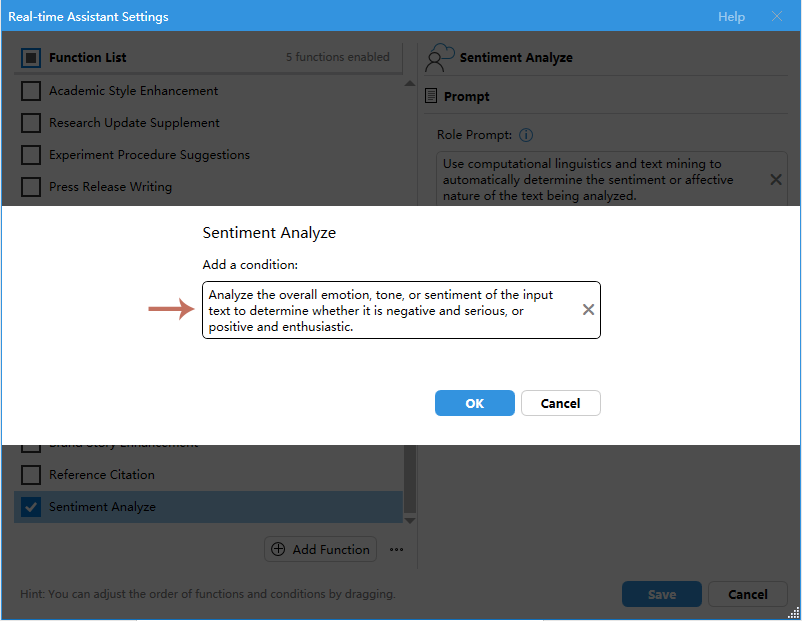
- Add any additional conditions needed to further refine the prompts.
- Now, your custom function prompt is created successfully. Click Save button to save the rule and close this dialog box.

- Then you need to manually add this function to the Real-Time Assistant pane. From now on, when you select content, the AI will automatically analyze the text and generate a sentiment analysis. See screenshot:


Some tips for using Real-time Assistant
1. If the current paragraph (or selected text) already has a result from a previous AI operation, we will display the existing result directly without resending the content to the AI, helping to conserve tokens.
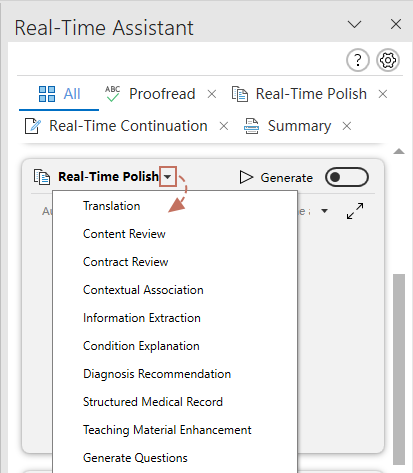
2. If you prefer not to add multiple AI functions to the pane but still want to utilize different AI roles, you can easily switch between them within a content box under the All tab. Simply click the drop-down arrow next to the current Real-Time mode to access a list of predefined role prompts—such as Translation, Content Review, Contract Review, and more. Select the desired role to apply AI behavior tailored to that specific task.
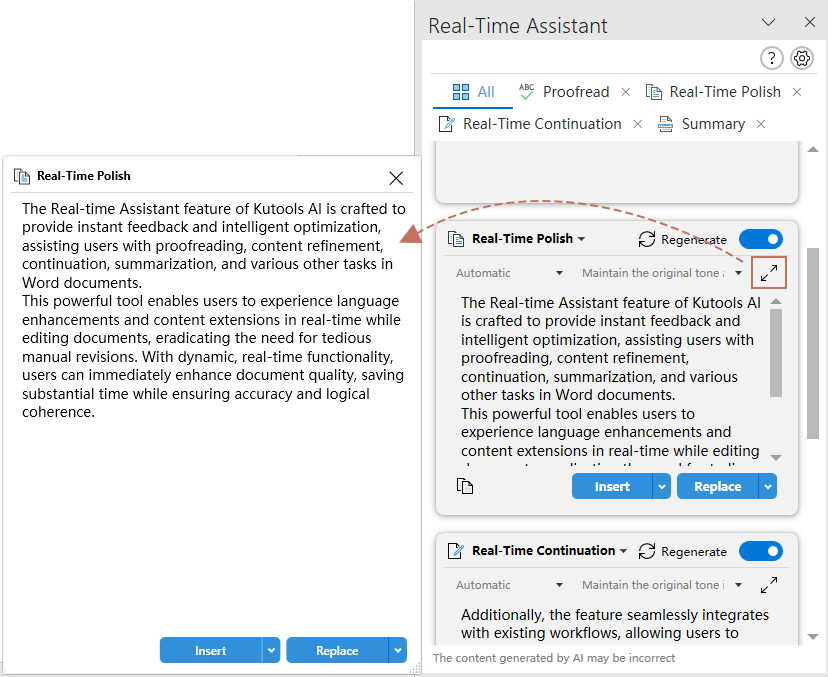
3. If the generated content is very long, you can click  button to expand the corresponding content box under the All tab. Or navigate to the corresponding function tab to display only the content box of the function.
- Click the header line to drag the box to anywhere you need;
- Resize the window by hovering the mouse around the edges;
- Click anywhere outside this box will cause this window to close.

4. If the output content is lengthy, you can resize the output box by dragging its bottom edge. Then, double-clicking the bottom edge will restore it to its default height.
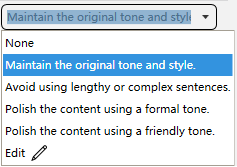
5. In the pane, you can also modify the language or specify writing style (key information) to suit your needs.
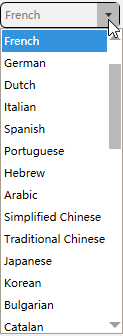
If your text is in English but you want the output in another language, you can select your desired language from here.
● If you don't have any specific requirements, you can select None.
● You can directly modify the information in the text box or click Edit to modify the prompts to better suit your specific needs or write your own prompt.
6. You can switch the auto mode on or off freely, adjusting it flexibly to meet your needs. If auto-mode is turned off, you will need to click the Generate button manually to produce the results.
Other tips and tricks of Real-time Assistant feature
Here are some additional tips and tricks for using the Real-time Assistant feature:
Single page view VS Tabbed view
Click on Single Page View to switch to Tabbed View, or vice versa, from the top of the pane.
All checked AI functions are displayed in order from top to bottom in the pane under the All tab, allowing users to scroll through and view all the content.
Each AI function is displayed separately, and users need to click on the tabs at the top to switch between different feature. This keeps the interface clean and allows users to focus on the current task.

Set, modify the functions or prompts
You can set, modify, and customize the functions or prompts according to your specific needs. Whether you need to adjust a function, refine a prompt, or add new capabilities, Kutools gives you full control over how the Real-time Assistant supports your tasks.
Update the role prompt and usage conditions for a particular AI feature.
In the Real-Time Assistant pane, under the tab of a specific AI feature, click the Function Management  button to open its corresponding Function Management window. Here, you can directly modify the role prompt and usage conditions for that AI feature.
Manage the Real-time Assistant Settings
1. Adjust the order of the functions:
Drag your frequently used functions to the front for quicker and more convenient access.
2. Copy or reset the default function

- Copy: click the copy button to copy the selected function;
- Reset: click the Reset button to restore to its original settings.
3. Copy, rename or delete the custom function

- Copy: click the copy button to copy the selected function;
- Rename: click the Rename button to modify the function name;
- Delete: click Delete button to delete the custom function.
4. Export, Import or Reset Function List

- Export Function List: Click this option to export the function lists to save your current settings or share them with others.;
- Import Function List: Similarly, click this option to import the function lists to quickly apply predefined configurations;
- Reset Default Function list: You can also reset the function list to restore the default settings, ensuring a clean starting point or undoing unwanted changes by clicking this option.
5. Modify and delete the prompt item

- Edit: Click this Edit button to modify the prompt to meet your need;
- Delete: Click this Delete button to delete the selected prompt item.
How to Setup Real-time Assistant of Kutools AI?
Kutools AI supports multiple leading AI platforms, including OpenAI and GoogleAI. We also offer our own KutoolsAI, which provides 100 free uses upon registration. Additionally, users have the option to input their own large-model servers, enabling customized configurations to meet specific needs.
Normal AI Providers setting (such as OpenAI, GoogleAI)
You can choose from popular AI service providers like OpenAI and GoogleAI. Go to click AI Setting button in the pane. In the AI Settings dialog box:
- Select the AI provider (OpenAI or GoogleAI) from the AI provider drop-down list.
- Copy and paste your API key into the API key textbox. (create OpenAI API key, create GoogleAI API key )
- Select the model from the Model drop-down list.
- Finally, click the Save button.


Kutools AI Providers setting
KutoolsAI leverages advanced AI models, such as OpenAI and GoogleAI, to dynamically select the most suitable model for your request based on specific needs. Additionally, our KutoolsAI offers 100 free uses upon registration, allowing users to explore its features and capabilities at no cost.
In the AI Settings dialog box:
- Select KutoolsAI from the AI provider drop-down list.
- Copy and paste your API key into the API key textbox. (create KutoolsAI API key)
- KutoolAI will automatically select and match one advanced AI model.
- Finally, click the Save button.


Custom AI Providers setting
You can also configure your own AI models or connect to alternative providers beyond the default options. This provides flexibility for organizations or individuals who prefer to use proprietary large-language models or integrate with specific AI services. You can input custom URL and API key, ensuring seamless access to their preferred AI platforms. (Please ensure that the model you are using is compatible with the OpenAI format.)
Go to the AI Settings dialog box:
- Select OtherAI(Other Cloud Models) from the AI provider drop-down list.
- Copy and paste your API key into the API key textbox.
- Then, copy the URL of the AI platform into the URL textbox.
- Enter your own AI model into the Model textbox.
- Finally, click the Save button.


Best Office Productivity Tools
Kutools for Word - Elevate Your Word Experience with Over 100 Remarkable Features!
🤖 Kutools AI Features: AI Assistant / Real-Time Assistant / Super Polish (Preserve Format) / Super Translate (Preserve Format) / AI Redaction / AI Proofread...
📘 Document Mastery: Split Pages / Merge Documents / Export Selection in Various Formats (PDF/TXT/DOC/HTML...) / Batch Convert to PDF...
✏ Contents Editing: Batch Find and Replace across Multiple Files / Resize All Pictures / Transpose Table Rows and Columns / Convert Table to Text...
🧹 Effortless Clean: Sweap away Extra Spaces / Section Breaks / Text Boxes / Hyperlinks / For more removing tools, head to the Remove group...
➕ Creative Inserts: Insert Thousand Separators / Check Boxes / Radio Buttons / QR Code / Barcode / Multiple Pictures / Discover more in the Insert group...
🔍 Precision Selections: Pinpoint Specific Pages / Tables / Shapes / Heading Paragraphs / Enhance navigation with more Select features...
⭐ Star Enhancements: Navigate to Any Location / Auto-Insert Repetitive Text / Toggle Between Document Windows / 11 Conversion Tools...
🌍 Supports 40+ Languages: Use Kutools in your preferred language – supports English, Spanish, German, French, Chinese, and 40+ others!

Office Tab - Brings Tabbed interface to Office, Make Your Work Much Easier
- Enable tabbed editing and reading in Word, Excel, PowerPoint, Publisher, Access, Visio and Project.
- Open and create multiple documents in new tabs of the same window, rather than in new windows.
- Increases your productivity by 50%, and reduces hundreds of mouse clicks for you every day!
✨ Kutools for Office – One Installation, Five Powerful Tools!
Includes Office Tab Pro · Kutools for Excel · Kutools for Outlook · Kutools for Word · Kutools for PowerPoint
📦 Get all 5 tools in one suite | 🔗 Seamless integration with Microsoft Office | ⚡ Save time and boost productivity instantly
Best Office Productivity Tools
Kutools for Word - 100+ Tools for Word
- 🤖 Kutools AI Features: AI Assistant / Real-Time Assistant / Super Polish / Super Translate / AI Redaction / AI Proofread
- 📘 Document Mastery: Split Pages / Merge Documents / Batch Convert to PDF
- ✏ Contents Editing: Batch Find and Replace / Resize All Pictures
- 🧹 Effortless Clean: Remove Extra Spaces / Remove Section Breaks
- ➕ Creative Inserts: Insert Thousand Separators / Insert Check Boxes / Create QR Codes
- 🌍 Supports 40+ Languages: Kutools speaks your language – 40+ languages supported!
Table of contents
- Why choose Real-time Assistant of Kutools AI?
- Examples for using Real-time Assistant of Kutools AI
- Example 1: Real-time proofread
- Example 2: Real-time refinement
- Example 3: Real-time continuation
- Example 4: Real-time summarization
- Other Examples: Real-time content review, information extraction, and more features
- Create custom role prompts and information for your own
- Some tips for using Real-time Assistant
- Other tips and tricks of Real-time Assistant feature
- All tab view VS Tabbed view
- Set, modify the functions or prompts
- How to Setup Real-time Assistant of Kutools AI?
- Normal AI Providers setting (such as OpenAI, GoogleAI)
- Kutools AI Providers setting
- Custom AI Providers setting
- The Best Office Productivity Tools
- Comments