How to redact or conceal sensitive information in Word
Kutools for Word
Redacting sensitive information in Word documents can be a tedious and error-prone task, especially when dealing with large documents. Whether you're a legal professional, a compliance officer, or anyone working with sensitive information, ensuring that private data is thoroughly redacted is crucial.
Kutools for Word offers an efficient and user-friendly solution with its newly introduced Redaction Tool. This tutorial will guide you through using this powerful feature to secure your documents effectively.
Why You Need the Redaction Tool
Why You Need the Redaction Tool
Redacting text manually in Word can be risky and time-consuming. You might overlook some instances of the text or make mistakes that leave sensitive information exposed. The Redaction Tool in Kutools for Word simplifies this process by allowing you to mark, clear, and apply redactions across your entire document with just a few clicks.
Enable the Redaction Tool
On the Kutools tab, click on the Redaction Tool button. And a toolbar will appear.

![]()
Tip: When you first open the Redaction Tool, you'll see a Help window that outlines the tool's application scenarios and provides an overview of its features. Just click the Close button.
Mark Texts for Redaction
Click the Mark button on the toolbar to open the Mark text to be covered pane.
Select the text you want to redact.
All sentences containing the selected text will be listed in the Mark text to be covered pane.
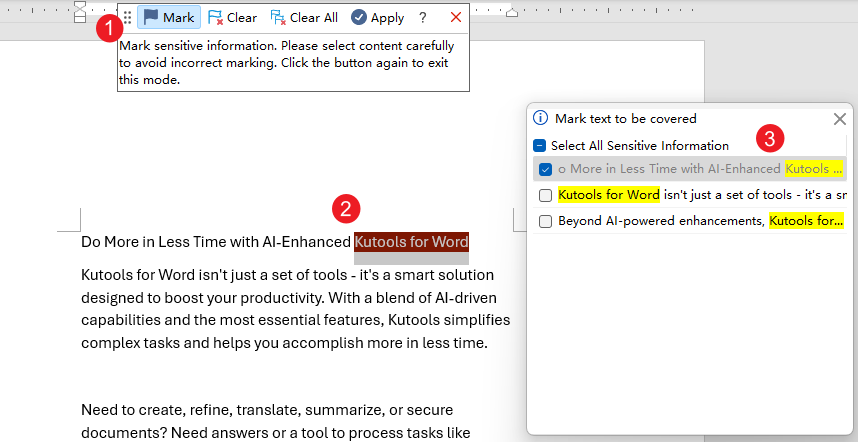
In the pane, choose where you want to mark the text, or click Select all sensitive information to mark all instances.
The tool will automatically detect and mark every occurrence of the selected text throughout the document.
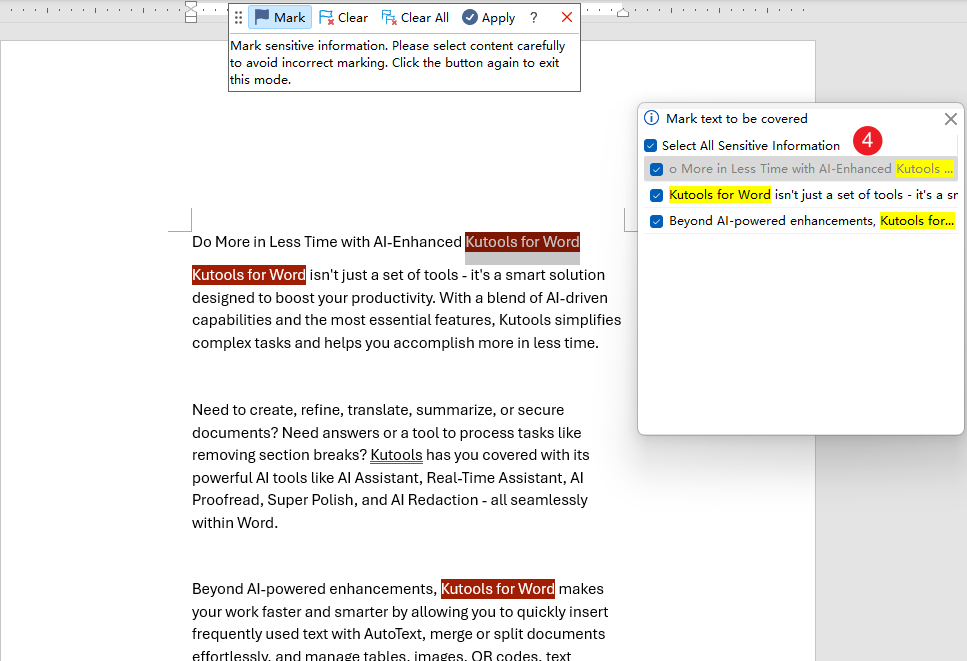
To continue marking other sensitive content, place your cursor anywhere on the page and repeat steps 2 to 4.
✨ Note: For best results, place the cursor in a blank area of the page (do not highlight any existing text) before selecting the next sensitive text to redact.

Demo:

Clear Marks
Clear all marks through the document:
Click Clear All on the toolbar to remove all marked text throughout the document.

To remove specific marks that were added by mistake, follow these steps:
✨ Note: Before proceeding, make sure to place your cursor in a blank area of the page or exit Mark mode.
Select the text you want to unmark, or select the sentence containing the marked text.
Click Clear in the toolbar to open the Clear marked text pane.
In the pane, uncheck the text you no longer want to mark. To unmark everything, simply uncheck Select All Sensitive Information.
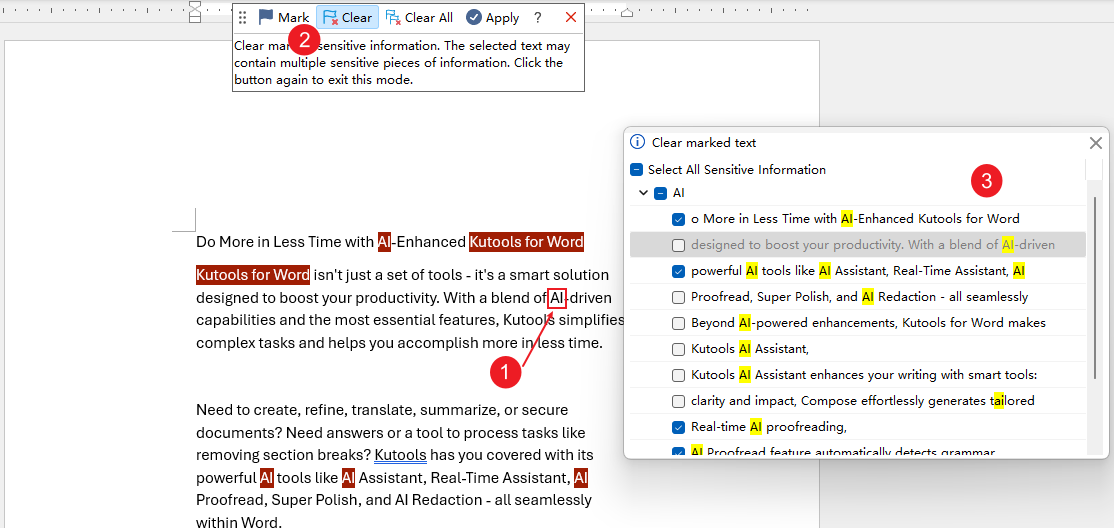
The tool will remove the mark from all instances of this text across the document.
Demo:

Apply the Redactions
Once you’ve marked all the necessary text, click the Apply button.

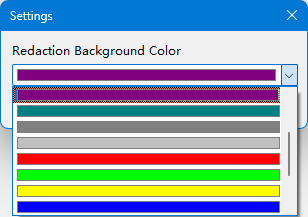
A Settings dialog will appear, allowing you to select the background color for redaction. After choosing a color, click OK to continue.
Next, a confirmation dialog will appear:
- Click Yes to save the document with the marked text and apply redaction.
- Click No to cancel the redaction process.
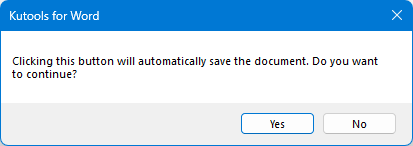
If you click Yes, a new document will be generated with all marked text fully redacted. The original and redacted documents will be opened side by side for easy comparison.
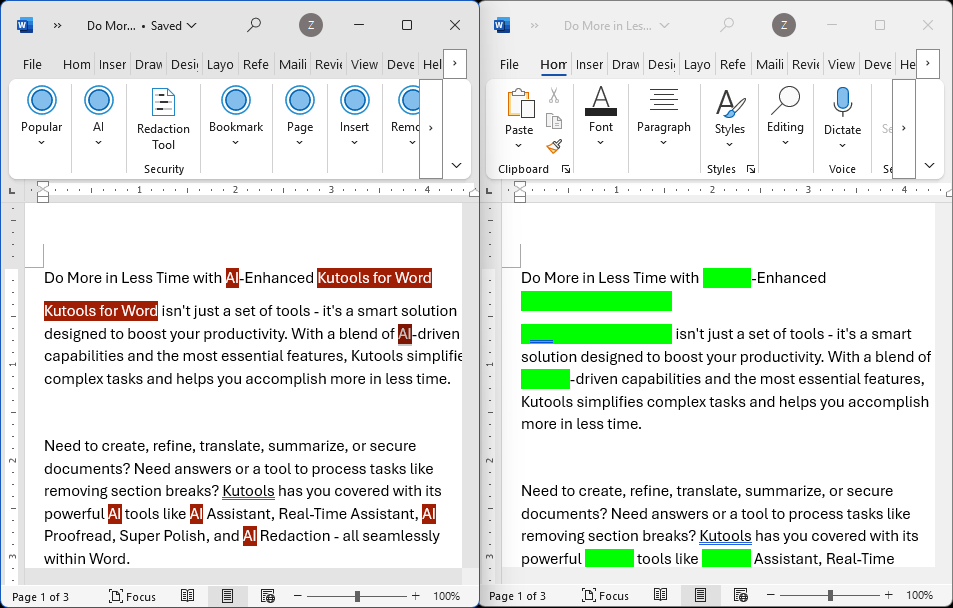
✨ Note: Meanwhile, the newly created document with marks has been saved in the same location as the original file, with “-Redacted” added to the original file name.
Close the Redaction Toolbar
If you want to close the Redaction toolbar temporarily, click the Close button.
![]()
Any marks you've made will remain in place until you use the Clear or Clear All buttons, allowing you to hide the toolbar without losing your work.
Above is all the relevant content related to the Redaction Tool of Kutools for Word. I hope you find the tutorial helpful. If you're looking to explore more Word features provided by Kutools, please visit the product page to access our extensive collection of feature tutorials.
Best Office Productivity Tools
Kutools for Word - Elevate Your Word Experience with Over 100 Remarkable Features!
🤖 Kutools AI Features: AI Assistant / Real-Time Assistant / Super Polish (Preserve Format) / Super Translate (Preserve Format) / AI Redaction / AI Proofread...
📘 Document Mastery: Split Pages / Merge Documents / Export Selection in Various Formats (PDF/TXT/DOC/HTML...) / Batch Convert to PDF...
✏ Contents Editing: Batch Find and Replace across Multiple Files / Resize All Pictures / Transpose Table Rows and Columns / Convert Table to Text...
🧹 Effortless Clean: Sweap away Extra Spaces / Section Breaks / Text Boxes / Hyperlinks / For more removing tools, head to the Remove group...
➕ Creative Inserts: Insert Thousand Separators / Check Boxes / Radio Buttons / QR Code / Barcode / Multiple Pictures / Discover more in the Insert group...
🔍 Precision Selections: Pinpoint Specific Pages / Tables / Shapes / Heading Paragraphs / Enhance navigation with more Select features...
⭐ Star Enhancements: Navigate to Any Location / Auto-Insert Repetitive Text / Toggle Between Document Windows / 11 Conversion Tools...
🌍 Supports 40+ Languages: Use Kutools in your preferred language – supports English, Spanish, German, French, Chinese, and 40+ others!

Office Tab - Brings Tabbed interface to Office, Make Your Work Much Easier
- Enable tabbed editing and reading in Word, Excel, PowerPoint, Publisher, Access, Visio and Project.
- Open and create multiple documents in new tabs of the same window, rather than in new windows.
- Increases your productivity by 50%, and reduces hundreds of mouse clicks for you every day!
✨ Kutools for Office – One Installation, Five Powerful Tools!
Includes Office Tab Pro · Kutools for Excel · Kutools for Outlook · Kutools for Word · Kutools for PowerPoint
📦 Get all 5 tools in one suite | 🔗 Seamless integration with Microsoft Office | ⚡ Save time and boost productivity instantly
Best Office Productivity Tools
Kutools for Word - 100+ Tools for Word
- 🤖 Kutools AI Features: AI Assistant / Real-Time Assistant / Super Polish / Super Translate / AI Redaction / AI Proofread
- 📘 Document Mastery: Split Pages / Merge Documents / Batch Convert to PDF
- ✏ Contents Editing: Batch Find and Replace / Resize All Pictures
- 🧹 Effortless Clean: Remove Extra Spaces / Remove Section Breaks
- ➕ Creative Inserts: Insert Thousand Separators / Insert Check Boxes / Create QR Codes
- 🌍 Supports 40+ Languages: Kutools speaks your language – 40+ languages supported!


