Easily save, list and insert autotext entries in word
Kutools for Word
Auto Text is a way to store parts of a word document that is available for you to use in any document. In other words, with the Auto Text entries you have stored, you do not need to type same contents over and over again. But how can we use the Auto Text entries quickly? Kutools for Word’s AutoText Pane can save, list and insert autotext entries easily in document.
➤ Quickly save a selection of document as an AutoText entry
➤ List all AutoText entries in a pane
➤ Easily insert and edit AutoText entries
➤ Import and export all AutoText entries in Word
➤ Adjust the text size in the AutoText Pane
➤ Preview AutoText in the pane
Recommended Productivity Tools for Word
Kutools for Word: Integrating AI 🤖, over 100 advanced features save 50% of your document handling time.Free Download
Office Tab: Introduces the browser-like tabs to Word (and other Office tools), simplifying multi-document navigation.Free Download
Click the Kutools > AutoText. See screenshot:

After clicking AutoText, it will display the Kutools Pane in the left side of the document as shown in the below screenshot.

Quickly save a selection as an AutoText entry
- Select the content you want to save as AutoText. For example:

- In the AutoText Pane, click the
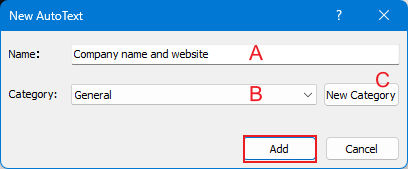
 Add button to open the New AutoText dialog.
 In the dialog, you can:
A. Enter a name for the entry in Name.
B. Choose a group in Category.
C. Create a new group if needed. - Click Add to save the entry.

List all autotext entries in a pane
All the saved AutoText entries will be listed in the pane. 
Easy to insert and edit the autotext entry
1. Click on the AutoText entry within the pane, and it will insert the AutoText entry into the current cursor position in the document.
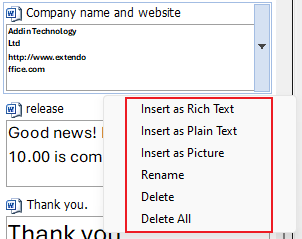
2. To insert AutoText as plain text, a picture, or to rename/delete it, click the arrow next to the AutoText entry and choose your desired option. 
Import and Export all autotext entries in Word
Click Import and Export button to import or export all AutoText entries. With the import and export utilities, you can export all autotext entries from an existing document, and then import the Autotext entries to any document on another computer you want.
Preview AutoText in the pane
Click the Settings button to customize how AutoText entries are previewed in the pane.
For example, enabling Show floating preview of AutoText entry will display a small preview window when you hover over an entry.
Best Office Productivity Tools
Kutools for Word - Elevate Your Word Experience with Over 100 Remarkable Features!
🤖 Kutools AI Features: AI Assistant / Real-Time Assistant / Super Polish (Preserve Format) / Super Translate (Preserve Format) / AI Redaction / AI Proofread...
📘 Document Mastery: Split Pages / Merge Documents / Export Selection in Various Formats (PDF/TXT/DOC/HTML...) / Batch Convert to PDF...
✏ Contents Editing: Batch Find and Replace across Multiple Files / Resize All Pictures / Transpose Table Rows and Columns / Convert Table to Text...
🧹 Effortless Clean: Sweap away Extra Spaces / Section Breaks / Text Boxes / Hyperlinks / For more removing tools, head to the Remove group...
➕ Creative Inserts: Insert Thousand Separators / Check Boxes / Radio Buttons / QR Code / Barcode / Multiple Pictures / Discover more in the Insert group...
🔍 Precision Selections: Pinpoint Specific Pages / Tables / Shapes / Heading Paragraphs / Enhance navigation with more Select features...
⭐ Star Enhancements: Navigate to Any Location / Auto-Insert Repetitive Text / Toggle Between Document Windows / 11 Conversion Tools...
🌍 Supports 40+ Languages: Use Kutools in your preferred language – supports English, Spanish, German, French, Chinese, and 40+ others!

Office Tab - Brings Tabbed interface to Office, Make Your Work Much Easier
- Enable tabbed editing and reading in Word, Excel, PowerPoint, Publisher, Access, Visio and Project.
- Open and create multiple documents in new tabs of the same window, rather than in new windows.
- Increases your productivity by 50%, and reduces hundreds of mouse clicks for you every day!
✨ Kutools for Office – One Installation, Five Powerful Tools!
Includes Office Tab Pro · Kutools for Excel · Kutools for Outlook · Kutools for Word · Kutools for PowerPoint
📦 Get all 5 tools in one suite | 🔗 Seamless integration with Microsoft Office | ⚡ Save time and boost productivity instantly
Best Office Productivity Tools
Kutools for Word - 100+ Tools for Word
- 🤖 Kutools AI Features: AI Assistant / Real-Time Assistant / Super Polish / Super Translate / AI Redaction / AI Proofread
- 📘 Document Mastery: Split Pages / Merge Documents / Batch Convert to PDF
- ✏ Contents Editing: Batch Find and Replace / Resize All Pictures
- 🧹 Effortless Clean: Remove Extra Spaces / Remove Section Breaks
- ➕ Creative Inserts: Insert Thousand Separators / Insert Check Boxes / Create QR Codes
- 🌍 Supports 40+ Languages: Kutools speaks your language – 40+ languages supported!

