How to insert a date picker in emails in Outlook?
Suppose you need to send a work schedule to your colleagues, assigning different tasks to different people on different dates. However, you are worried about making mistakes entering the date manually, so you need a date picker instead. This tutorial provides a method to help you insert a date picker in emails in Outlook.

Insert a date picker in Emails in Outlook with VBA code
You can run the following VBA code to insert a date picker in Outlook emails. Please follow the instructions below.
- Launch your Outlook, press the Alt + F11 keys to open the Microsoft Visual Basic for Applications window.
- In the left pane, double click Project1 > Microsoft Outlook Objects > ThisOutlookSession, and then copy the following VBA code into the ThisOutlookSession (Code) window.
VBA code: Insert date picker in Outlook emails
Sub DatePicker()
'Updated by Extendoffice 20220615
  Dim xDoc As Document
  On Error Resume Next
  Set xDoc = Application.ActiveInspector.WordEditor
  With xDoc.Application.Selection
    .Range.ContentControls.Add (wdContentControlDate)
    .ParentContentControl.DateDisplayFormat = "MMMM d, yyyy"
    .InsertAfter Format(Now(), "MMMM d, yyyy")
    .MoveRight wdCharacter, 1
  End With
End Sub
Note: In the code, you can change "MMMM d, yyyy" to the date format you need.
- Stay in the Microsoft Visual Basic for Applications window, click Tools > References.

- In the References – Project1 dialog box, check the Microsoft Word 16.0 Object Library checkbox, and click OK to save the changes.

- Press the Alt + Q keys to close the Microsoft Visual Basic for Applications window.
- In the Mail view, click the New Email button under the Home tab to create a new email.
- In the Message window, click the Customize Quick Access Toolbar button
 , and then select More Commands from the drop-down menu. See screenshot:

- In the Outlook Options window, you need to configure as follows.
- Choose Macros in the Choose command from drop-down list;
- Select the script you created above in the left commands box;
- Click the Add button.
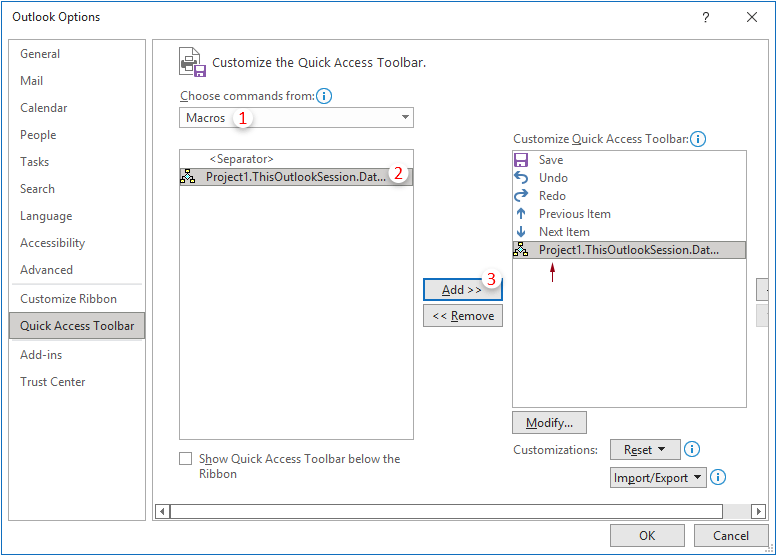
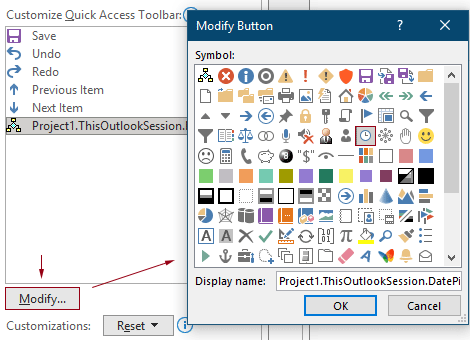
- Keep the script selected in the right box, and then click the Modify button. In the Modify Button dialog box, assign a new button to the script and click OK.
- Click OK in the Outlook Options window to save the changes.

- The VBA script is now added to the Quick Access Toolbar and displayed as the icon you specified.

- From now on, when composing an email, you can click the date picker icon on the Quick Access Toolbar to insert a date picker into the email body, and then select a date you need from it. See the following demo.


 , and then select More Commands from the drop-down menu. See screenshot:


- You can insert multiple date pickers into the body of an email.
- You can change the date you have selected: click on the date field to display the Date control, then select a new date as needed.
- This date picker can also be inserted into the body of an appointment or a task. If you need to, create a new appointment or task and repeat the step 7-8 above to achieve it.
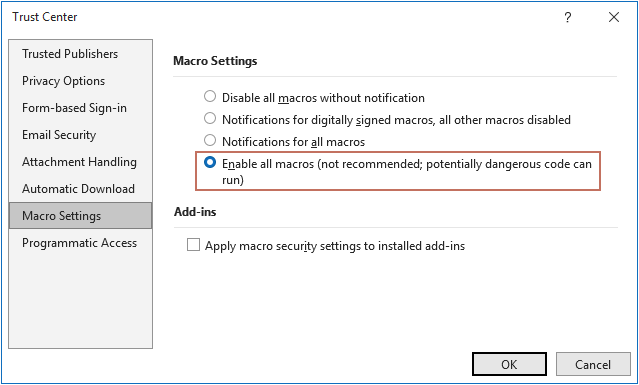
- If you restart Outlook and find that the script does not run. That's because the macro was disabled. You need to follow the steps below to re-enable the macro:
- Click on File > Options to enter the Outlook Options window.
- Click on Trust Center > Trust Center Settings.
- In the Trust Center window, click on the Macro Settings tab, select the Enable all macros option, and click OK > OK to save the new settings.
- Restart Outlook once more.

Best Office Productivity Tools
Kutools for Outlook - Over 100 Powerful Features to Supercharge Your Outlook
🤖 AI Mail Assistant: Instant pro emails with AI magic--one-click to genius replies, perfect tone, multilingual mastery. Transform emailing effortlessly! ...
📧 Email Automation: Out of Office (Available for POP and IMAP) / Schedule Send Emails / Auto CC/BCC by Rules When Sending Email / Auto Forward (Advanced Rules) / Auto Add Greeting / Automatically Split Multi-Recipient Emails into Individual Messages ...
📨 Email Management: Easily Recall Emails / Block Scam Emails by Subjects and Others / Delete Duplicate Emails / Advanced Search / Consolidate Folders ...
📁 Attachments Pro: Batch Save / Batch Detach / Batch Compress / Auto Save / Auto Detach / Auto Compress ...
🌟 Interface Magic: 😊More Pretty and Cool Emojis / Boost Your Outlook Productivity with Tabbed Views / Minimize Outlook Instead of Closing ...
👍 One-click Wonders: Reply All with Incoming Attachments / Anti-Phishing Emails / 🕘Show Sender's Time Zone ...
👩🏼🤝👩🏻 Contacts & Calendar: Batch Add Contacts From Selected Emails / Split a Contact Group to Individual Groups / Remove Birthday Reminders ...
Over 100 Features Await Your Exploration! Click Here to Discover More.

