Easily block multiple senders at once in Outlook
Kutools for Outlook
Normally you can only add an email address to Block Sender list per time in Excel. Kutools for Outlook’s Block Senders utility can help you easily add multiple email addresses into Block Senders list at once. Kutools for Outlook's Junk Email Filter will filter emails based on the Block Sender list when receiving emails. All emails from Block Senders will be filtered into Junk email folder by Junk Email Filter.
Easily block and filter multiple senders' emails as junks in Outlook
Easily customize and manage block sender list
Easily block and filter multiple senders' emails as junks in Outlook
You can easily add multiple senders into block sender list and filter their emails as junk when receiving them in Outlook as follows.
Kutools for Outlook: Unlock 100+ powerful tools for Outlook. including advanced AI capabilities to boost your productivity.
Discover More...Try It Now!
1. Hold down the Ctrl key to select the emails for which you want to add their senders into the block sender list. And then apply this utility by clicking Kutools > Junk > Block Senders. See screenshot:

2. Now the Block Senders dialog box comes out and remind you all senders of the selected emails have been added into the blocked sender list. Click the OK button to close it.

3. Then, another Kutools for Outlook dialog appears, click Yes to enable the Junk feature.

From now on, emails arriving from these specific addresses will be automatically moved to the Junk E-mail folder.
- The blocked senders will be added to the Block Senders rule. You can view and edit the rule by clicking Kutools > Junk > Manage Junk Email Filter.
- You can quickly add the sender of an email into the Block Senders list by right-clicking on the email, and selecting Junk (Kutools) > Block Senders. See screenshot:


Easily customize and manage block sender list
You can easily customize and manage block sender list within Junk manager as follows.
1. Please open the Junk manager by clicking Kutools > Junk > Manage Junk Email Filter See screenshot:

2. In the Junk manager, there is a Block Senders rule. Select the rule, and then click the underlined text in the Rule description textbox, see screenshot:

3. In the popped-out Text Contains dialog box, you can add new senders, edit the original senders or delete the unwanted senders as you need. If you want to add new senders to block,please do as this:
- Click New button to open the Search Text dialog box;
- Type the address that you want to block into the New Search Text box;
- Click Add button to add it to the Search list box;
- Click OK.

4. Then, it returns to the Text Contains dialog box, and the new sender address has been added into the Text listbox. Click OK, see screenshot:

5. It returns to the Junk dialog, where you can observe that the underlined senders have been updated based on your changes. Ensure the Block Senders rule is still ticked, then click OK to finalize the settings and close the dialog.

1. Click the Enable Junk Email Filter again will turn off the whole Junk feature. If you only want to disable a certain rule, please go to the Junk dialog, and uncheck the rule.
2. A right-click menu is provided for quick selection of rules if there are multiple rules in the Junk dialog box.
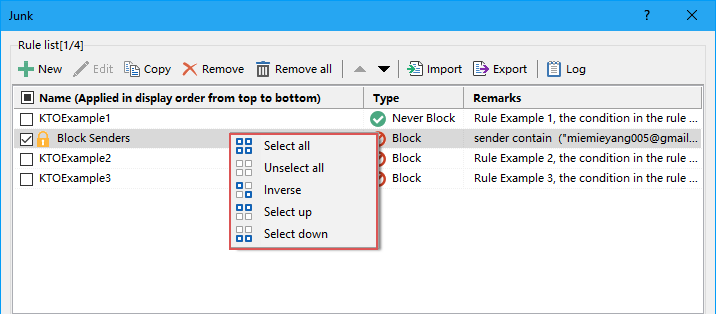
- Select All: Select all rules in Junk manager.
- Unselect All: Deselect all rules in the Junk manager.
- Inverse: Reverse the status of the current selection.
- Select up: Select the rules above the current selected rule(including the current rule).
- Select down: Select the rules below the current selected rule(including the current rule).
3. In the Junk dialog box, there are some example rules which can help you to understand how to create rules you need.
4. In the Junk dialog, if your rule conditions are too long, you can check Display the rule description inline wrap option to make the rule inline wrap.
5. If you have created multiple rules in the Junk dialog box, they will be executed in order from top to bottom. For instance, if an email meets the criteria of the first rule and is moved to the Junk folder, subsequent rules (like the second or third) won't be applied to that email. However, if an email matches the first rule to remain in the inbox but also fits the criteria of the second rule to be moved to the Junk folder, it will still not be relocated to the spam folder.
Demo: block multiple senders in bulk in Outlook
Explore the Kutools / Kutools Plus tab in this video – packed with powerful features, including powerful AI tools! Try all features free for 30 days with no limitations!
Best Office Productivity Tools
Experience the all-new Kutools for Outlook with 100+ incredible features! Click to download now!
📧 Email Automation: Auto Reply (Available for POP and IMAP) / Schedule Send Emails / Auto CC/BCC by Rules When Sending Email / Auto Forward (Advanced Rules) / Auto Add Greeting / Automatically Split Multi-Recipient Emails into Individual Messages ...
📨 Email Management: Recall Emails / Block Scam Emails by Subjects and Others / Delete Duplicate Emails / Advanced Search / Consolidate Folders ...
📁 Attachments Pro: Batch Save / Batch Detach / Batch Compress / Auto Save / Auto Detach / Auto Compress ...
🌟 Interface Magic: 😊More Pretty and Cool Emojis / Remind you when important emails come / Minimize Outlook Instead of Closing ...
👍 One-click Wonders: Reply All with Attachments / Anti-Phishing Emails / 🕘Show Sender's Time Zone ...
👩🏼🤝👩🏻 Contacts & Calendar: Batch Add Contacts From Selected Emails / Split a Contact Group to Individual Groups / Remove Birthday Reminders ...
Use Kutools in your preferred language – supports English, Spanish, German, French, Chinese, and 40+ others!


🚀 One-Click Download — Get All Office Add-ins
Strongly Recommended: Kutools for Office (5-in-1)
One click to download five installers at once — Kutools for Excel, Outlook, Word, PowerPoint and Office Tab Pro. Click to download now!
- ✅ One-click convenience: Download all five setup packages in a single action.
- 🚀 Ready for any Office task: Install the add-ins you need, when you need them.
- 🧰 Included: Kutools for Excel / Kutools for Outlook / Kutools for Word / Office Tab Pro / Kutools for PowerPoint