Excel: How to split delimited text to rows
When working with data in Excel, users often face situations where a single cell contains several pieces of information separated by delimiters—such as commas, semicolons, or spaces. For example, you may find a list of tags, names, or item codes all grouped within one cell. In order to perform meaningful analysis, filter data correctly, or prepare it for later use, splitting these delimited values into individual rows becomes necessary. Successfully separating delimited values into rows makes subsequent data handling, visualization, and reporting much simpler and more effective. Excel provides a variety of solutions to accomplish this, catering to different usage scenarios, Excel versions, and user skill levels. Below, you'll find a comprehensive guide—covering several practical approaches, from formulas to built-in tools and add-ins—on how to split delimited text into rows in Excel.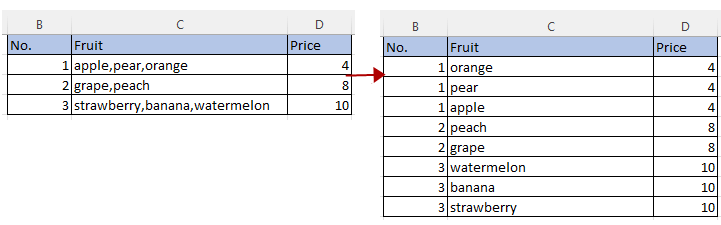
Split delimited text to rows by using VBA
Split delimited text to rows by Kutools for Excel
Split delimited text to rows by POWER QUERY
Split delimited text to rows by using Excel formula (TEXTSPLIT, FILTER, SEQUENCE)
If you often need to split delimited text into rows and are comfortable with macros, VBA can handle this automatically. This approach works in all versions of Excel and is particularly useful if you want to automate repetitive splitting tasks. Keep in mind that running a VBA macro will modify your original data, so it's a good idea to save a backup copy before proceeding, especially in workbooks containing important or non-recoverable information.
1. Press "Alt + F11" keys to open the "Microsoft Visual Basic for Applications" editor window.
2. In the VBA editor, click "Insert" in the menu, then select "Module" to create a new blank module.
3. Copy and paste the following code into the blank module:
VBA: Split delimited text to rows
Public Sub SplitTextInCellsToRows()
'UpdatebyExtendoffice20220622
    Dim xSRg, xIptRg, xCrRg, xRg As Range
    Dim xSplitChar As String
    Dim xArr As Variant
    Dim xFNum, xFFNum, xRow, xColumn, xNum As Integer
    Dim xWSh As Worksheet
    Set xSRg = Application.InputBox("Select a range:", "Kutools for Excel", , , , , , 8)
    If xSRg Is Nothing Then Exit Sub
    xSplitChar = Application.InputBox("Type delimiter:", "Kutools for Excel", , , , , , 2)
    If xSplitChar = "" Then Exit Sub

    Application.ScreenUpdating = False
    xRow = xSRg.Row
    xColumn = xSRg.Column
    Set xWSh = xSRg.Worksheet
    For xFNum = xSRg.Rows.Count To 1 Step -1

        Set xRg = xWSh.Cells.Item(xRow + xFNum - 1, xColumn)
        Debug.Print xRg.Address
        xArr = Split(xRg, xSplitChar)
        For xFFNum = LBound(xArr) To UBound(xArr)
            xRg.EntireRow.Copy
            xRg.Offset(1, 0).EntireRow.Insert Shift:=xlShiftDown
            xRg.Worksheet.Cells(xRow + xFNum, xColumn) = xArr(xFFNum)
        Next
        xRg.EntireRow.Delete
    Next
    Application.CutCopyMode = False
    Application.ScreenUpdating = True
End Sub
4. Press the F5 key or click the "Run" button to activate the code. When prompted, select the range of cells (excluding any headers) that contain the delimited text you wish to split into rows, and click OK.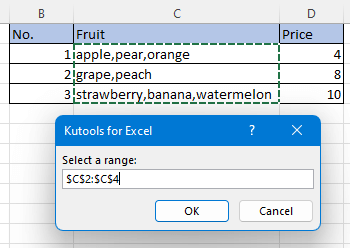
5. In the next dialog, enter the delimiter you want to split by (such as a comma, semicolon, or space). For instance, type a comma (,) if your data is comma-separated, then click OK.
Now, each delimited value will be placed in a new row, and other related columns will be duplicated accordingly, allowing your records to remain complete.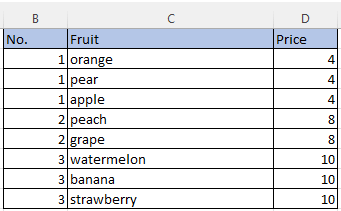
Please note: The VBA method will change your original dataset. Make sure to save your workbook or create a backup before running the macro. Also, for larger datasets or complex workbooks, ensure that you enable macros and that you have the necessary permissions to run VBA code.
For Excel users who prefer a graphical interface and wish to avoid writing or running code, Kutools for Excel offers a highly efficient tool to split delimited text into rows. This add-in is ideal for those seeking convenience in handling both small and large batches of data without delving into formulas or scripts. Kutools supports various delimiters, such as commas, semicolons, and spaces, and can handle multiple scenarios with ease. It’s especially beneficial when you want a quick and error-free conversion that replicates all related columns consistently.
After installing Kutools for Excel, perform the following steps:
1. Click on the "Kutools" tab, go to "Merge & Split," and then select "Split Data to Rows" from the dropdown menu. See screenshot below for guidance:
2. In the "Split Data to Rows" dialog box, follow these steps to configure the operation:
- Select the column that you want to split in the "Range (single column)" textbox.
- Choose the delimiter separating your data. For custom delimiters—such as ", " (comma and space)—select "Other" and enter your delimiter.
- After verifying your settings, click the OK button.


The selected delimited text will immediately be split into multiple rows according to your specified separator, with all other columns preserved and repeated as required.
When using Kutools, it’s recommended to first check your settings before confirming, especially in larger tables. Additionally, Kutools provides options to handle blank cells, custom delimiters, and other advanced splitting behaviors for specialized scenarios. If you frequently split delimited data, this method can save significant time and effort.
Kutools for Excel - Supercharge Excel with over 300 essential tools, making your work faster and easier, and take advantage of AI features for smarter data processing and productivity. Get It Now
Power Query is a robust data transformation tool included in Excel 2016 and later (and available as a free add-in for Excel 2013). It’s especially well-suited for complex or large-scale data restructuring, allowing you to split delimited text into rows while preserving reproducibility and traceability via query steps. Power Query is a preferred method if you often need to reshape imported data, combine several transformation actions, or refresh split data automatically when the source changes. Use caution when working with tables linked to external data sources, and be aware that after loading, the split data result will appear in a new sheet.
1. Select your original data range and click "Data" > "From Table/Range".
2. In the "Create Table" dialog, check "My table has headers" if applicable, then click OK.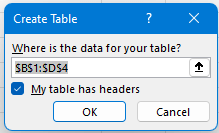
The "Power Query Editor" window will now open, showing your data in table format.
3. Select the column containing the delimited text. Click the "Transform" tab, then choose "Split Column" > "By Delimiter".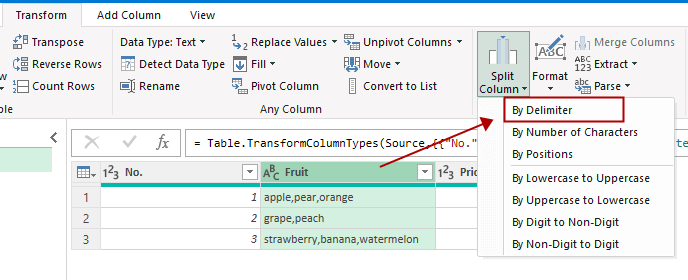
Alternatively, right-click on the column header to access the same "Split Column" options from the context menu.
4. In the "Split Column by Delimiter" dialog, select your delimiter (such as a comma or space) from the "Select or enter delimiter" dropdown. Be sure to choose "Each occurrence of the delimiter". For the split mode, expand "Advanced options" and select "Rows". Then, click OK.
After applying the split, each value separated by the chosen delimiter will move to a new row.
5. After finishing your adjustments, click "Close & Load", then confirm in the pop-up dialog by clicking Keep.
A new worksheet containing your newly split data will be created.
Using Power Query, you preserve a complete record of your transformation steps, so you can easily refresh your split data if the source changes, and automate complex repetition. As a best practice, always check that your delimiters and column selections are correct before completing the load. If errors or incorrect row counts appear, review each transformation step in the Applied Steps pane to troubleshoot.
Starting from Excel 365 and Excel 2021, users have access to dynamic array formulas such as TEXTSPLIT, FILTER, and SEQUENCE, which make splitting delimited text into multiple rows possible without code or add-ins. This approach is ideal for those who want a native, formula-based solution that updates automatically whenever the source data changes. It's particularly practical for live dashboards, reporting workbooks, or situations where automation and transparency are preferred over manual processing. However, it's important to note that these functions are only available in Microsoft 365 and Excel 2021 or later.
Applicable scenario: When you have a list where each cell contains values separated by a specific delimiter (like commas or semicolons), and you want to convert this information into a continuous list of values in separate rows.
Advantages: Native, instant updating, no macros or add-ins required, results can spill automatically to accommodate variable numbers of split items.
Limitations: These formulas do not repeat other columns by default; additional steps may be needed to link with related data, especially in multi-column datasets.
1. Suppose your delimited data starts in cell A2 (e.g., “Apple,Banana,Cherry”). In a new sheet or an empty column, enter this formula in B2 to split all values into separate rows:
=TRANSPOSE(TEXTSPLIT(A2, ","))After entering the formula, press Enter. The cell will spill results vertically, listing each fruit in its own row. You can drag/copy this formula for other rows as needed. Note, the TEXTSPLIT function lets you specify your delimiter, so adjust "," to match the symbol in your data.
2. If you need to split a range of cells (say A2:A4) containing delimited values and list all results in a single column, use the following array formula in another column (e.g., starting at B2):
=LET(flat, TEXTSPLIT(TEXTJOIN(",",TRUE,A2:A4), ","), TRANSPOSE(flat))This formula combines all values from A2:A4, splits them by the delimiter, and then lists them in separate rows. Press Enter; all values will appear as a spill range vertically. If your data uses a different delimiter, replace "," accordingly.
For users without TEXTSPLIT, you can employ a sequence of formulas using FILTER, INDEX, and SEQUENCE together, but the process is more complex and less dynamic.
When applying these formulas, errors usually stem from mismatched delimiters, extra spaces, or non-standard cell formatting. Double-check your delimiter and ensure no extra spaces are left in your data. When adjusting to multiple rows or columns, be cautious with copying and referencing to avoid overwriting existing data.
Note: If the spill range displays a #SPILL! error, ensure there are no blocks (such as other filled cells) directly beneath the formula, and adjust references if necessary. Saving your work or working on a separate copy is recommended when applying dynamic formulas extensively to new datasets.
These formula-based solutions offer an efficient, update-friendly way to split text into rows, making them an excellent choice for modern Excel environments focused on automation and flexibility.
How to alternate row color based on group in Excel?
In Excel, to color every other row may be easier for most of us, but, have you ever tried to color the rows alternately based on a column value changes – Column A as following screenshot shown, in this article, I will talk about how to alternate row color based on group in Excel.
How To Reduce Excel File Size?
Sometimes, it will take minutes to open or save if the Excel file is too large. For solving this problem, here in this tutorial, it tells you how to reduce the Excel file size by removing the contents or formats which are unnecessary or never used.
Excel: How To Create Or Insert A Bookmark
Have you ever imagined creating or inserting a bookmark for quickly jumping to a specific data range while there is a lot of data in a worksheet or a workbook?
How to apply shading to odd or even (alternative) rows/columns in Excel?
While designing a worksheet, many people tend to apply shading to odd or even (alternative) rows or columns in order to make the worksheet more visual. This article will show you two methods to apply shading to odd or even rows/columns in Excel.
Best Office Productivity Tools
Supercharge Your Excel Skills with Kutools for Excel, and Experience Efficiency Like Never Before. Kutools for Excel Offers Over 300 Advanced Features to Boost Productivity and Save Time. Click Here to Get The Feature You Need The Most...
Office Tab Brings Tabbed interface to Office, and Make Your Work Much Easier
- Enable tabbed editing and reading in Word, Excel, PowerPoint, Publisher, Access, Visio and Project.
- Open and create multiple documents in new tabs of the same window, rather than in new windows.
- Increases your productivity by 50%, and reduces hundreds of mouse clicks for you every day!
All Kutools add-ins. One installer
Kutools for Office suite bundles add-ins for Excel, Word, Outlook & PowerPoint plus Office Tab Pro, which is ideal for teams working across Office apps.
- All-in-one suite — Excel, Word, Outlook & PowerPoint add-ins + Office Tab Pro
- One installer, one license — set up in minutes (MSI-ready)
- Works better together — streamlined productivity across Office apps
- 30-day full-featured trial — no registration, no credit card
- Best value — save vs buying individual add-in