Easily protect multiple Excel workbooks with password at once
Kutools for Excel
Boosts Excel With 300+
Powerful Features
Normally, you can run VBA code to protect multiple workbooks in a folder with the same password at once. Here highly recommend the Encrypt Workbooks feature of Kutools for Excel, this feature helps to encrypt a batch of workbooks which saved in the same or different folders in current device or OneDrive with the same password at the same time.
Easily protect multiple Excel workbooks with the same password at once
The following steps demonstrate how the Encrypt Workbooks feature protect multiple workbooks at the same time with the same password.
1. Click Kutools Plus > Encrypt Workbooks > Encrypt Workbooks.

2. Then a Kutools for Excel dialog box pops up, click the OK button.
Note: Before protecting workbooks, make sure the workbooks are closed in case error occurring.

3. In the opening Encrypt Workbooks dialog box, you need to configure as follows.
- File(s): Select this option to open the Select File window, then choose the workbooks you need to protect;
- Folder: Select this option to open the Select Folder window, then choose a folder which contains the workbooks you want to protect at once;
- OneDriveFile(s): Select this option, and then choose the workbooks you need to protect from a specific OneDrive account ;
- OneDrive Folder: Select this option, and then choose a folder which contains the workbooks you want to protect at once from a specific OneDrive account.
Note: The OneDrive File(s) and OneDrive Folder options only support Excel 2013 and the later versions.


Note: Sensitivity Label Required
If the selected workbooks include a workbook that is protected by a Sensitivity Label, a prompt will appear after you click OK, notifying you that the workbook contains a sensitivity label.
Click OK, then choose the corresponding sensitivity label in the next dialog box. Once the label is confirmed, the password protection will be applied successfully.
4. Then a dialog box pops up to tell you how many workbooks are successfully encrypted, click OK to close it.

5. Then another dialog box pops up to ask for scenario saving. If you want to save current workbook configuration as a scenario, click Yes, otherwise, click No to finish the operation.

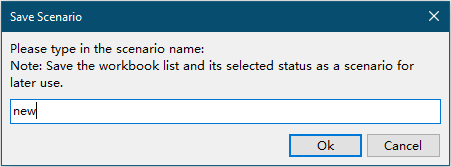
6. If you click the Yes button, a Save Scenario dialog box will open. You need to type a name for the scenario and then click OK button.

Now all selected workbooks are protected with the same password at once.
Tips:
 : Click this button to show the password in the textbox.
 : Click this button to use the password you have saved in the Password Manage to protect the currently selected workbooks. After clicking this button, a list box pops up with all saved passwords listing, click one of the passwords to fill in the textbox.
 : Click this button will open the Password Manager dialog box. Click to know how to use the Password Manager feature.
 : Click this button to open the Open scenario dialog box.
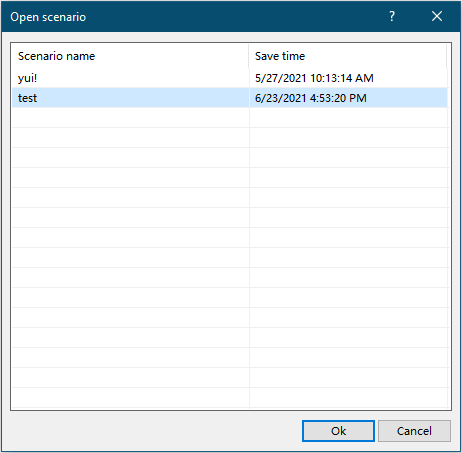
- Open: Directly open the Open scenario dialog box. All saved scenarios are saved in this dialog. Select a scenario and then click OK will open it.
- Save: This option helps to save current workbook structure as a scenario. Click this option to open the Save Scenario dialog box, enter the scenario name and then click OK.
- Save as: This option helps to save current scenario as a new one.
- Manager: Click this option to open the Manager Scenario dialog box. In the dialog box, you can rename, delete and sort the saved scenarios as you need.


Demo: Easily protect multiple Excel workbooks with password at once
Productivity Tools Recommended
Office Tab: Use handy tabs in Microsoft Office, just like Chrome, Firefox, and the new Edge browser. Easily switch between documents with tabs — no more cluttered windows. Know more...
Kutools for Outlook: Kutools for Outlook offers 100+ powerful features for Microsoft Outlook 2010–2024 (and later versions), as well as Microsoft 365, helping you simplify email management and boost productivity. Know more...
Kutools for Excel
Kutools for Excel offers 300+ advanced features to streamline your work in Excel 2010 – 2024 and Microsoft 365. The feature above is just one of many time-saving tools included.
