Create drop-down lists and data validation rules with AI in Excel
Setting up data validation in Excel often involves navigating multiple dialog options for drop-down lists, value restrictions, input prompts, and error alerts. With AI-powered Data Validation in ZKutools Anywhere for Excel, you can simply describe the rule you want in natural language.
Whether you use Excel on the web, desktop, Windows, or Mac, the AI can understand your instructions and automatically generate the appropriate validation settings, including drop-down lists, custom restrictions, input messages, and error alerts, without requiring you to manually configure each option.
 |
What Data Validation can do
With Data Validation, you can quickly create Excel validation rules, drop-down lists, input prompts, and error alerts using natural language.
🎯 Apply rules with plain language
Describe the validation rule you want in natural language instead of configuring every setting manually.
🧩 Customize validation behavior
Control options such as ignoring blank cells or showing drop-down arrows for list validation.
📋 Create drop-down lists
Generate drop-down lists by simply describing the allowed values or validation conditions you want.
⚡ Simplify different validation tasks
Create rules for dates, numbers, text length, custom formats, allowed values, and other common validation conditions.
⚠️ Generate error alerts
Create user-friendly error messages automatically when invalid data is entered into validated cells.
💬 Create input prompts
Generate helpful input messages to guide users when selecting or entering data in a worksheet.
Benefits of AI-powered Data Validation
Creating data validation rules in Excel often involves opening multiple dialog boxes, configuring settings manually, and writing input or error messages yourself. AI-powered Data Validation helps simplify this process by generating the validation setup based on your request.
Reduce manual setup
Create validation rules faster without manually configuring every option in the Data Validation dialog.
Work across Excel platforms
Use AI-powered Data Validation in Excel on the web, desktop, Windows, and Mac.
Handle different validation tasks
Create validation rules for dates, numbers, text length, custom formats, unique values, allowed ranges, and other common worksheet requirements.
Create drop-down lists more easily
Generate list-based validation rules quickly for forms, trackers, surveys, or shared worksheets.
Generate prompts and alerts automatically
Create input prompts and error messages automatically instead of writing them manually.
Adjust generated settings before applying
Review and modify the generated validation range, source list, prompts, or alerts before applying the rule.
How to use Data Validation
Follow the steps below to generate and apply a data validation rule in Excel.
Step 1: Enter your validation request
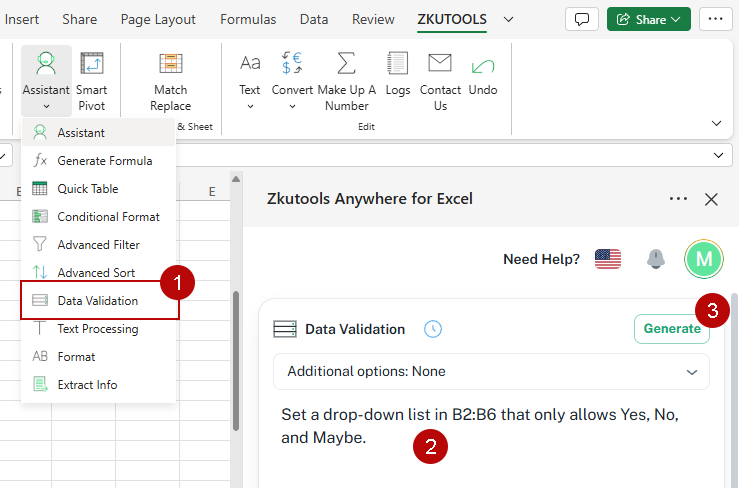
- Open Excel, go to the ZKUTOOLS tab, and click Assistant >Data Validation.
- In the Data Validation pane, describe the rule you want to apply.
Example: Set a drop-down list in column B that only allows Yes, No, and Maybe.
- Click the Generate button.
Step 2: Review and adjust the generated rule
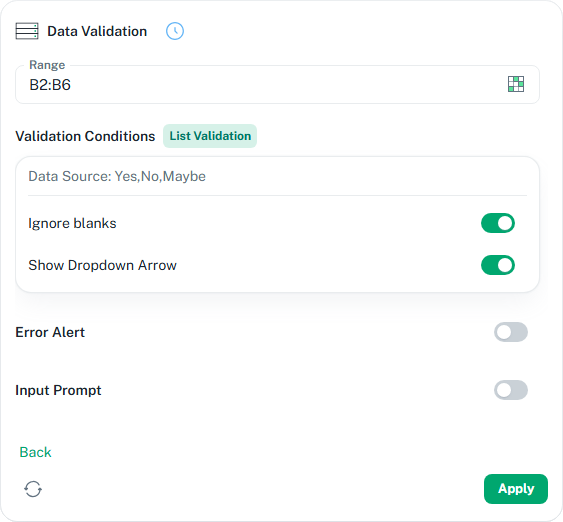
- Review the generated validation settings in the pane. In this example, the rule is applied to B2:B6, and the list source is generated as Yes, No, Maybe.
- Confirm the validation options. You can keep Ignore blanks enabled to allow empty cells, and keep Show Dropdown Arrow enabled to display the drop-down list in the selected cells.
- Enable Error Alert if you want Excel to display a warning message when users enter invalid data.
- Enable Input Prompt if you want to display a helpful message when users select the validated cells. This can guide users on what values are allowed.
💡 Tip:
If you are not satisfied with the result, click the Regenerate button
 in the lower-left corner to create a new version. If needed, click Back to adjust your request, specify an additional option, and generate the validation rule again.
 in the lower-left corner to create a new version. If needed, click Back to adjust your request, specify an additional option, and generate the validation rule again.
Step 3: Apply the validation rule
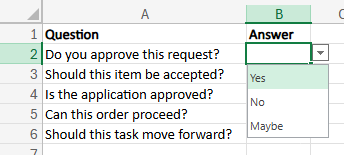
- If everything looks correct, click Apply to apply the data validation rule to the specified range in the worksheet.
Tips for better results
- Be specific in your request: Mention the target range, allowed values, and the type of validation you want to create. If needed, click Back to adjust your request and generate the validation rule again.
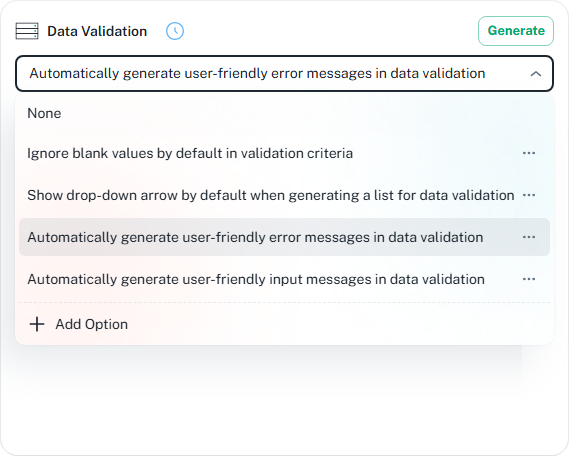
- Use additional options: Open the Additional options dropdown to enable features such as automatically generating user-friendly error alerts and input prompts.
💡 Tips:
- Click the three-dot menu beside an option to edit or delete it.
- Click Add Option to add your own custom generation option.
|  |
 beside the Range box to select the cells directly from the worksheet where you want to apply the validation rule.
Best use cases for AI-powered data validation
AI-powered Data Validation is useful for many common Excel scenarios where you need to control user input, reduce mistakes, or create cleaner worksheets.
Note:
The examples below demonstrate different types of data validation rules. You can also combine them with an input prompt or error alert in the same request, such as: "Allow only email addresses in column B, show an input message explaining the required format, and display an error alert if the entry is invalid."
Drop-down lists
Create list-based validation rules for forms, trackers, surveys, or shared worksheets.
Date restrictions
Restrict cells so users can enter only valid dates within a specific range or year.
Custom ID formats
Limit entries to a specific ID or code format for cleaner and more consistent data.
Numeric limits
Restrict cells to valid numbers, percentages, or value ranges.
Text length restrictions
Limit how many characters users can enter in specific cells.
Email format validation
Help ensure users enter values in a valid email-style format.
Duplicate prevention
Prevent duplicate values from being entered in important columns.
Percentage limits
Restrict percentage values to a valid range.
Required prefixes
Require entries to start with specific text or codes.
Weekday-only dates
Restrict date entries to weekdays only.
Conclusion
AI-powered Data Validation makes it easier to create Excel validation rules without manually configuring every setting in the Data Validation dialog. By describing the rule you want in natural language, you can quickly generate drop-down lists, value restrictions, input prompts, error alerts, and other validation settings in just a few clicks.
Whether you use Excel on the web, desktop, Windows, or Mac, this feature can help simplify worksheet setup when preparing forms, restricting user input, building templates, or creating cleaner shared worksheets.
ZKutools Anywhere for Excel
ZKutools Anywhere for Excel helps you work smarter in Excel wherever you are—web, desktop, Windows, or Mac. Every feature is completely free to use, including AI tools with free AI tokens included.
