How to remove an account but keep its emails in Outlook?
Imagine you've set up multiple email accounts in Microsoft Outlook, but find that you seldom use some of them. You might consider removing these less active accounts. Typically, deleting an email account from Microsoft Outlook also removes its associated emails. However, this article will guide you through various techniques to eliminate email accounts from Microsoft Outlook while preserving their messages.
- Automate emailing with Auto CC/BCC, Auto Forward by rules; send Auto Reply (Out of Office) without requiring an exchange server...
- Get reminders like BCC Warning when replying to all while you're in the BCC list, and Remind When Missing Attachments for forgotten attachments...
- Improve email efficiency with Reply (All) With Attachments, Auto Add Greeting or Date & Time into Signature or Subject, Reply Multiple Emails...
- Streamline emailing with Recall Emails, Attachment Tools (Compress All, Auto Save All...), Remove Duplicates, and Quick Report...
Remove an account but keep its email by saving original data file
This method will guide you to remove an email account from Microsoft Outlook, but keep all items of this email account in Microsoft Outlook.
Important Note: This procedure is designed for email accounts that use .pst data files. If your account operates on .ost files, ensure to convert and export them as .pst first. This step is crucial to avoid losing any email data when you proceed with the account removal.
- Open the Account Settings dialog box by clicking File > Info > Account Settings > Account Settings.

- In the Account Settings dialog box, on the Email tab, follow these steps:
- Select the email account that you will remove. Make sure the account you select is associated with a .pst data file. If it's linked to an .ost file, removing the account could result in the loss of all emails.
- Click the Remove button.
- Click the Close button at the bottom to exit the dialog box.

- Now you are back to the main interface of Outlook. Click File > Open & Export > Open Outlook Data File.
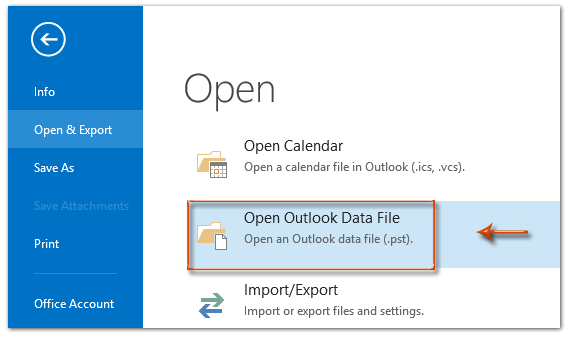
- In the pop-up Open Outlook Data File window, locate the data file you wish to access. Select it, and then click the Open button. Tip: If your .pst file is stored in a non-default location, navigate to that specific folder to open the .pst file.


Result
The email account has now been removed from your Microsoft Outlook; however, the folders associated with this account remain visible and accessible in the Navigation pane.
Remove an account but keep its email by copying and pasting
Actually, before removing an email account from Microsoft Outlook, we can save all of its emails into other folders by manually copying and pasting. Here's a detailed guide to do this:
- Open the email folder in the Navigation Pane associated with the account you plan to remove that contains the emails you want to preserve.

- Press Ctrl + A to select all the emails in the opened folder.
- Press Ctrl + C to copy these email messages.
- Navigate to the folder where you wish to transfer these emails. In my example, I would open the Inbox of a different email account as shown below.

- Press Ctrl + V to paste all copied email messages into this opened folder.
Tips:
- Repeat steps 1 to 5 to move email messages from other folders of the account you're removing.
- This method does not include subfolders. For emails in subfolders, you'll need to replicate steps 1 to 5 for each subfolder.
- Open the Account Settings dialog box by clicking File > Info > Account Settings > Account Settings.
- In the Account Settings dialog box, on the Email tab, follow these steps:
- Select the email account that you will remove.
- Click the Remove button.
- Click the Close button at the bottom to exit the dialog box.


Export emails to a PST file before account removal
To retain emails from an account you're removing in Outlook, exporting them as a PST (Outlook Data File) is a reliable method. This process creates a backup of your emails, which can be accessed even after the account is removed. Here’s how to do it:
- Open the Import and Export Wizard dialog box by clicking File > Open & Export > Import & Export.
- In the wizard, select Export to a file, and click the Next button.

- In the Export to a File dialog box, select Outlook Data File (.pst) > Next.

- In the Export Outlook Data File dialog box, select the email account that you will remove later to export its data, ensure Include subfolders is checked, and click Next.

- Set export parameters as follows:
- Click Browse, select a folder to save the PST file, and name the file.
- Choose the Do not export duplicate items option.
- Click Finish.

- The Create Outlook Data File dialog will appear:
- To add a password, enter it in both Password and Verify Password boxes, then click OK.
- To skip adding a password, click Cancel.


After completing these steps, you can proceed with the procedure outlined in the initial method to delete an existing email account while retaining the original emails.
Best Office Productivity Tools
Kutools for Outlook - Over 100 Powerful Features to Supercharge Your Outlook
🤖 AI Mail Assistant: Instant pro emails with AI magic--one-click to genius replies, perfect tone, multilingual mastery. Transform emailing effortlessly! ...
📧 Email Automation: Out of Office (Available for POP and IMAP) / Schedule Send Emails / Auto CC/BCC by Rules When Sending Email / Auto Forward (Advanced Rules) / Auto Add Greeting / Automatically Split Multi-Recipient Emails into Individual Messages ...
📨 Email Management: Easily Recall Emails / Block Scam Emails by Subjects and Others / Delete Duplicate Emails / Advanced Search / Consolidate Folders ...
📁 Attachments Pro: Batch Save / Batch Detach / Batch Compress / Auto Save / Auto Detach / Auto Compress ...
🌟 Interface Magic: 😊More Pretty and Cool Emojis / Boost Your Outlook Productivity with Tabbed Views / Minimize Outlook Instead of Closing ...
👍 One-click Wonders: Reply All with Incoming Attachments / Anti-Phishing Emails / 🕘Show Sender's Time Zone ...
👩🏼🤝👩🏻 Contacts & Calendar: Batch Add Contacts From Selected Emails / Split a Contact Group to Individual Groups / Remove Birthday Reminders ...
Over 100 Features Await Your Exploration! Click Here to Discover More.

