How to automatically print an incoming email in Outlook?
Have you ever tried to print an email automatically when it is received? Let's say someone's email is always considered important and needs to be filed on paper for others to review. Normally, after receiving the email, you need to preview it and then print it manually, which is an interruption to your work. In this tutorial, we are going to show you how to automatically print an incoming email that meets the specified conditions.
Automatically print incoming emails by creating rules
Please do as follows to create a rule to automatically print incoming emails that meet the conditions you specified in the rule.
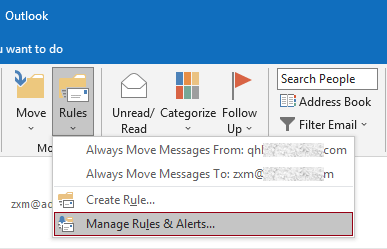
1. In the Mail view, go to the Home tab, and then click Rules > Manager Rules & Alerts.
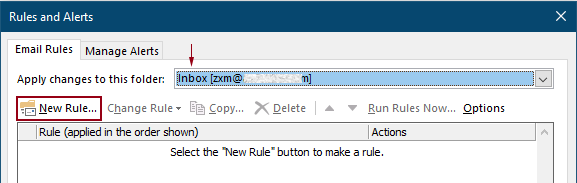
2. In the Rules and Alerts dialog box, click the New Rule button to create a rule.
Tips: If you have added multiple email accounts to your Outlook, please specify an account in the Apply changes to this folder drop-down list where you want to apply the rule. Otherwise, it will be applied to the inbox of the currently selected email account.
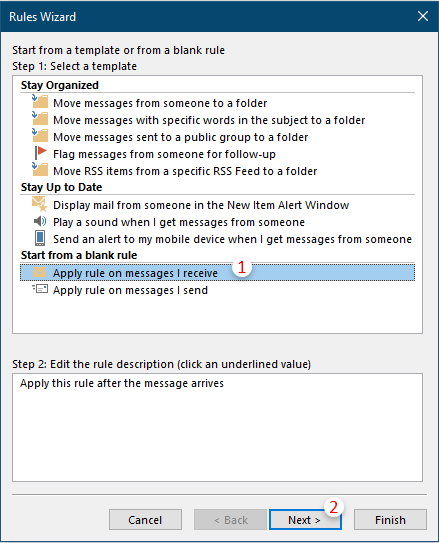
3. In the first Rules Wizard dialog box, select Apply rule on messages I receive in the Step 1 box, and then click Next.
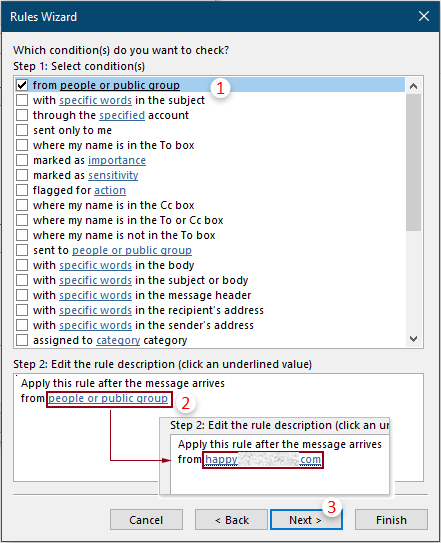
4. In the second Rules Wizard dialog box, you need to:
5. In the third Rules Wizard dialog box, check the print it box in the Step 1 box, and then click the Next button.

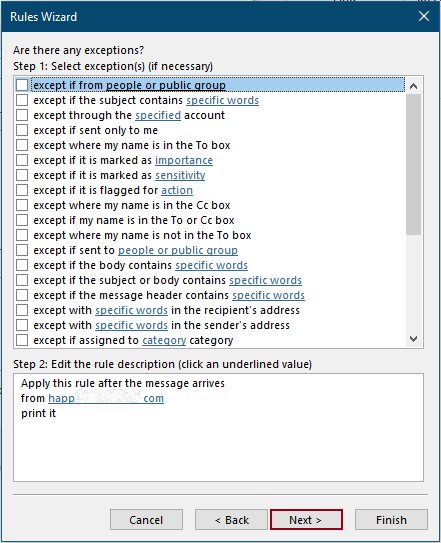
6. Then another rules wizard pops up asking for exceptions. Select the exceptions if necessary, otherwise, click the Next button without any selections.
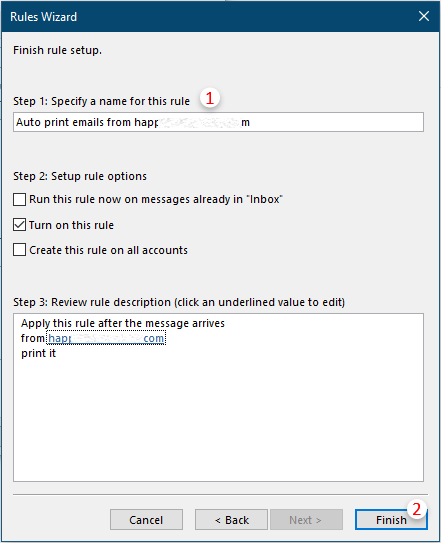
7. In the last Rules Wizard, you need to specify a name for the rule, and then click the Finish button.
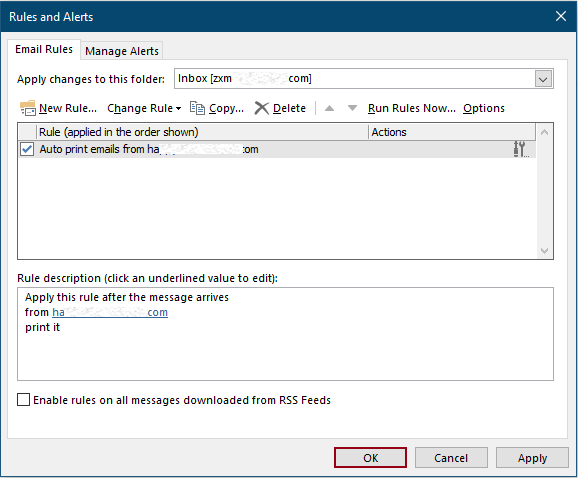
8. Then it returns to the Rules and Alerts dialog box, you can see the rule you created listed inside, click the OK button to finish the whole settings.
From now on, when an email is received that meets the conditions you specified in the rule, it will be printed automatically.
Note: The attachments received in the email will not be printed.
Related articles
Only Print Attachment(S) From One Email Or Selected Emails In Outlook
In Outlook, you can print the emails, but have you printed the attachments only from one email or selected emails in Outlook? This article introduces the tricks on solving this job.
Only Print Message Header Of An Email In Outlook
When printing an email in Outlook, it will print both of message header and message body in the email. However, in some special cases, you may just need to print out the message header with the subject, sender, recipients, etc. This article will introduce two solutions to do it.
Print A Calendar In A Specified/Custom Date Range In Outlook
Normally, when printing a calendar in Month view in Outlook, it will automatically select the month containing the currently selected date. But, you may need to print the calendar within a custom date range, such as 3 months, half of year, etc. This article will introduce the solution for you.
Print A Contact With Picture In Outlook
Normally, a contact’s picture won’t be printed out when printing the contact in Outlook. But sometimes, it will be more impressive to print a contact with its picture. This article will introduce some workarounds to get it done.
Print A Selection Of An Email In Outlook
If you received an email message and found that there is a selection of the email content need to be printed out instead of printing the whole message, what would you do? Actually, Outlook can help you achieve this operation with the help of internet browsers, such as the Firefox and the Internet Explorer. Here I will take the Internet browsers for example. Please look at the following tutorials.
Best Office Productivity Tools
Kutools for Outlook - Over 100 Powerful Features to Supercharge Your Outlook
🤖 AI Mail Assistant: Instant pro emails with AI magic--one-click to genius replies, perfect tone, multilingual mastery. Transform emailing effortlessly! ...
📧 Email Automation: Out of Office (Available for POP and IMAP) / Schedule Send Emails / Auto CC/BCC by Rules When Sending Email / Auto Forward (Advanced Rules) / Auto Add Greeting / Automatically Split Multi-Recipient Emails into Individual Messages ...
📨 Email Management: Easily Recall Emails / Block Scam Emails by Subjects and Others / Delete Duplicate Emails / Advanced Search / Consolidate Folders ...
📁 Attachments Pro: Batch Save / Batch Detach / Batch Compress / Auto Save / Auto Detach / Auto Compress ...
🌟 Interface Magic: 😊More Pretty and Cool Emojis / Boost Your Outlook Productivity with Tabbed Views / Minimize Outlook Instead of Closing ...
👍 One-click Wonders: Reply All with Incoming Attachments / Anti-Phishing Emails / 🕘Show Sender's Time Zone ...
👩🏼🤝👩🏻 Contacts & Calendar: Batch Add Contacts From Selected Emails / Split a Contact Group to Individual Groups / Remove Birthday Reminders ...
Over 100 Features Await Your Exploration! Click Here to Discover More.

