How to lock and protect selected cells from editing in Excel?
It's easy to lock and protect the whole worksheet or workbook with clicking the Protect Sheet button or Protect Workbook button under Review tab. However, sometimes you may need to lock and protect only specific cells or selections in a sheet. How would you like to do? This article will guide you to lock and protect selected cells or ranges in Excel with following steps:
- Lock and protect selected cells from editing with modifying cell formatting
- Lock and protect selected cells from editing with Kutools for Excel
- Lock and protect selected cells from viewing by encrypting (2 steps)
Lock and protect selected cells from editing with modifying cell formatting
The following steps will guide you to unlock all cells in current firstly, lock required cells and ranges, and then protect current worksheet. Please do as follows:
1. Click the Arrow  at the upper-left corner of worksheet to select all cells in active worksheet.
2. Right click any selected cell, and select the Format Cell item from the context menu. See below screenshot:

3. In the Format Cells dialog box, uncheck the Locked option under Protection tab, and click OK button. See above screenshot:
4. Select cells and ranges that you want to lock, right click and select the Format Cell item from the context menu.

5. In the Format Cells dialog box, check the Lock option under Protection tab, and click OK button. See above screenshot:
6. Click Review > Protect Sheet to protect current worksheet. See below screenshot:
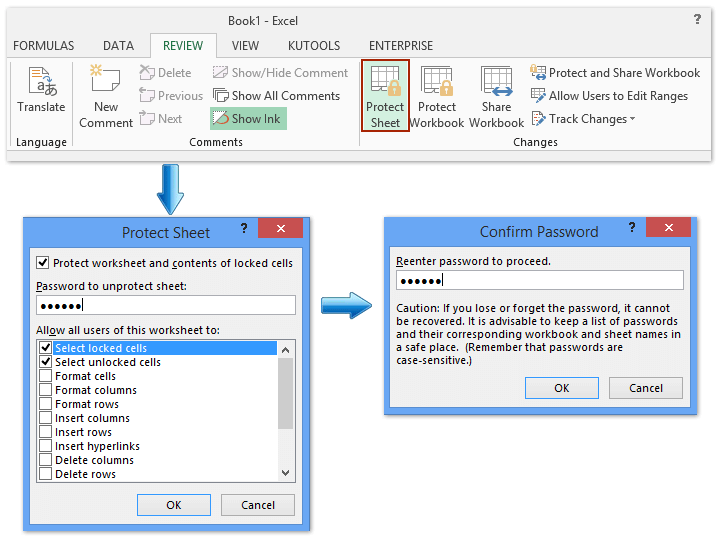
7. Enter a password in the blank box in the popping up Protect Sheet dialog box, and click the OK button. And then retype the password into the another Confirm Password dialog box, and click the OK button. See screenshot above.
And now it locks and protects only cells and ranges you selected in the Step 4, while unselect ranges are editable.
Lock and protect selected cells from editing with Kutools for Excel
Kutools for Excel's Selection Unlock utility and Selection Lock utility enable you to unlock/lock all selected cells with only one click, and then you can protect the whole worksheet with allowing unlocked cells to be edited.
Kutools for Excel - Supercharge Excel with over 300 essential tools. Enjoy a full-featured 30-day FREE trial with no credit card required! Get It Now
1. Click the Arrow at the upper-left corner of worksheet to select all cells in active worksheet.
2. Click Kutools Plus > Worksheet Design to activate the Design tab, and then click the Design > Unlock Cells. See screenshot:

Then a dialog box comes out to tell you selected cells have been unlocked. Just click the OK button to close it.
3. Select cells and ranges that you want to lock, and click the Design > Lock Cells.

Then click the OK button to close the popping up Kutools for Excel dialog box.
4. Click the Design > Protect Sheet or Review > Protect Sheet, and then you can follow the same steps we introduced in the first method to protect current worksheet.
Lock and protect selected cells from viewing by encrypting
If you have Kutools for Excel installed, it’s another Encrypt Cells utility can help you quickly lock and protect selected cells quickly. You can do as follows:
Kutools for Excel - Supercharge Excel with over 300 essential tools. Enjoy a full-featured 30-day FREE trial with no credit card required! Get It Now
1. Select the cells that you want to lock and protect, and click the Kutools Plus > Encrypt Cells > Encrypt Cells.

2. In the opening Encrypt Cells dialog box, type your password into both Password box and Confirm box, select one of mask types, and click the Ok button.

Then you will see all selected cells are encrypted at once as following screen shot shown:

Note: You can decrypt these encrypted cells with clicking Kutools Plus > Encrypt Cells > Decrypt Cells, and then type you password into opening dialog box.
Kutools for Excel - Supercharge Excel with over 300 essential tools. Enjoy a full-featured 30-day FREE trial with no credit card required! Get It Now
Demo: lock and protect selected cells in Excel
Quickly mass password protect multiple/all worksheets in Excel
Normally Excel's Protect Sheet feature can only protect active sheet. However, Kutools for Excel's Protect Worksheet utility enables to batch protect multiple (or all) worksheets with same password by only 2 steps.

Best Office Productivity Tools
Supercharge Your Excel Skills with Kutools for Excel, and Experience Efficiency Like Never Before. Kutools for Excel Offers Over 300 Advanced Features to Boost Productivity and Save Time. Click Here to Get The Feature You Need The Most...
")
Office Tab Brings Tabbed interface to Office, and Make Your Work Much Easier
- Enable tabbed editing and reading in Word, Excel, PowerPoint, Publisher, Access, Visio and Project.
- Open and create multiple documents in new tabs of the same window, rather than in new windows.
- Increases your productivity by 50%, and reduces hundreds of mouse clicks for you every day!
")