Outlook: insert symbols of degree, trademark, emotions, and euro
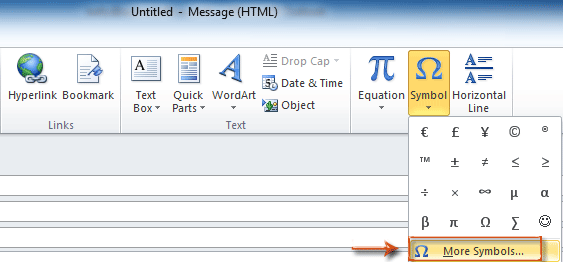
Normally it is easy to find out the symbol gallery with clicking "Symbol" > "More Symbols" on the "Insert" tab in the Message window.

However, there are too many special symbols in the Symbol gallery to find out a specified one in a short time easily. This article is provided to guide you find out the specified symbols of degree, trademark, emotions, and euro in Microsoft Outlook at once.
Insert symbol of degree, trademark, emotions and euro with symbol function
Save symbols as auto text entry and reuse them in the future with one click 👍
Insert symbol of degree, trademark, emotions and euro with symbol function
Step 1: Create a new email message:
- In Outlook 2007, click "File" > "New" > "Mail Message".
- In Outlook 2010 and 2013, click "New Email" in the "New" group on the "Home" tab.
Step 2: Open the Symbol dialog box with clicking "Symbol" > "More Symbols" in the "Symbols" group on the "Insert" tab.
Step 3: Find out special symbols:
- Find out the degree symbol.
- In the "Font:" box, select (or enter) the "(normal text)";
- In the "Subset:" box, select (or enter) the "Latin-1 Supplement".
Then you will see the degree symbol at once.

- Find out the trademark symbol.
- In the "Font:" box, select (or enter) the "(normal text)";
- In the "Subset:" box, select (or enter) the "Letterlike Symbols".
Then you will see the trademark symbol as following:

- Find out the emotion symbol.
In the "Font:" box, select (or enter) the "Wingdings", and then you will get the emotion symbols. See screenshot:

- Find out the euro sign.
- In the "Font:" box, select (or enter) the "Aparajita";
- In the "Subset:" box, select (or enter) the "Currency Symbols".
Then you will see the euro sign as following:

Step 4: Click the "Insert" button in the Symbols dialog box.
Save symbols as auto text entry and reuse them in the future with one click 👍
Once you've inserted multiple symbols into your email using the method above, discover the power of "Kutools for Outlook"'s "AutoText" utility. This handy feature lets you save each symbol as its own AutoText entry, enabling you to reuse them effortlessly with just a single click in future messages!
Say goodbye to Outlook inefficiency! Kutools for Outlook makes batch email processing easier - now with a 30-day free trial! Download Kutools for Outlook Now!!
1. Go to the "Kutools" tab, and click "Resource".

2. The "Kutools Pane" shows up, please go to the "AutoText" tab. Select the symbol, and click the "New" button.

3. In the "New AutoText" dialog box, enter a name for the symbol in the "Name" textbox, and click the "Add" button.

4. Now the symbol is successfully added. To reuse it in the body of a message, click the AutoText entry in the "Kutools Pane", and then the symbol will be inserted into the email body immediately.
Tip:
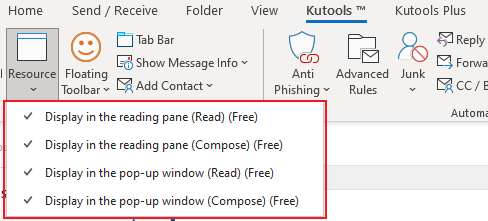
- The "Resource" pane in Outlook supports both reading pane and pop-up window views. You can configure it according to your preference:
- Go to the "Kutools" tab in Outlook. Then click the drop-down arrow of the "Resource" button.
- Choose the pane or window where you want the "Resource" pane to appear automatically.

Best Office Productivity Tools
Experience the all-new Kutools for Outlook with 100+ incredible features! Click to download now!
📧 Email Automation: Auto Reply (Available for POP and IMAP) / Schedule Send Emails / Auto CC/BCC by Rules When Sending Email / Auto Forward (Advanced Rules) / Auto Add Greeting / Automatically Split Multi-Recipient Emails into Individual Messages ...
📨 Email Management: Recall Emails / Block Scam Emails by Subjects and Others / Delete Duplicate Emails / Advanced Search / Consolidate Folders ...
📁 Attachments Pro: Batch Save / Batch Detach / Batch Compress / Auto Save / Auto Detach / Auto Compress ...
🌟 Interface Magic: 😊More Pretty and Cool Emojis / Remind you when important emails come / Minimize Outlook Instead of Closing ...
👍 One-click Wonders: Reply All with Attachments / Anti-Phishing Emails / 🕘Show Sender's Time Zone ...
👩🏼🤝👩🏻 Contacts & Calendar: Batch Add Contacts From Selected Emails / Split a Contact Group to Individual Groups / Remove Birthday Reminders ...
Use Kutools in your preferred language – supports English, Spanish, German, French, Chinese, and 40+ others!


🚀 One-Click Download — Get All Office Add-ins
Strongly Recommended: Kutools for Office (5-in-1)
One click to download five installers at once — Kutools for Excel, Outlook, Word, PowerPoint and Office Tab Pro. Click to download now!
- ✅ One-click convenience: Download all five setup packages in a single action.
- 🚀 Ready for any Office task: Install the add-ins you need, when you need them.
- 🧰 Included: Kutools for Excel / Kutools for Outlook / Kutools for Word / Office Tab Pro / Kutools for PowerPoint
