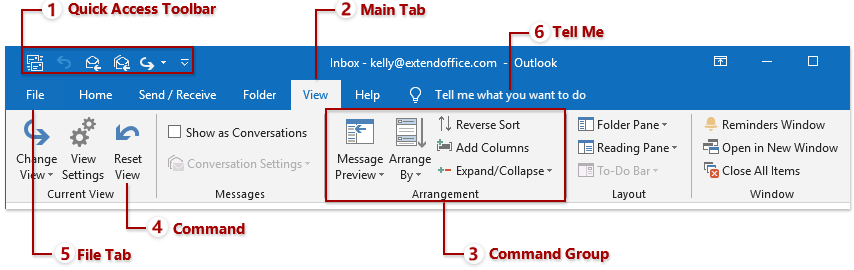
Outlook Main Interface – Ribbon
The Ribbon layout has been brought to Outlook interface since Outlook 2010, and it has been improved slightly in the latest Outlook 2019.
Note: This tutorial is introduced based on Microsoft Outlook 2019 desktop program in Windows 10. And it may vary significantly or slightly depending on the version of Microsoft Outlook and the Windows environments.
Overview of the Outlook Ribbon
Note: The main tabs, command groups, and commands varies depending on which view you are in. Now I will take the Mail view for example to explain the overview of the Outlook Ribbon.
1. Quick Access Toolbar
The quick access Toolbar contains a set of common-used commands, and displays at the upper-left corner of the Ribbon all the time, no matter which main tab you activate. Outlook users can add or remove commands from it, and change its position to the top/bottom of Ribbon.

2. Main Tabs
The main tabs stay at the top of Ribbon, such as Home, Send/Receive, Folder, etc. Click a certain main tab, and it will open the commands on the tab.
3. Command Group
Commands under a certain tab are grouped and separated by vertical lines. Generally, there are several commands groups under every main tab. For example, in the Mail view, on the Home tab, there are New group, Delete group, Respond group, etc.
4. Command
Click commands based on what you want to do. For example, you want to move selected items to Archive folder, you can click the Archive command in the Delete group under the Home tab.
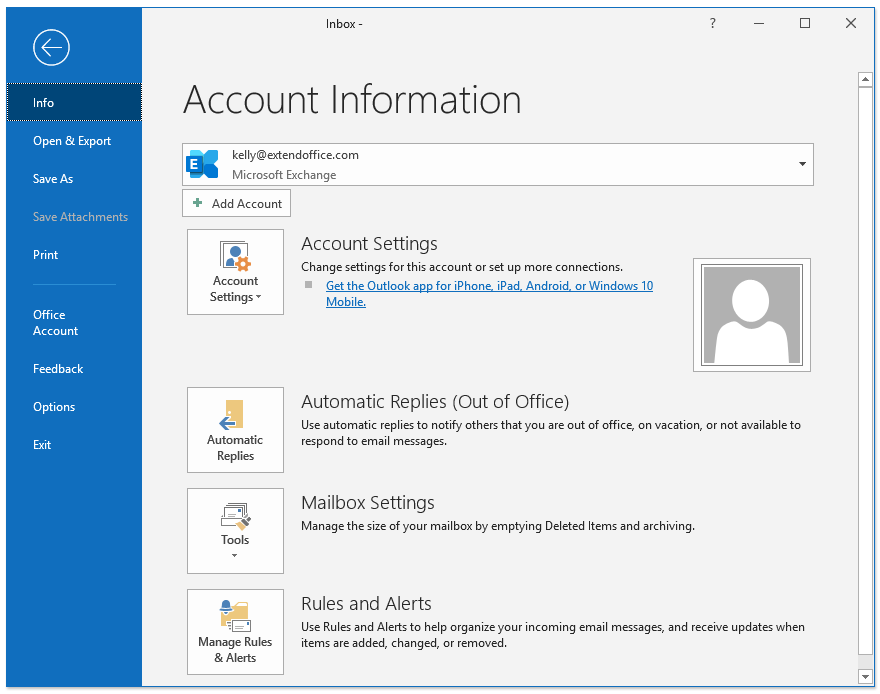
5. File tab brings backstage view
Click the File tab in the leftmost of main tabs, and it will open the Outlook backstage view. In the backstage view, you can manage your mailboxes, print, import and export data, and so on.
6. Tell me
Type the keyword about what you want to do in the Tell Me box. And it will bring the specified feature immediately. This amazing feature will save your time on memorizing and looking for features on Ribbon.
Expand, collapse, and hide the Ribbon
The Outlook ribbon displays fully by default in Outlook. And you can collapse the Ribbon and then expand easily.
1. Expand and collapse the Ribbon
Go to the lower-right corner of the Outlook Ribbon, and click ![]() to collapse the Outlook Ribbon (only show the main tabs). If the Outlook Ribbon has been collapsed already, you can click any main tab to show the Ribbon temporarily, and then click
to collapse the Outlook Ribbon (only show the main tabs). If the Outlook Ribbon has been collapsed already, you can click any main tab to show the Ribbon temporarily, and then click ![]() to pin the Ribbon.
to pin the Ribbon.
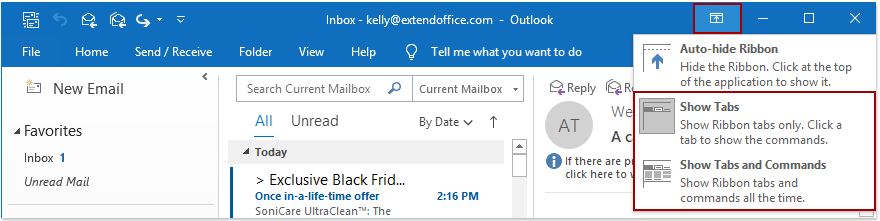
Note: You can also click Ribbon Display Options > Show Tabs to collapse the Ribbon, and click Ribbon Display Options > Show Tabs and Commands to expand the Ribbon.
2. Auto Hide the Ribbon
If you want to hide the Ribbon completely without showing the main tabs, you can click Ribbon Display Options![]() > Auto-hide Ribbon to get it done.
> Auto-hide Ribbon to get it done.
After enabling this option, the whole Ribbon will display as a gray bar. And click the gray bar will display the Ribbon, while the Ribbon will hide again when you activate other items.
Note: You can click Ribbon Display Options ![]() > Show Tabs and Commands to restore the default Ribbon.
> Show Tabs and Commands to restore the default Ribbon.
More articles ...
Best Office Productivity Tools
Experience the all-new Kutools for Outlook with 100+ incredible features! Click to download now!
📧 Email Automation: Auto Reply (Available for POP and IMAP) / Schedule Send Emails / Auto CC/BCC by Rules When Sending Email / Auto Forward (Advanced Rules) / Auto Add Greeting / Automatically Split Multi-Recipient Emails into Individual Messages ...
📨 Email Management: Recall Emails / Block Scam Emails by Subjects and Others / Delete Duplicate Emails / Advanced Search / Consolidate Folders ...
📁 Attachments Pro: Batch Save / Batch Detach / Batch Compress / Auto Save / Auto Detach / Auto Compress ...
🌟 Interface Magic: 😊More Pretty and Cool Emojis / Remind you when important emails come / Minimize Outlook Instead of Closing ...
👍 One-click Wonders: Reply All with Attachments / Anti-Phishing Emails / 🕘Show Sender's Time Zone ...
👩🏼🤝👩🏻 Contacts & Calendar: Batch Add Contacts From Selected Emails / Split a Contact Group to Individual Groups / Remove Birthday Reminders ...
Use Kutools in your preferred language – supports English, Spanish, German, French, Chinese, and 40+ others!


🚀 One-Click Download — Get All Office Add-ins
Strongly Recommended: Kutools for Office (5-in-1)
One click to download five installers at once — Kutools for Excel, Outlook, Word, PowerPoint and Office Tab Pro. Click to download now!
- ✅ One-click convenience: Download all five setup packages in a single action.
- 🚀 Ready for any Office task: Install the add-ins you need, when you need them.
- 🧰 Included: Kutools for Excel / Kutools for Outlook / Kutools for Word / Office Tab Pro / Kutools for PowerPoint