How to auto forward email messages in Outlook?
When you are away on a trip and you don’t want your vacation being interrupted by Outlook emails but you still need to deal with this emails on time, now you need to forward your incoming messages to others and let them help you deal with it as soon as possible. This tutorial will show you several methods of how to auto forward email messages in Outlook.
- Auto forward email messages with creating rule in Outlook
- Auto forward email messages with Kutools for Outlook
- Quickly forward multiple emails individually with only one click
Auto forward email messages with creating rule in Outlook
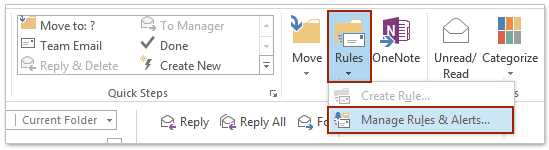
1. Please click "Home" > "Rules" > "Manager Rules & Alerts". See screenshot:
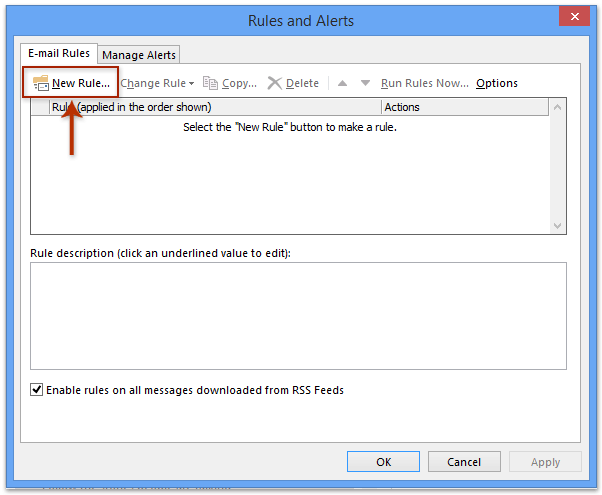
2. In "Rules and Alerts" dialog, under "E-mail Rules" tab, click on "New Rule" option.
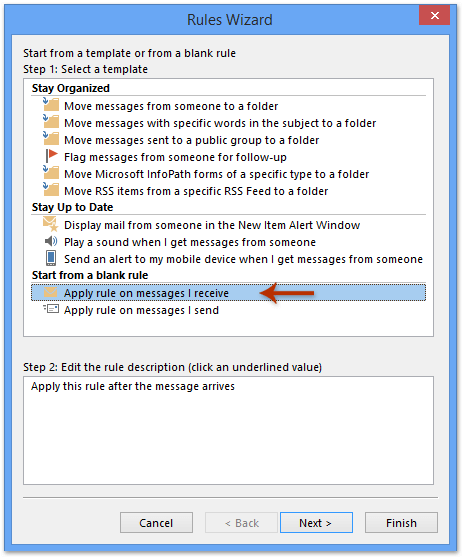
3. Then a "Rules Wizard" dialog pop up. Under "Start from a blank rule", select "Apply rule on messages I receive", and then click "Next" to continue.
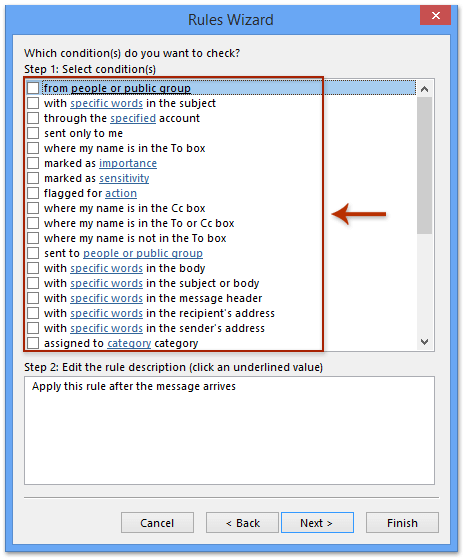
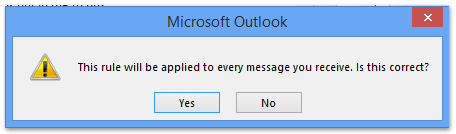
4. Selecting any condition allows you to forward the specific email that meets your requirement. But uncheck all the conditions, the rule will be applied to every message you receive. When you unchecked all the conditions, click "Next" then a prompt box will pop up, click "Yes".
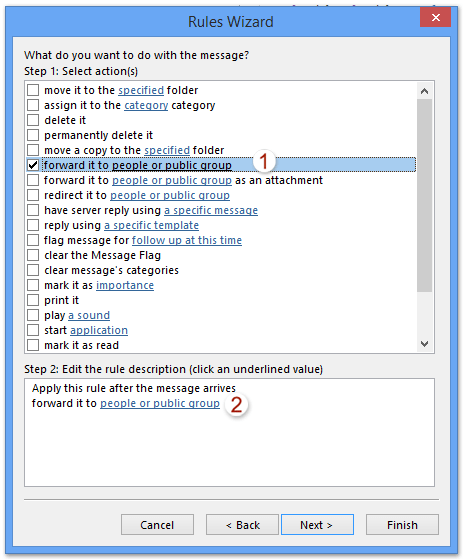
5. Now in the new Rules Wizard dialog box, please select "forward it to people or public group" option In step 1 section, and click people or public group in "Step 2" section. See screenshot:
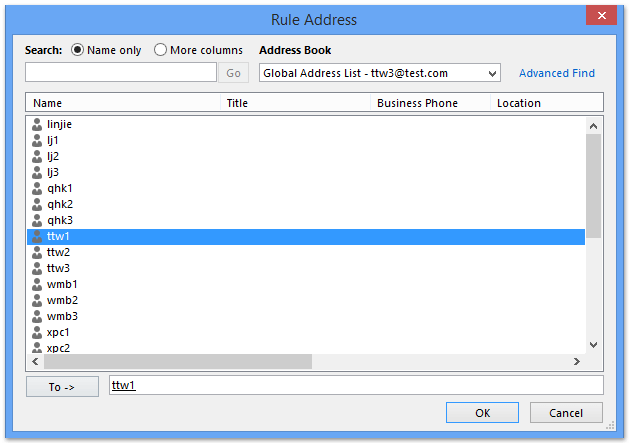
6. When a "Rule Address" dialog popping up, click your desired address and then click on "To" button (you can also double-clicking on the address to select it). Or you can directly type the email address in the "To" field. Finally click "OK".
7. Now it returns to the previous window, and you can see the previous people or public group was replaced by your specified email address. Click "Next" to see the further information.
8. When an exceptions dialog popping up, select any exception that you would like to apply to this rule and then click Next. Tip: Most users leave the exceptions unchecked.
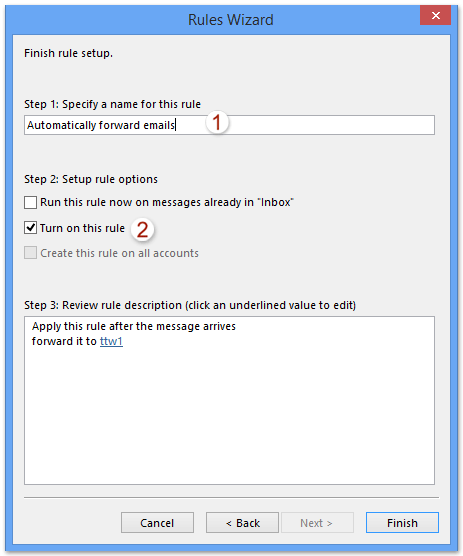
9. Now you get into the last Rules Wizard dialog box, please type a name for the new rule in the "Step 1" box, check options in the "Step 2" section, and click the "Finish" button. See screenshot:
10. And now you get back to the Rules and Alerts dialog box, please click the "OK" button to close it.
Auto forward email messages with Kutools for Outlook
The above setting rule method is complicated and time-consuming for many Outlook users. Here with the Automatic "Forward utility of Kutools for Outlook," you can easily auto forward all emails when receiving in Outlook.
Say goodbye to Outlook inefficiency! Kutools for Outlook makes batch email processing easier - now with a 30-day free trial! Download Kutools for Outlook Now!!
1. Please enable the utility by clicking "Kutools Plus" > "Forward" > "Rule Manager". See screenshot:

Note: If there has no auto forward rule existing, you can get into the Auto Forward Settings dialog box directly by clicking "Enable Auto Forward".
2. In the popping up "Auto Forward Settings" dialog box, please click "New" button.
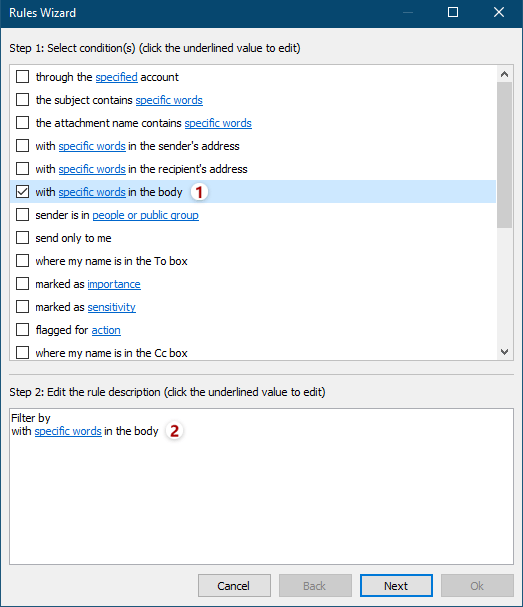
3. In the Rules Wizard, please tick the specified conditions you will filter the coming emails, and click the underline value to specify the conditions as you need. In my case, I tick the "with specific words" in the body option, and then click the underline text of specific words to edit it. See screenshot:
4. Now the Text Contains dialog comes out. Click the "New" button to add the specified words as you need.

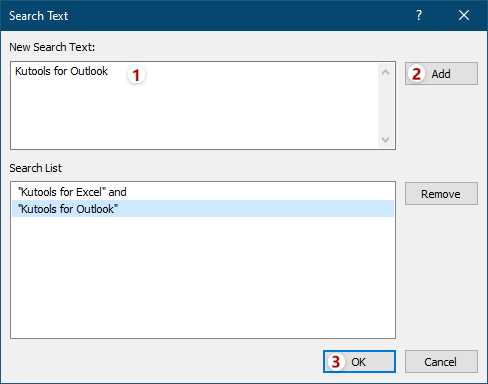
5. In the Search Text dialog, type in the specified word in the "New Search Text" box, click the "Add" button, and then Click the "OK" button.
Tips: To add multiple specified words, you can type one word in the "New Search Text" box, and click the "Add"button. Then repeat this operation to add other words one by one. After adding all words, click the "OK" button.
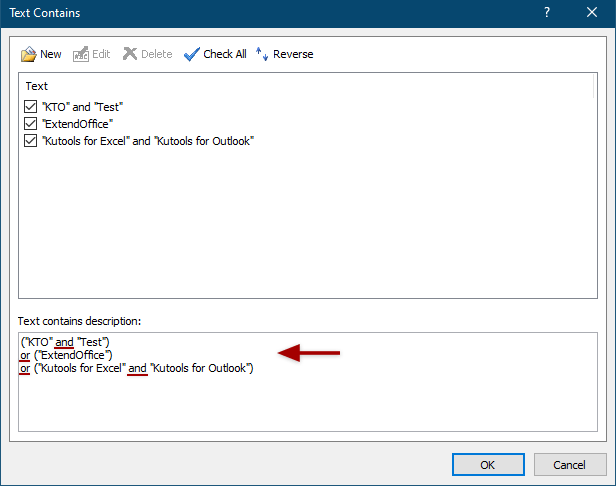
6. It will return to the Text Contains dialog. If necessary, you can click the "New" button to add other words as you need, and then click the "OK" button.
Tips: If you add multiple words in above Search Text dialog at the same time, the relationship between these words is "AND"; if you add multiple words by clicking the "New" button in the Text Contains dialog successively, the relationship between these words is "OR". See screenshot:
7. Now it goes back to the Rules Wizard, specify other condition as you need, and click the "Next" button.
8. In the second Rules Wizard, specify the exceptions or do not tick any exceptions as you need, and click the "Next" button.
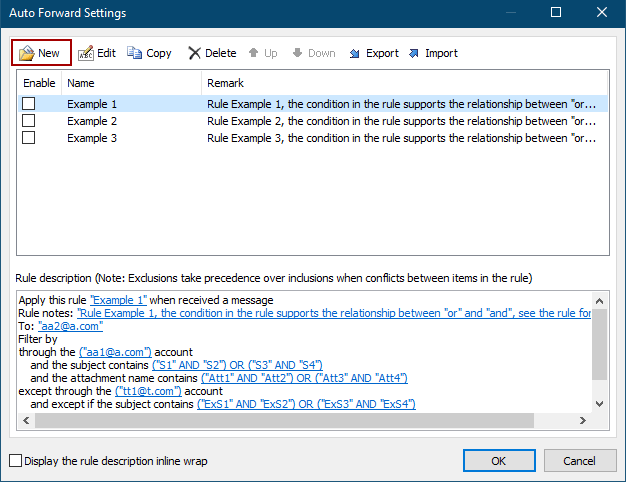
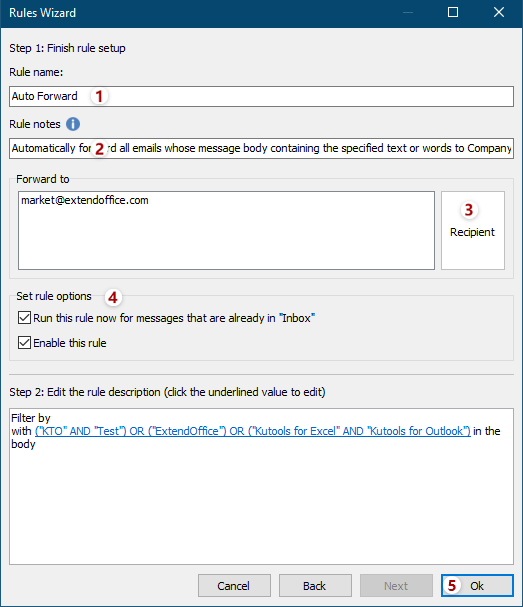
10. In the last Rules Wizard dialog box, (1) type a name for the new forward rule in the "Rule name" box; (2) add notes for this forwarding rule in the "Rule notes" box; (3) click the "Recipient" button and specify the email address you will forward to in the opening dialog box; (4) In the "Set rule options" section, tick the running options as you need, and (5) click the "OK" button.
11. When it returns to the "Auto Forward Settings" dialog box, make sure the rule you created just now is checked, and "OK" button to finish the settings.
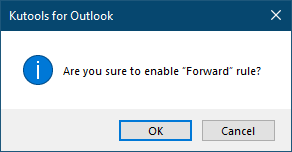
12. Now in the main interface of Outlook, click "Kutools" > "Forward" > "Enable Auto Forward" to run the rule.

And in the popping out reconfirming dialog, click the "OK"button.
Note: With "Kutools for Outlook"’s "Automatic Forward" utility, you can not only automatically forward all emails when receiving, but also automatically forward certain emails by special criteria such as email account, subject, and so on in Outlook.
Auto forward email messages with Kutools for Outlook Demo
Best Office Productivity Tools
Experience the all-new Kutools for Outlook with 100+ incredible features! Click to download now!
📧 Email Automation: Auto Reply (Available for POP and IMAP) / Schedule Send Emails / Auto CC/BCC by Rules When Sending Email / Auto Forward (Advanced Rules) / Auto Add Greeting / Automatically Split Multi-Recipient Emails into Individual Messages ...
📨 Email Management: Recall Emails / Block Scam Emails by Subjects and Others / Delete Duplicate Emails / Advanced Search / Consolidate Folders ...
📁 Attachments Pro: Batch Save / Batch Detach / Batch Compress / Auto Save / Auto Detach / Auto Compress ...
🌟 Interface Magic: 😊More Pretty and Cool Emojis / Remind you when important emails come / Minimize Outlook Instead of Closing ...
👍 One-click Wonders: Reply All with Attachments / Anti-Phishing Emails / 🕘Show Sender's Time Zone ...
👩🏼🤝👩🏻 Contacts & Calendar: Batch Add Contacts From Selected Emails / Split a Contact Group to Individual Groups / Remove Birthday Reminders ...
Use Kutools in your preferred language – supports English, Spanish, German, French, Chinese, and 40+ others!


🚀 One-Click Download — Get All Office Add-ins
Strongly Recommended: Kutools for Office (5-in-1)
One click to download five installers at once — Kutools for Excel, Outlook, Word, PowerPoint and Office Tab Pro. Click to download now!
- ✅ One-click convenience: Download all five setup packages in a single action.
- 🚀 Ready for any Office task: Install the add-ins you need, when you need them.
- 🧰 Included: Kutools for Excel / Kutools for Outlook / Kutools for Word / Office Tab Pro / Kutools for PowerPoint