How to assign and edit color categories to Outlook items?
Assigning color categories to certain Outlook items, such as email messages, events and contacts, allows you to quickly recognize and group related items in Outlook, so that you can easily track them and improve efficiency. If any of the items are related to more than one category, just assign more color categories to it. In this article, we will introduce the methods to assign a color category to an Outlook item, and create your own categories, change the color or name of an existing color category, and other quick methods to apply categories to highlight Outlook items.
Create a color category and assign a shortcut key to it in Outlook
Outlook comes with a set of default color categories, but it will be easier to create and use your own categories, so that you can better spot the associated items.
1. In the "Mail" view, on the "Home" tab, in the "Tags" group, click "Categorize" > "All Categories".
2. In the pop-up "Color Categories" dialog box, click on the "New" button.
3. In the new "Add New Category" dialog, give the category a name in the input box, and assign a recognizable color to it. If you want, set a shortcut key to it.
4. Click "OK". You will see the created category is now listed in the "Color Categories" dialog as shown below. Click "OK" to save the category and close the dialog.
AI Mail Assistant in Outlook: Smarter Replies, Clearer Communication (one-click magic!)
Streamline your daily Outlook tasks with the AI Mail Assistant from Kutools for Outlook. This powerful tool learns from your past emails to offer intelligent and accurate responses, optimize your email content, and help you draft and refine messages effortlessly.

This feature supports:
- Smart Replies: Get responses crafted from your past conversations—tailored, precise, and ready to go.
- Enhanced Content: Automatically refine your email text for clarity and impact.
- Effortless Composition: Just provide keywords, and let AI handle the rest, with multiple writing styles.
- Intelligent Extensions: Expand your thoughts with context-aware suggestions.
- Summarization: Get concise overviews of long emails instantly.
- Global Reach: Translate your emails into any language with ease.
This feature supports:
- Smart email replies
- Optimized content
- Keyword-based drafts
- Intelligent content extension
- Email summarization
- Multi-language translation
Don’t wait—download AI Mail Assistant now and enjoy!
Assign a color category to Outlook items (or with shortcut key)
To assign a color category to one or more messages, appointments, contacts, or tasks in Outlook, you can do as follows:
1. Select the Outlook items that you will assign a color category to.
2. Assign the category by either of the ways below:
- If you did not set shortcut key for the color category you want to assign: Right-click on any of the selected items, click "Categorize" from the drop-down menu, and then select the category you want to assign.
Note: If you accidentally assigned a color category, you can right-click the item and choose "Clear All Categories". 
- If you have set a shortcut key for the color category you want to assign: Press the shortcut key.
Note: Pressing the same shortcut key again will clear the category.

Assign a color category to an Outlook item with Quick Click
To assign a color category to an email message, go to "View" > "Change View" > "Single" or "Preview". To assign a category to an event or contact, go to "View" > "Change View" > "List". Then:
1. In the "Mail" view, on the "Home" tab, in the "Tags" group, click "Categorize" > "Set Quick Click".
2. In the "Set Quick Click" dialog, select the category you will assign.
3. If prompted to rename the category, click "Yes" or "No" as needed.
4. Hover over a message to see an empty box under the "Categories" column. Click it to assign the Quick Click category.
Note: Clicking the box again will remove the category.
Assign a color category to Outlook messages with Quick Step
Outlook has a Quick Steps feature that allows you to assign a color category to one or multiple email messages in Outlook with one click. To do so, please follow the steps below:
1. In the "Mail" view, on the "Home" tab, click "Create New" in the "Quick Steps" box.
2. Click "Choose an Action" to open the drop-down list of multiple actions. Then select "Categorize message".
3. Click "Choose category" to select the color category that you will assign to messages with Quick Step.
4. The name of the action will automatically fill into the Name box. You can change it to something more recognizable. You can also set a shortcut key for this action (for example, "CTRL+SHIFT+2"), or edit the tooltip text. Then click "Finish".
5. Repeat the steps above if you need to create quick steps for additional categories.
6. Now, go back to your mail list. Select the messages that you want to categorize, and click on the quick step you just created in the "Quick Steps" box. The selected messages will then be categorized.
Note: If you accidentally assigned a color category to an item, you can select the item, right-click it, and choose "Clear All Categories" from the drop-down menu. Alternatively, when creating a quick step, you can choose "Clear Categories" instead of categorizing, to create a quick action that clears categories.
Edit a color category and its shortcut key in Outlook
1. In the "Mail" view, on the "Home" tab, in the "Tags" group, click "Categorize" > "All Categories".
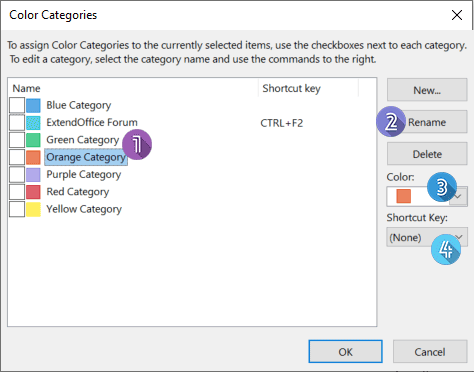
2. In the pop-up "Color Categories" dialog box, please do as follows to edit a category:
- Select the category you want to edit.
- Click "Rename" and type a new name.
- Click the drop-down arrow under "Color" to assign a different color.
- Click the drop-down arrow under "Shortcut Key" to assign a different shortcut key.

3. If you need to edit more categories, repeat the above steps. Once finished, click "OK" to save the changes.
Related articles
How To Automatically Color Categorize Emails Based On Subject In Outlook?
Color categories allow you to quickly recognize and group related items in Outlook, so that you can easily track them and improve efficiency. In this article, we will talk about how to create a rule in Outlook to automatically assign color categories to email messages based on their subjects.
How To Automatically Assign Color Category To Meetings After Accepting Them In Outlook?
In your daily work, you may receive multiple meeting emails in Outlook. Sometimes, you wish to assign a specific color category to meetings automatically when they are accepted. Normally, you can assign them manually, but this can be troublesome. In this article, I will explain how to automate this task in Outlook.
How To Group Email Messages By Specified Color Categories In Outlook?
Sometimes, you mark email messages with specific color categories so you can easily rule, organize, or find them later. When many emails crowd a folder, it becomes hard to spot categorized messages. This article introduces methods to group email messages by color category in Outlook quickly.
How To Collapse Or Expand All Color Categories By Default In Outlook?
Suppose you have assigned color categories to email messages and grouped them based on these categories. However, when you collapse or expand folders, Outlook may reset the view when reopening the folder. This tutorial explains how to maintain your collapsed or expanded view for color categories in Outlook.
Best Office Productivity Tools
Experience the all-new Kutools for Outlook with 100+ incredible features! Click to download now!
📧 Email Automation: Auto Reply (Available for POP and IMAP) / Schedule Send Emails / Auto CC/BCC by Rules When Sending Email / Auto Forward (Advanced Rules) / Auto Add Greeting / Automatically Split Multi-Recipient Emails into Individual Messages ...
📨 Email Management: Recall Emails / Block Scam Emails by Subjects and Others / Delete Duplicate Emails / Advanced Search / Consolidate Folders ...
📁 Attachments Pro: Batch Save / Batch Detach / Batch Compress / Auto Save / Auto Detach / Auto Compress ...
🌟 Interface Magic: 😊More Pretty and Cool Emojis / Remind you when important emails come / Minimize Outlook Instead of Closing ...
👍 One-click Wonders: Reply All with Attachments / Anti-Phishing Emails / 🕘Show Sender's Time Zone ...
👩🏼🤝👩🏻 Contacts & Calendar: Batch Add Contacts From Selected Emails / Split a Contact Group to Individual Groups / Remove Birthday Reminders ...
Use Kutools in your preferred language – supports English, Spanish, German, French, Chinese, and 40+ others!


🚀 One-Click Download — Get All Office Add-ins
Strongly Recommended: Kutools for Office (5-in-1)
One click to download five installers at once — Kutools for Excel, Outlook, Word, PowerPoint and Office Tab Pro. Click to download now!
- ✅ One-click convenience: Download all five setup packages in a single action.
- 🚀 Ready for any Office task: Install the add-ins you need, when you need them.
- 🧰 Included: Kutools for Excel / Kutools for Outlook / Kutools for Word / Office Tab Pro / Kutools for PowerPoint