How to send email to all accepted meeting attendees in Outlook?
It is common in a business or collaborative environment to organize meetings using Outlook. Sometimes, after a meeting is scheduled and you have collected responses from invitees, you may need to communicate specifically with attendees who have accepted your invitation. These could be updates, follow-up actions, or important information relevant only to those confirmed participants. Sending an email just to accepted attendees helps maintain clarity and relevance in your communication, avoids unnecessary emails to those who declined or have not responded, and streamlines team management. In this article, we discuss several practical ways you can send an email to all accepted meeting attendees for a specified meeting in Microsoft Outlook, together with essential tips for each approach.
Send email to all accepted attendees with Message to Attendees function
Send email to all accepted attendees in Outlook with Excel’s Filter function
Send email to all accepted attendees using VBA code
Send email to all accepted attendees with Message to Attendees function
Outlook provides an integrated way to send emails directly to meeting attendees who have accepted your invitation, allowing for efficient follow-up or targeted communication. This method is straightforward and is best suited for meetings that have a manageable number of invitees where you want to quickly reach everyone who has accepted without exporting data or using external tools.
1. Switch to the Calendar view in Outlook, and double-click to open the specific meeting for which you wish to contact all accepted attendees. Ensure you have organizer permissions for the meeting to access attendee tracking features.
2. In the meeting window, navigate to the Meeting tab. Click Tracking > View Tracking Status. This opens a pane where you can see each invitee’s response status, including Accepted, Declined, Tentative, or No Response.
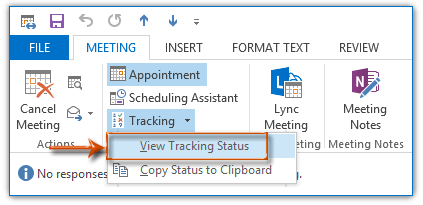
Tip: In some versions of Outlook, there is only a single Tracking button without a drop-down menu. Clicking it will open the tracking window directly.
For older versions like Outlook 2007, you may find the Tracking button directly on the Meeting tab. The location of commands can vary slightly depending on your Outlook version.
3. Within the attendee status list, mark the checkboxes only next to names of those who responded as Accepted. Deselect (uncheck) everyone else if any are selected. This action determines which attendees will receive your follow-up email. For meetings with many participants, carefully double-check that only the accepted recipients are selected to avoid accidental emails.
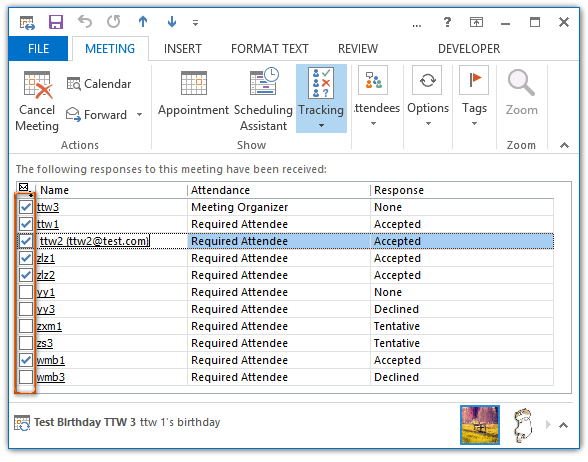
Note: The checkbox for the Meeting Organizer remains checked and cannot be cleared, meaning you will be included as a recipient unless manually removed later.
4. Proceed to Contact Attendees > New E-mail to Attendees found on the Meeting tab. A new message will automatically open listing the accepted participants in the To field, excluding the declined, tentative, or non-respondents. You may manually adjust recipients if necessary before sending.
Tip: In Outlook 2007, access this via Message to Attendees > New Message to Attendees on the same tab.
You can now draft your email as needed and click Send to deliver the message directly to the selected accepted attendees.
If you encounter a situation where the attendee tracking pane does not allow selection or does not display a checkbox for each attendee, try restarting Outlook or ensure that your permissions are sufficient to view tracking details.
Send email to all accepted attendees with Excel’s Filter function
For meetings with a large number of attendees, manually checking each accepted responder may be inefficient. This alternative method leverages Outlook’s ability to export the response status of invitees, allowing you to use Excel’s filtering capabilities to quickly identify accepted attendees. This approach is particularly useful for mass events, training sessions, or webinars where participant lists are extensive and you need accuracy when selecting recipients.
1. Switch to the Calendar view and open the meeting in question as above. Ensure you have access to attendee response data for the meeting.
2. In the open meeting window, go to Tracking > Copy Status to Clipboard on the Meeting tab. This copies the list of invitees and their current response statuses to your clipboard. See screenshot:
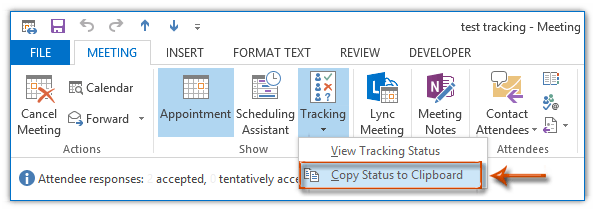
Note: In some Outlook versions, you need to go to the Meeting tab and click Tracking to open the Tracking window. And then click Copy Status to Clipboard in that window.
The Copy Status to Clipboard feature is only available in Outlook 2010 and later. If you are using Outlook 2007 or earlier, you will need to rely on the previous method.
3. Open Microsoft Excel and create a new blank workbook. Click on cell A1 (or any desired cell), then paste using Ctrl + V. Your attendee names and their response statuses will populate the worksheet.
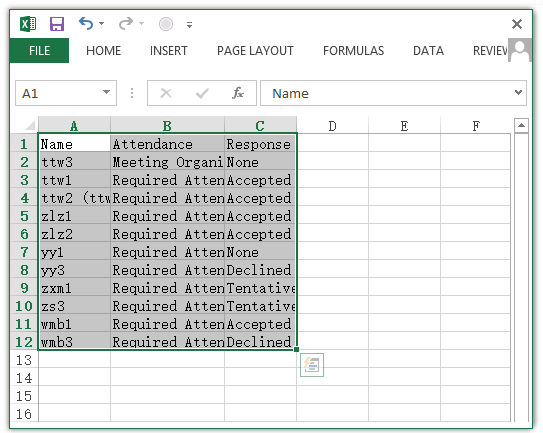
Tip: Before pasting, ensure the selection cell is empty to avoid overwriting existing content. If the pasted information appears misaligned, check for extra line breaks or column mismatch.
4. Highlight the Response column. Access the Filter button from the Data tab at the top menu. This enables filters for each header cell within your data table.
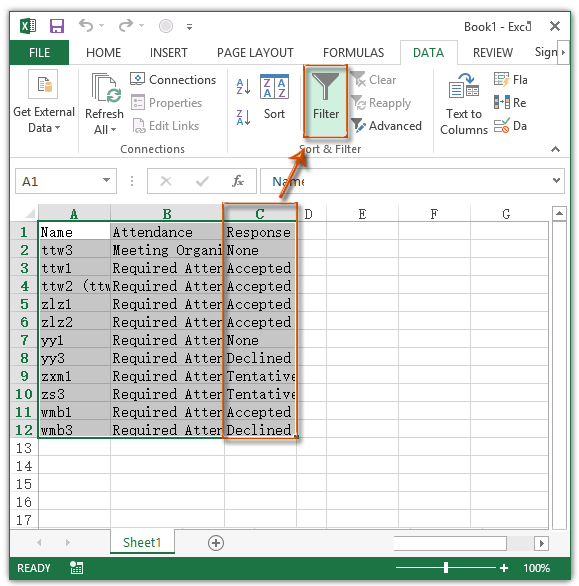
Tip: Filtering works best if your headers are clearly labeled. If needed, rename columns to “Name”, “Response”, etc., for clarity.
5. Click the filter icon (triangle) in the header of your Response column and select only the Accepted option. Confirm by clicking OK. This will instantly display only the rows of attendees who have accepted your invitation, making the selection process much more efficient and accurate.

6. Select and copy all cells in the Name column of the filtered results. These are your accepted attendees. Right-click to copy or use Ctrl + C for speed.
Tip: If your data includes email addresses, you can copy these directly for even more accurate recipient selection. Always double-check for hidden extra spaces or formatting issues after filtering.
7. Go back to Outlook and create a new email message. Paste the copied names or email addresses into the To field of the message window.

Tip: Outlook may not automatically resolve names to email addresses in some cases - if so, right-click the pasted names and review the recipient list to verify each address. You can also paste into the CC or BCC field as needed to control visibility of recipient addresses.
8. Compose your email, then click Send when ready. All filtered and pasted contacts will receive your message.
Note: This Excel filter method does not apply to Outlook 2007, as the necessary Tracking > Copy Status to Clipboard feature is unavailable. Consider alternative methods if you are on an older version.
This method is more manual and offers advanced flexibility for large meetings, but always verify the accuracy of your copied list before use. For recurring operations, you may consider creating a reusable Excel template and setting up macros to further automate the filtering and copying process.
If you encounter issues such as unable to copy status, blank cells after pasting, or names not resolving in Outlook, ensure your Outlook is updated, review that all responses have been received, and check that Excel columns are correctly formatted.
Advantages: Easier to handle long lists and cross-reference other attendee details - such as roles or departments - before sending emails. This method also gives you more flexibility in reviewing or organizing data directly within Excel.
Send email to all accepted attendees using VBA code
For advanced users or those needing maximum flexibility - such as when managing recurring large meetings or automating repeated communications - a simple VBA script can extract all accepted attendees and prepare an email to them directly from Outlook.
Before running VBA: Select the specific calendar meeting in Outlook whose accepted attendees you wish to contact.
1. Press Alt + F11 to open the Microsoft Visual Basic for Applications window.
2. In the VBA window, click Insert > Module. Then copy the code below into the module.
VBA code: Automatically create an email to all accepted attendees of a selected meeting
Sub SendEmailToAcceptedAttendees()
    On Error Resume Next
    Dim xAppointment As AppointmentItem
    Dim xRecipient As Recipient
    Dim xAcceptedList As String
    Dim xMail As MailItem
    Dim xAttendees As Recipients

    Set xAppointment = Outlook.Application.ActiveExplorer.Selection.Item(1)
    Set xAttendees = xAppointment.Recipients

    For Each xRecipient In xAttendees
        If xRecipient.MeetingResponseStatus = olResponseAccepted Then
            If xAcceptedList = "" Then
                xAcceptedList = xRecipient.Address
            Else
                xAcceptedList = xAcceptedList & ";" & xRecipient.Address
            End If
        End If
    Next

    Set xMail = Outlook.Application.CreateItem(olMailItem)
    xMail.To = xAcceptedList
    xMail.Subject = "Follow-up for " & xAppointment.Subject
    xMail.Display

    MsgBox "Email prepared for all accepted attendees.", vbInformation, "KutoolsforOutlook"

    Set xMail = Nothing
    Set xAttendees = Nothing
    Set xAppointment = Nothing
End Sub
3. Press F5 to run the code. Outlook will generate a new email addressed to all invitees who accepted the selected meeting. Review recipients before sending. If your meeting selection was incorrect, rerun the code after selecting the correct item.
Troubleshooting: If you see errors or an empty recipient list, confirm an appointment is selected and that all invitee responses have been received and synchronized. If your Outlook security settings block macros, enable macro content via File > Options > Trust Center > Macro Settings.
The VBA method offers convenience in bulk actions and can be extended for more complex conditions (such as filtering by role or region). However, it does require a basic understanding of Outlook VBA and macro security settings.
Related Article
How to send an email to all meeting attendees in Outlook?
Best Office Productivity Tools
Experience the all-new Kutools for Outlook with 100+ incredible features! Click to download now!
📧 Email Automation: Auto Reply (Available for POP and IMAP) / Schedule Send Emails / Auto CC/BCC by Rules When Sending Email / Auto Forward (Advanced Rules) / Auto Add Greeting / Automatically Split Multi-Recipient Emails into Individual Messages ...
📨 Email Management: Recall Emails / Block Scam Emails by Subjects and Others / Delete Duplicate Emails / Advanced Search / Consolidate Folders ...
📁 Attachments Pro: Batch Save / Batch Detach / Batch Compress / Auto Save / Auto Detach / Auto Compress ...
🌟 Interface Magic: 😊More Pretty and Cool Emojis / Remind you when important emails come / Minimize Outlook Instead of Closing ...
👍 One-click Wonders: Reply All with Attachments / Anti-Phishing Emails / 🕘Show Sender's Time Zone ...
👩🏼🤝👩🏻 Contacts & Calendar: Batch Add Contacts From Selected Emails / Split a Contact Group to Individual Groups / Remove Birthday Reminders ...
Use Kutools in your preferred language – supports English, Spanish, German, French, Chinese, and 40+ others!


🚀 One-Click Download — Get All Office Add-ins
Strongly Recommended: Kutools for Office (5-in-1)
One click to download five installers at once — Kutools for Excel, Outlook, Word, PowerPoint and Office Tab Pro. Click to download now!
- ✅ One-click convenience: Download all five setup packages in a single action.
- 🚀 Ready for any Office task: Install the add-ins you need, when you need them.
- 🧰 Included: Kutools for Excel / Kutools for Outlook / Kutools for Word / Office Tab Pro / Kutools for PowerPoint