How to add border line below when value changes in an Excel column?
Adding a border line below rows when the value in a column changes is a practical and visually effective formatting technique in Excel. It is especially helpful for improving data clarity and making large datasets more accessible. By creating clear visual breaks between groups of identical values, you can quickly identify different sections and interpret information at a glance. This approach is frequently used in sales reports, inventory lists, transaction logs, and any situation where you want to highlight and separate data segments as values change in a specific column.
Add border line below when value changes with VBA
Add border line below when value changes with Kutools for Excel
Add border line below when value changes with VBA
Excel does not provide a direct, built-in function for adding a border line below when a cell value changes. However, you can achieve this effect efficiently using VBA. This method is highly suitable for larger datasets or when you require a one-time or repeatable automation. One advantage of using VBA is its ability to instantly process large amounts of data and customize the appearance according to your requirements.
To avoid interfering with existing formatting, consider backing up your data before running the code, especially if your worksheet already contains customized borders.
1. Press Alt + F11 keys simultaneously to open the Microsoft Visual Basic for Applications window.
2. In the VBA window, click Insert > Module, and then paste the following code into the blank module.
VBA: Add border line below when value changes
Sub AddBorderLineWhenValueChanges()
'UpdatebyExtendoffice20160918
    Application.ScreenUpdating = False
    Dim LastRow As Long
    Dim xrg As Range
    LastRow = Cells.Find("*", SearchOrder:=xlByRows, SearchDirection:=xlPrevious).Row
    For Each xrg In Range("A2:A" & LastRow)
        If xrg <> xrg.Offset(1, 0) Then
            Range("A" & xrg.Row & ":K" & xrg.Row).Borders(xlEdgeBottom).LineStyle = xlContinuous
        End If
    Next xrg
    Application.ScreenUpdating = True
End Sub
3. Press the F5 key or click the Run button to execute the code. After execution, Excel will add a bottom border to the last row of each group of identical values within the specified range (for example, A2:A).
Add border line below when value changes with Kutools for Excel
Kutools for Excel offers a quick and user-friendly solution for inserting a border line below rows where a value changes. This is a great choice if you prefer a graphical interface and wish to avoid writing or executing code. It is particularly useful for those managing moderate to large datasets frequently or aiming for customization without complexity.
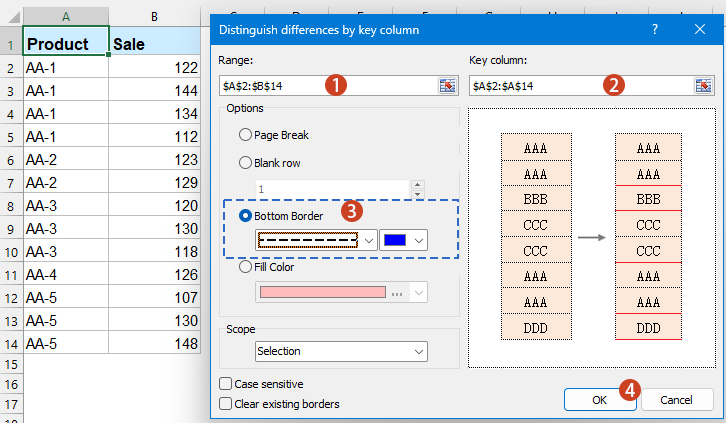
After installing Kutools for Excel, you can apply this format in just a few steps. Begin by clicking Kutools > Format > Distinguish Differences to open the dialog box. In the Distinguish differences by key column dialog box, follow these operations:
- Select the range of data you wish to format (ensure you include the header row if desired);
- Choose the key column—the column that will be monitored for changes;
- In the "Bottom Border" section, pick your desired border style and color for clear differentiation;
- When all settings are specified, click the "OK" button to apply the formatting.
Result: Borders are automatically placed beneath rows where the value in your chosen column changes. This makes it much easier to spot separate groups or highlight transitions in your data, as shown below:
Kutools for Excel - Supercharge Excel with over 300 essential tools, making your work faster and easier, and take advantage of AI features for smarter data processing and productivity. Get It Now
This approach saves considerable time compared to manual formatting and maintains consistency across the worksheet. If you want to undo the effect later, you can use Kutools’ built-in "Undo" or simply reapply your preferred format.
Adding a border line below rows where a value changes in Excel greatly improves data structure and presentation. You can select the method that aligns best with your workflow—whether utilizing VBA for automation, Kutools for ease and customization. Each method can contribute to enhancing readability, preventing visual confusion, and streamlining analysis for both personal and collaborative Excel projects. If you are interested in learning additional Excel formatting tricks or encountering challenges, reviewing our comprehensive tutorial library can offer more targeted guidance.
Best Office Productivity Tools
Supercharge Your Excel Skills with Kutools for Excel, and Experience Efficiency Like Never Before. Kutools for Excel Offers Over 300 Advanced Features to Boost Productivity and Save Time. Click Here to Get The Feature You Need The Most...
Office Tab Brings Tabbed interface to Office, and Make Your Work Much Easier
- Enable tabbed editing and reading in Word, Excel, PowerPoint, Publisher, Access, Visio and Project.
- Open and create multiple documents in new tabs of the same window, rather than in new windows.
- Increases your productivity by 50%, and reduces hundreds of mouse clicks for you every day!
All Kutools add-ins. One installer
Kutools for Office suite bundles add-ins for Excel, Word, Outlook & PowerPoint plus Office Tab Pro, which is ideal for teams working across Office apps.
- All-in-one suite — Excel, Word, Outlook & PowerPoint add-ins + Office Tab Pro
- One installer, one license — set up in minutes (MSI-ready)
- Works better together — streamlined productivity across Office apps
- 30-day full-featured trial — no registration, no credit card
- Best value — save vs buying individual add-in