3 methods to easily grey out all unused area in Excel
In Excel, graying out the unused areas of your worksheet can help focus attention on the active data and make your spreadsheet cleaner and more professional, especially when printing or presenting data. This tutorial will guide you through three effective methods to easily gray out all unused areas in Excel. These techniques include hiding unused rows and columns, using the efficient tools provided by Kutools for Excel, and utilizing the Page Break Preview feature.
Grey out unused area by hiding unused rows and columns
Hiding unused rows and columns is a straightforward way to clean up your worksheet by removing distractions from blank spaces. Please follow the steps below to accomplish this task.
Step 1: Select all unused columns in your worksheet.
To select all unused columns to the right of your data, you need to select the first empty column and press Ctrl + Shift + Right Arrow.

Step 2: Hide all selected columns
After selecting all unused columns, right click on the selection and choose Hide from the right-clicking menu.

Step 3: Select all unused rows in your worksheet
To select all unused rows below your data, you need to select the first empty row and press Ctrl + Shift + Down Arrow.

Step 4: Hide all selected rows
After selecting all unused columns, right click on the selection and choose Hide from the right-clicking menu.

Result
All unused areas in the current worksheet have been greyed out as shown in the screenshot below.
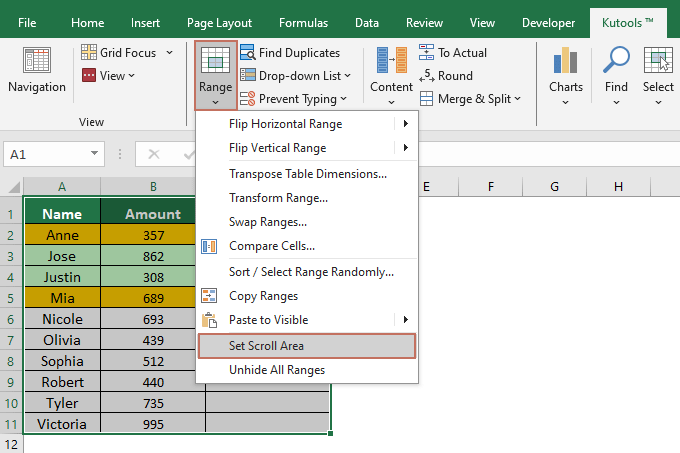
One click to grey out unused area with Kutools for Excel:
Kutools for Excel provides an efficient, one-click solution to grey out unused areas without manually hiding rows and columns.
After installing Kutools for Excel, do as follows to grey out unused area.
Select the range of cells you want to display only, and then select Kutools > Range > Set Scroll Area.
Result
The current worksheet then displays only the selected area and all unused areas are shown in grey.
To use this feature, you should install Kutools for Excel first, please click to download and have a 30-day free trial now!
Grey out unused area with the Page Break Preview feature:
In the Page Break Preview view, the unused area will be greyed out.
Enable the sheet in which you want to display working area only, and click View > Page Break Preview. See screenshot:
If you want to go back to normal view, just click Normal under View tab.
Graying out unused areas in Excel sheets helps in focusing on relevant data and gives your spreadsheets a more organized and professional appearance. By implementing these techniques, you can ensure that viewers of your worksheets concentrate only on the essential information. For those eager to delve deeper into Excel's capabilities, our website boasts a wealth of tutorials. Discover more Excel tips and tricks here.
Demo
Best Office Productivity Tools
Supercharge Your Excel Skills with Kutools for Excel, and Experience Efficiency Like Never Before. Kutools for Excel Offers Over 300 Advanced Features to Boost Productivity and Save Time. Click Here to Get The Feature You Need The Most...
")
Office Tab Brings Tabbed interface to Office, and Make Your Work Much Easier
- Enable tabbed editing and reading in Word, Excel, PowerPoint, Publisher, Access, Visio and Project.
- Open and create multiple documents in new tabs of the same window, rather than in new windows.
- Increases your productivity by 50%, and reduces hundreds of mouse clicks for you every day!
")