Excel tutorial – Send emails from Excel
Normally, we use email clients such as Outlook, Gmail, etc. to send emails. But, many people store data in Excel workbooks and need to send some data along to others while they are working with it. Therefore, they need to send emails directly from Excel workbook, which saves the time of operating an email client. This step-by-step tutorial will show you how to send emails from Excel under different conditions.
Note: Before applying the following methods, you need to configure an Outlook email client in your computer and set it as your default email client.
Table of Contents:[ Hide ]
1. The basics of sending emails from Excel
This section introduces the basics of sending emails from Excel.
1.1 Send emails from Excel with Excel built-in functions
If you only want to send simple emails from Excel, including only the To, Subject, Cc and body fields. The built-in functions in Excel can help.
1.1.1 Send email from Excel by using a formula
As shown in the table below, to send different emails from Excel based on the given fields, you can use the cell references of the given fields to create different Hyperlink formulas to get it done. After creating the email hyperlinks, you can click on the hyperlink you need to send an email automatically.
Note: If there is more than one recipient in the To or Cc fields, please separate them with semicolons.

This section is divided into four parts to show you the steps to add email address, Cc recipient(s), subject line, and body text separately to the Hyperlink formula. Please do as follows.
The syntax and arguments of the "HYPERLINK" function are as follows.
Syntax
HYPERLINK(link_location, [friendly_name])
Arguments
1.1.1.1 Add email address to Hyperlink formula
Here we use "mailto:" as part of the formula to add an email recipient. In this example, the first recipient's email address is in cell B2, so we need to add "mailto:" and reference it to cell B2.
“mailto:”&B2
1. Select a cell to display the hyperlink. In this case, I select the cell F2.
2. Then enter the following formula into it.
=HYPERLINK("mailto:"&B2)
Note: If you press the "Enter" key, a hyperlink will be created as shown in the screenshot below. When you click on the link, an Outlook email will be created and the recipient’s email address will be populated in the To field automatically.

The recipient’s email address is now added to the Hyperlink formula. Please continue with the following steps to add the subject line, Cc recipient(s), and body text as you need.
1.1.1.2 Add Cc recipient(s) to Hyperlink formula
To add the Cc recipient(s) to the Hyperlink function, please add "?cc=" as part of the formula as follows.
The formula in cell F2 should be as follows:
=HYPERLINK("mailto:" & B2 & "?cc=" & C2)
1.1.1.3 Add subject line to Hyperlink formula
To add the subject line to the Hyperlink function, please add "&subject=" as part of the formula as follows.
The formula in cell F2 should now look like the following:
=HYPERLINK("mailto:" & B2 & "?cc=" & C2 & "&subject="& D2)
1.1.1.4 Add body text with line breaks to Hyperlink formula
The last step is to add the body text to the Hyperlink formula. As you can see in the example, two lines of text in E2 are separated by a line break, and you want to keep the line break in the email body. Does Outlook recognize the line break in this circumstance? Let’s check for it.
To add the body text to the Hyperlink formula, you need to add “&body=" as part of the formula as follows.
The formula in cell F2 is now displayed as follows:
=HYPERLINK("mailto:" & B2 & "?cc=" & C2 & "&subject="& D2 & "&body="& E2)
Note: If you press the "Enter" key and click on the link. You can see in the new email that the contents in the email body are displayed in the same line.

To display the email body in separate lines, you need to modify the cell content by adding the carriage return character code "%0A" to the text where you need to insert a line break. See screenshot:

1.1.1.5 Specify the text to display for the hyperlink
In the above steps, we finished the Link_location argument with email fields. Here in this section, we are going to finish the next argument [friendly_name].
In this case, I want the hyperlink cell to display the text as “Email to xx”, where xx is the recipient’s name in A2. So, the formula in F2 should be changed to:
=HYPERLINK("mailto:" & B2 & "?cc=" & C2 & "&subject="& D2 & "&body="& E2, "Email to "&A2)Press the "Enter" key to get the result.

Select this formula cell and drag its "AutoFill Handle" down to create other email hyperlinks. See screenshot:

1.1.2 Send email from Excel with the Hyperlink function
Except for using the above Hyperlink formula, you can manually create an email hyperlink with the "Insert Hyperlink" function in Excel. This section is going to show you the steps.
1. Right click an email where you want to insert a hyperlink, select "Link" from the right-clicking menu.

2. In the popping up "Insert Hyperlink" dialog box, you need to configure as follows.
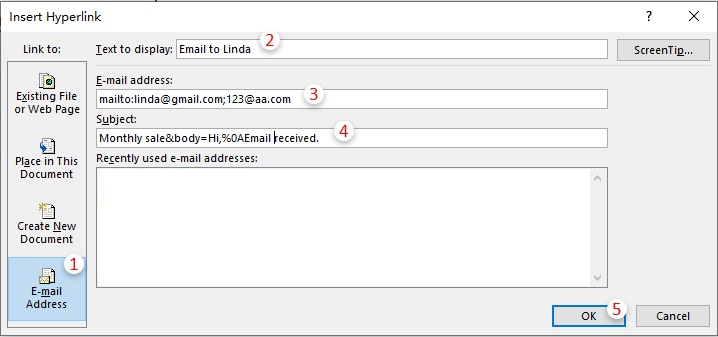
When you click on the hyperlink, an Outlook email will be created with the specified To, Subject and Body fields as shown in the screenshot below.

Notes:
1.2 Send email to multiple recipients in cells with VBA script
In the example above, you can see multiple email addresses are displayed in a cell, separated by semicolons. If you have a list of email addresses as shown in the screenshot below and want to send an email or independent email to all of them, the following VBA code can do you a favor.

1.2.1 Send an email to multiple recipients in cells with VBA script
1. In the worksheet that contains all the email addresses you want to send the email to. Press the "Alt" + "F11" keys to open the "Microsoft Visual Basic for Applications" window.
2. In the "Microsoft Visual Basic for Applications" window, click "Insert" > "Module", and then paste the following code into the "Module (Code)" window.

VBA code: Send email to a list of email addresses
Sub sendmultiple()
'updateby Extendoffice 20220802
    Dim xOTApp As Object
    Dim xMItem As Object
    Dim xCell As Range
    Dim xRg As Range
    Dim xEmailAddr As String
    Dim xTxt As String
    On Error Resume Next
    xTxt = ActiveWindow.RangeSelection.Address
    Set xRg = Application.InputBox("Please select the addresses list:", "Kutools for Excel", xTxt, , , , , 8)
    If xRg Is Nothing Then Exit Sub
    Set xOTApp = CreateObject("Outlook.Application")
    For Each xCell In xRg
        If xCell.Value Like "*@*" Then
            If xEmailAddr = "" Then
                xEmailAddr = xCell.Value
            Else
                xEmailAddr = xEmailAddr & ";" & xCell.Value
            End If
        End If
    Next
    Set xMItem = xOTApp.CreateItem(0)
    With xMItem
        .To = xEmailAddr
        .Subject = "Test"
        .Body = "Dear " _
                & vbNewLine & vbNewLine & _
                "This is a test email " & _
                "sending in Excel"
        .Display
    End With
End Sub
3. Press the "F5" key to run the code and a "Kutools for Excel" dialog box pops up. Select the list of email addresses and click "OK".

Notes:
.Body = "Dear " _
        & vbNewLine & vbNewLine & _
        "This is a test email " & _
"sending in Excel"After running the code, all email addresses in the selected range are displayed in the To field of the message window. See screenshot:

1.2.2 Separately send emails to each recipient listed in cells with VBA script
The above code adds all email addresses in the selected range to the To field of the message window. If you want to send emails to each email address listed in cells separately without letting them see each other's email addresses, you can try the followings VBA script.
1. In the worksheet that contains all the email addresses you want to send the emails to. Press the "Alt" + "F11" keys to open the "Microsoft Visual Basic for Applications window".
2. In the "Microsoft Visual Basic for Applications" window, click "Insert" > "Module", and then paste the following code into the Module (Code) window.
VBA code: Send emails to each email address listed in cells separately
Sub SendEmailToAddressInCells()
'Updated by Extendoffice 20220802
    Dim xRg As Range
    Dim xRgEach As Range
    Dim xRgVal As String
    Dim xAddress As String
    Dim xOutApp As Outlook.Application
    Dim xMailOut As Outlook.MailItem
    On Error Resume Next
    xAddress = ActiveWindow.RangeSelection.Address
    Set xRg = Application.InputBox("Please select the addresses list", "KuTools For Excel", xAddress, , , , , 8)
    If xRg Is Nothing Then Exit Sub
    Application.ScreenUpdating = False
    Set xOutApp = CreateObject("Outlook.Application")
    Set xRg = xRg.SpecialCells(xlCellTypeConstants, xlTextValues)
    For Each xRgEach In xRg
        xRgVal = xRgEach.Value
        If xRgVal Like "?*@?*.?*" Then
            Set xMailOut = xOutApp.CreateItem(olMailItem)
            With xMailOut
                .To = xRgVal
                .Subject = "Test"
                .Body = "Dear " _
                      & vbNewLine & vbNewLine & _
                        "This is a test email " & _
                        "sending in Excel"
                .Display
                '.Send
            End With
        End If
    Next
    Set xMailOut = Nothing
    Set xOutApp = Nothing
    Application.ScreenUpdating = True
End Sub
3. Then click "Tools" > "References." In the "References – VBAProject" dialog box, find and check the "Microsoft Outlook 16.0 Object Library" box and then click the "OK" button to save the changes.

4. Press the "F5" key to run the code and a "Kutools for Excel" dialog box pops up. Select the list of email address and click "OK."

Notes:
.Subject = "Test"
.Body = "Dear " _
        & vbNewLine & vbNewLine & _
        "This is a test email " & _
"sending in Excel"In this example, there are six email addresses in the selected range, so six Outlook message window will be created automatically with separate email address listed in the To field as shown in the screenshot below.

5. At last, click "Send" button to send the email one by one.
2. Insert attachments or Outlook signature in the emails sent from Excel (with VBA scripts)
This section is going to show you how to insert attachments or Outlook default signature in the emails sent from Excel.
2.1 Insert attachments in the emails sent from Excel
Here we describe the different cases of inserting attachments, and you can choose the method according to your needs. In this section, you can learn to (click on any of the following link to navigate to the corresponding method):
2.1.1 Email a certain file as an attachment
You can apply the following VBA code to email one or more files in a folder as attachments from Excel.
1. Press the "Alt" + "F11" keys.
2. In the opening "Microsoft Visual Basic for Applications" window, click "Insert" > "Module". Then paste the following VBA code into the Module (Code) window.
VBA code: Email files in a folder as attachments from Excel
Sub EmailWithAttachments()
'Updated by Extendoffice 20220802
    Dim xStrFile As String
    Dim xFilePath As String
    Dim xFileDlg As FileDialog
    Dim xFileDlgItem As Variant
    Dim xOutApp As Outlook.Application
    Dim xMailOut As Outlook.MailItem
    Application.ScreenUpdating = False
    Set xOutApp = CreateObject("Outlook.Application")
    Set xMailOut = xOutApp.CreateItem(olMailItem)
    Set xFileDlg = Application.FileDialog(msoFileDialogFilePicker)
    If xFileDlg.Show = -1 Then
        With xMailOut
            .BodyFormat = olFormatRichText
            .To = "xxx@aaa.com"
            .Subject = "test"
            .HTMLBody = "test"
            For Each xFileDlgItem In xFileDlg.SelectedItems
                .Attachments.Add xFileDlgItem
            Next xFileDlgItem
            .Display
        End With
    End If
    Set xMailOut = Nothing
    Set xOutApp = Nothing
    Application.ScreenUpdating = True
End Sub
Notes:
3. Then click "Tools" > "References." In the "References – VBAProject" dialog box, find and check the "Microsoft Outlook 16.0 Object Library" box and then click the "OK" button to save the changes.

4. Press the "F5" key to run the code, then a "Browse" window pops up, please select the files you need to attach in the email, and then click "OK".

Then a message window pops up. You can see the selected files are displayed as attachments in the Attached field.

2.1.2 Email the current worksheet as an attachment
If you want to email the current worksheet as an attachment from Excel, you can apply the VBA script in this section.
1. Press the "Alt" + "F11" keys.
2. In the opening "Microsoft Visual Basic for Applications" window, click "insert" > "Module". Then paste the following VBA code into the "Module (Code)" window.
VBA code: Email the current worksheet as an attachment
Sub SendWorkSheet()
'Update by Extendoffice 20220802
Dim xFile As String
Dim xFormat As Long
Dim Wb As Workbook
Dim Wb2 As Workbook
Dim FilePath As String
Dim FileName As String
Dim OutlookApp As Object
Dim OutlookMail As Object
On Error Resume Next
Application.ScreenUpdating = False
Set Wb = Application.ActiveWorkbook
ActiveSheet.Copy
Set Wb2 = Application.ActiveWorkbook
Select Case Wb.FileFormat
Case xlOpenXMLWorkbook:
    xFile = ".xlsx"
    xFormat = xlOpenXMLWorkbook
Case xlOpenXMLWorkbookMacroEnabled:
    If Wb2.HasVBProject Then
        xFile = ".xlsm"
        xFormat = xlOpenXMLWorkbookMacroEnabled
    Else
        xFile = ".xlsx"
        xFormat = xlOpenXMLWorkbook
    End If
Case Excel8:
    xFile = ".xls"
    xFormat = Excel8
Case xlExcel12:
    xFile = ".xlsb"
    xFormat = xlExcel12
End Select
FilePath = Environ$("temp") & "\"
FileName = Wb.Name & Format(Now, "dd-mmm-yy h-mm-ss")
Set OutlookApp = CreateObject("Outlook.Application")
Set OutlookMail = OutlookApp.CreateItem(0)
Wb2.SaveAs FilePath & FileName & xFile, FileFormat:=xFormat
With OutlookMail
    .To = "xxx@aaa.com"
    .CC = "Email Address"
    .BCC = "Email Address"
    .Subject = "kte features"
    .Body = "Please check and read this document."
    .Attachments.Add Wb2.FullName
    .Display
    '.Send
End With
Wb2.Close
Kill FilePath & FileName & xFile
Set OutlookMail = Nothing
Set OutlookApp = Nothing
Application.ScreenUpdating = True
End Sub
Notes:
3. Press the "F5" key to run the code, then the current worksheet is saved as an Excel workbook and automatically inserted in a message window as an attachment. See screenshot:

Note: The attached workbook that contains only the current worksheet has the same name as the original workbook. And the time you run the code is added to the workbook name as well.
2.1.3 Email the current workbook as an attachment
After learning the VBA code to email the current worksheet as an attachment from Excel, here we provide another VBA script to help you email the entire workbook as an attachment. Please do as follows.
1. Press the "Alt" + "F11" keys.
2. In the opening "Microsoft Visual Basic for Applications" window, click "Insert" > "Module". Then paste the following VBA code into the Module (Code) window.
VBA code: Email the current workbook as an attachment from Excel
Sub SendWorkBook()
'Update by Extendoffice 20220802
Dim OutlookApp As Object
Dim OutlookMail As Object
Set OutlookApp = CreateObject("Outlook.Application")
Set OutlookMail = OutlookApp.CreateItem(0)
On Error Resume Next
With OutlookMail
    .To = "xxx@aaa.com"
    .CC = "Email Address"
    .BCC = "Email Address"
    .Subject = "kte feature"
    .Body = "Hello, please check and read this document, thank you."
    .Attachments.Add Application.ActiveWorkbook.FullName
    .Display
    '.Send
End With
Set OutlookMail = Nothing
Set OutlookApp = Nothing
End Sub
Notes:
3. Press the "F5" key to run the code, then the current workbook is automatically inserted into the message window as an attachment. See screenshot:

2.1.4 Email the entire workbook as a PDF attachment
For most people, they tend to save an Excel workbook as a PDF file and then send it as an attachment to others. In this section, I will show you a way to send emails directly from Excel with the current open workbook as a PDF attachment without having to manually save the workbook as a PDF file.
1. Press the "Alt" + "F11" keys.
2. In the opening "Microsoft Visual Basic for Applications" window, click "Insert" > "Module". Then paste the following VBA code into the Module (Code) window.
VBA code: Email the entire workbook as a PDF attachment
Sub SendWorkBookAsPDF()
'Update 20220803
Dim Wb As Workbook
Dim FilePath As String
Dim FileName As String
Dim xOutApp As Object
Dim xOutMail As Object
On Error Resume Next

Application.ScreenUpdating = False
Set Wb = Application.ActiveWorkbook
FileName = Left(Wb.Name, (InStrRev(Wb.Name, ".", -1, vbTextCompare) - 1)) & Format(Now, "dd-mmm-yy h-mm-ss") & ".pdf"
FilePath = Environ$("temp") & "\" & FileName

Wb.ExportAsFixedFormat Type:=xlTypePDF, FileName:= _
    FilePath, Quality:=xlQualityStandard, _
    IncludeDocProperties:=True, IgnorePrintAreas:=False, OpenAfterPublish:= _
    False

Set xOutApp = CreateObject("Outlook.Application")
Set xOutMail = xOutApp.CreateItem(0)
With xOutMail
       .To = "xxx@aaa.com"
       .CC = "Email Address"
       .BCC = "Email Address"
       .Subject = "test"
       .Body = "test"
       .Attachments.Add FilePath
       .Display   'or use .Send
   End With
Kill FilePath
Set xOutMail = Nothing
Set xOutApp = Nothing
Application.ScreenUpdating = True
End Sub
Notes:
3. Press the "F5" key to run the code. Then the current workbook is automatically inserted in a new message window as an PDF file attachment. See screenshot:

2.1.5 Email the current worksheet as a PDF attachment
For example, there is a workbook named “Monthly sales”, and you have finished a sales report table in a worksheet named “sales report” and want to send this worksheet as a PDF file to your colleagues. The following VBA code can do you a favor.
1. Press the "Alt" + "F11" keys.
2. In the opening "Microsoft Visual Basic for Applications" window, click "insert" > "Module." Then paste the following VBA code into the Module (Code) window.
VBA code: Email the current worksheet as a PDF attachment
Sub SendWorkSheetToPDF()
'Update by Extendoffice 20220803
Dim Wb As Workbook
Dim FileName As String
Dim OutlookApp As Object
Dim OutlookMail As Object
On Error Resume Next
Set Wb = Application.ActiveWorkbook
FileName = Wb.FullName
xIndex = VBA.InStrRev(FileName, ".")
If xIndex > 1 Then FileName = VBA.Left(FileName, xIndex - 1)
FileName = FileName & "_" + ActiveSheet.Name & ".pdf"
ActiveSheet.ExportAsFixedFormat Type:=xlTypePDF, FileName:=FileName
Set OutlookApp = CreateObject("Outlook.Application")
Set OutlookMail = OutlookApp.CreateItem(0)
With OutlookMail
    .To = "xxx@aaa.com"
    .CC = "Email Address"
    .BCC = "Email Address"
    .Subject = "test"
    .Body = "test"
    .Attachments.Add FileName
    .Display
    '.Send
End With
Kill FileName
Set OutlookMail = Nothing
Set OutlookApp = Nothing
End Sub
Notes:
3. Press the "F5" key to run the code. Then the current worksheet is automatically inserted in a new message window as an PDF file attachment. See screenshot:

2.2 Insert Outlook signature in the emails sent from Excel
Take the above case as an example, you apply the above VBA code to send the current worksheet as an PDF file attachment from Excel, but Outlook signature cannot be added to the message window. To retain Outlook default signature in the email sent from Excel, the following method will help.
Two VBA codes are listed below.
VBA code 1: The code helps to retain Outlook signature.
VBA code 2: The code helps email the current worksheet as a PDF attachment.
VBA code 1: Retain Outlook signature
.HTMLBody = "Email body" & "
" & .HTMLBody
VBA code 2: Email the current worksheet as a PDF attachment
Sub SendWorkSheetToPDF()
'Update by Extendoffice 20220803
Dim Wb As Workbook
Dim FileName As String
Dim OutlookApp As Object
Dim OutlookMail As Object
On Error Resume Next
Set Wb = Application.ActiveWorkbook
FileName = Wb.FullName
xIndex = VBA.InStrRev(FileName, ".")
If xIndex > 1 Then FileName = VBA.Left(FileName, xIndex - 1)
FileName = FileName & "_" + ActiveSheet.Name & ".pdf"
ActiveSheet.ExportAsFixedFormat Type:=xlTypePDF, FileName:=FileName
Set OutlookApp = CreateObject("Outlook.Application")
Set OutlookMail = OutlookApp.CreateItem(0)
With OutlookMail
    .To = "xxx@aaa.com"
    .CC = "Email Address"
    .BCC = "Email Address"
    .Subject = "test"
    .Body = "test"
    .Attachments.Add FileName
    .Display
    '.Send
End With
Kill FileName
Set OutlookMail = Nothing
Set OutlookApp = Nothing
End Sub
1. Normally, you need to press the "Alt" + "F11" keys to open the "Microsoft Visual Basic for Applications" window.
2. In the "Microsoft Visual Basic for Applications" window, click "Insert" > "Module". Then paste the above VBA code 2 in the Module (Code) window.
3. To retain Outlook default signature in the email sent from Excel, you need to modify the VBA code 2 as follows:

Here is the complete code after modification.
Sub SendWorkSheetToPDF()
'Update by Extendoffice 20220803
Dim Wb As Workbook
Dim FileName As String
Dim OutlookApp As Object
Dim OutlookMail As Object
On Error Resume Next
Set Wb = Application.ActiveWorkbook
FileName = Wb.FullName
xIndex = VBA.InStrRev(FileName, ".")
If xIndex > 1 Then FileName = VBA.Left(FileName, xIndex - 1)
FileName = FileName & "_" + ActiveSheet.Name & ".pdf"
ActiveSheet.ExportAsFixedFormat Type:=xlTypePDF, FileName:=FileName
Set OutlookApp = CreateObject("Outlook.Application")
Set OutlookMail = OutlookApp.CreateItem(0)
With OutlookMail
    .Display
    .To = "xxx@aaa.com"
    .CC = "Email Address"
    .BCC = "Email Address"
    .Subject = "test"
    .HTMLBody = "Email body" & "
" & .HTMLBody
    .Attachments.Add FileName
    '.Send
End With
Kill FileName
Set OutlookMail = Nothing
Set OutlookApp = Nothing
End Sub
4. Press the "F5" key to run the code. Then you will get a new message window with the current worksheet attached as an PDF file, while the Outlook default signature will be inserted at the end of the email body automatically.

3. Automatically send emails from Excel when a condition is met (with VBA scripts)
In above examples, you need to run the code manually to achieve the email delivery. If you want to trigger the code automatically when a certain condition is met, such as when a cell reaches a certain value, when a cell’s value changes, when a date reached, etc., the email will be sent automatically. This section lists the conditions that Excel users often searched for in Google to help you automatically send emails from Excel when a certain condition is met.
3.1 Automatically send an email when a cell reaches a certain value
As shown in the screenshot below, suppose you have a sales table with cell D6 containing the sales total. You want to automatically send an email to your boss based on the sales total, for example, create or send an email automatically when the sales total exceeds 10000 but if the sales total is equal to or less than 10000, no action is taken.

1. In the worksheet contains the sale table, right click the sheet tab and click "View code" from the right-clicking menu.

2. In the opening "Microsoft Visual Basic for Applications" window, paste the following VBA code in the "Sheet (Code)" window.

VBA code: Automatically send an email when a cell reaches a certain value in Excel
Dim xRg As Range
'Update by Extendoffice 20200803
Private Sub Worksheet_Change(ByVal Target As Range)
On Error Resume Next
If Target.Cells.Count > 1 Then Exit Sub
Set xRg = Intersect(Range("D6"), Target)
If xRg Is Nothing Then Exit Sub
If IsNumeric(Target.Value) And Target.Value > 10000 Then
Call Mail_small_Text_Outlook
End If
End Sub
Sub Mail_small_Text_Outlook()
Dim xOutApp As Object
Dim xOutMail As Object
Dim xMailBody As String
Set xOutApp = CreateObject("Outlook.Application")
Set xOutMail = xOutApp.CreateItem(0)
xMailBody = "Hi boss" & vbNewLine & vbNewLine & _
"Total sales of over $10,000 in January: " & Range("D6")
On Error Resume Next
With xOutMail
.To = "xxx@aaa.com"
.CC = "Email address"
.BCC = "Email address"
.Subject = "test"
.Body = xMailBody
.Display 'or use .Send
End With
On Error GoTo 0
Set xOutMail = Nothing
Set xOutApp = Nothing
End Sub

Private Sub Worksheet_Calculate()
Dim xI As Integer
Dim xRg As Range
Set xRg = Range("D6")
On Error GoTo Err01
xI = Int(xRg.Value)
If xI > 10000 Then
Call Mail_small_Text_Outlook
End If
Err01:
End Sub
Notes:
xMailBody = "Hi boss" & vbNewLine & vbNewLine & _
"Total sales of over $10,000 in January: " & Range("D6")From now on, when the value in cell D6 exceeds 10000, an email will be created as shown in the screenshot below.

3.2 Automatically send an email when a cell value changes
As shown in the screenshot below, suppose you receive a workbook that contains monthly sales in different worksheets and the sales total in a worksheet. You need to verify the sales total and if the sales total is modified, send the workbook back to the sender and inform the sender that the cell has been modified.

1. In the worksheet contains the sale table, right click the sheet tab and click "View code" from the right-clicking menu.

2. In the opening "Microsoft Visual Basic for Applications" window, paste the following VBA code in the Sheet (Code) window.
VBA code: Automatically send an email when a specified cell value changes
Private Sub Worksheet_Change(ByVal Target As Range)
'Updated by Extendoffice 20220803
Dim xRgSel As Range
Dim xOutApp As Object
Dim xMailItem As Object
Dim xMailBody As String
Dim xBoolean As Boolean
Dim xItsRG As Range
Dim xDDs As Range
Dim xDs As Range
On Error Resume Next
Application.ScreenUpdating = False
Application.DisplayAlerts = False
xBoolean = False
Set xRg = Range("B14")

Set xItsRG = Intersect(Target, xRg)
Set xDDs = Intersect(Target.DirectDependents, xRg)
Set xDs = Intersect(Target.Dependents, xRg)
If Not (xItsRG Is Nothing) Then
Set xRgSel = xItsRG
xBoolean = True
ElseIf Not (xDDs Is Nothing) Then
Set xRgSel = xDDs
xBoolean = True
ElseIf Not (xDs Is Nothing) Then
Set xRgSel = xDs
xBoolean = True
End If

ActiveWorkbook.Save
If xBoolean Then
Debug.Print xRgSel.Address

Set xOutApp = CreateObject("Outlook.Application")
Set xMailItem = xOutApp.CreateItem(0)
xMailBody = "The cell " & xRgSel.Address(False, False) & _
" in the worksheet '" & Me.Name & "' were modified on " & _
Format$(Now, "mm/dd/yyyy") & " at " & Format$(Now, "hh:mm:ss") & _
" by " & Environ$("username") & "."

With xMailItem
.To = "xxx@aaa.com"
.CC = "Email address"
.BCC = "Email address"
.Subject = "Worksheet modified"
.Body = xMailBody
.Attachments.Add (ThisWorkbook.FullName)
.Display
End With
Set xRgSel = Nothing
Set xOutApp = Nothing
Set xMailItem = Nothing
End If
Application.DisplayAlerts = True
Application.ScreenUpdating = True
End Sub
Notes: In the code,
From now on, when the value in cell B14 changes, an Outlook message will be created automatically as shown in the screenshot below.

3.3 Automatically send an email when a workbook is saved
If you have a workbook that needs to be shared with others after modifying, normally you need to save the workbook, launch the email client, create a new email with this workbook attached, compose the corresponding fields then send the email. This section will show you a method to create an email automatically every time when you save the workbook. Please do as follows.
1. Press the "Alt" + "F11" keys to open the "Microsoft Visual Basic for Applications" window.
2. In this window, double click "ThisWorkbook" in the "Project" pane, then paste the following VBA code in the "ThisWorkbook (Code)" window.

VBA code: Automatically send an email when a workbook is saved
Private Sub Workbook_AfterSave(ByVal Success As Boolean)
'Updated by Extendoffice 20220804
    Dim xOutApp As Object
    Dim xMailItem As Object
    Dim xName As String
    On Error Resume Next
    Set xOutApp = CreateObject("Outlook.Application")
    Set xMailItem = xOutApp.CreateItem(0)
    xName = ActiveWorkbook.FullName
    With xMailItem
        .To = "xxx@aaa.com"
        .CC = "Email address"
        .BCC = "Email address"
        .Subject = "The workbook has been updated"
        .Body = "Hi," & Chr(13) & Chr(13) & "File is now updated."
        .Attachments.Add xName
        .Display
       '.send
    End With
    Set xMailItem = Nothing
    Set xOutApp = Nothing
End Sub
Notes: In the code,
3. From now on, when saving the workbook by pressing the "Ctrl" + "S" keys or clicking the "Save" button, an Outlook email will be created automatically. You can see that the current workbook is attached as an attachment and the fields are populated with the specified content. See screenshot:

Tips: If you frequently use this workbook, here recommend you save the workbook as an "Excel Macro-Enabled Workbook" to save the VBA script for future using. The steps are as follows.

3.4 Automatically send an email at a specific time
Let’s say you need to send an email with a task assignment workbook to someone "every Friday morning at 9am", and want to do this automatically in Excel without having to manually operate the email client. This section will show you the method to get it done.
1. Press the "Alt" + "F11" keys to open the "Microsoft Visual Basic for Applications" window.
2. In the "Microsoft Visual Basic for Applications" window, click "Insert" > "Module." Then paste the following VBA code in the Module window.

VBA code1 : Email the current workbook as an attachment from Excel
Sub Timer()
    If Weekday(Date) = vbFriday Then
        SendWorkBook
        Application.OnTime TimeValue("09:00:00"), "Timer"
    Else
        Application.OnTime TimeValue("09:00:00"), "Timer"
    End If
End Sub

Sub SendWorkBook()
'Update by Extendoffice 20220802
Dim OutlookApp As Object
Dim OutlookMail As Object
Set OutlookApp = CreateObject("Outlook.Application")
Set OutlookMail = OutlookApp.CreateItem(0)
On Error Resume Next
With OutlookMail
    .To = "xxx@aaa.com"
    .CC = "Email Address"
    .BCC = "Email Address"
    .Subject = "kte feature"
    .Body = "Hello, please check and read this document, thank you."
    .Attachments.Add Application.ActiveWorkbook.FullName
    .Display
    '.Send
End With
Set OutlookMail = Nothing
Set OutlookApp = Nothing
End Sub
3. In this window, double click "ThisWorkbook" in the "Project" pane, then paste the following VBA code in the "ThisWorkbook (Code)" window.

VBA code 2: Automatically send an email at a specific time
Private Sub Workbook_Open()
    Application.OnTime TimeValue("09:00:00"), "Timer"
End Sub
Notes:
4. Save the codes and then save the workbook as an Excel macro-enabled workbook as follows.
5. Open your saved macro-enabled workbook, then an email will be created or sent automatically when the day and time arrives.
4. Additional topics
This section collects other topics you may encounter when sending emails from Excel.
4.1 Email a range of cells from Excel (with VBA script)
Supposing there is a monthly sales table in an Excel worksheet as shown in the screenshot below, and you need to send this monthly sales table to others as the body content of an email or as an attachment directly. Here we provide you two methods to get it done.

4.1.1 Email a range as part of the body content from Excel
You can run the following VBA code to send a range of cells as part of the email body content from Excel
1. Press the "Alt" + "F11" keys to open the "Microsoft Visual Basic for Applications" window.
2. In the "Microsoft Visual Basic for Applications" window, click "Tools" > "References". And then check the "Microsoft Outlook 16.0 Object Library" box and click "OK" in the "References – VBAProject" dialog box.

3. Click "Insert" > "Module", then paste the following VBA code in the" Module (Code)" window.
VBA code: Send a range of cells as part of the email body content from Excel
Sub SendARangeofCells()
'Updated by Extendoffice 20220809
    Dim xRg As Range
    Dim I, J As Long
    Dim xAddress As String
    Dim xMailOut As Object
    Dim xOutApp As Object
    On Error Resume Next
    Set xOutApp = CreateObject("Outlook.Application")
    Set xMailOut = xOutApp.CreateItem(olMailItem)
    xAddress = ActiveWindow.RangeSelection.Address
    Set xRg = Application.InputBox("Please select range you need to paste into email body", "KuTools For Excel", xAddress, , , , , 8)
If xRg Is Nothing Then Exit Sub
Application.ScreenUpdating = False
    Set xOutApp = CreateObject("Outlook.Application")
    Set xMailOut = xOutApp.CreateItem(olMailItem)
    With xMailOut
        .Subject = "test"
        .To = "xxx@aaa.com"
        .CC = "Email address"
        .BCC = "Email address"
        .HTMLBody = RangetoHTML(xRg)
        .Display
        '.Send
    End With
    Set xMailOut = Nothing
    Set xOutApp = Nothing
    Application.ScreenUpdating = True
End Sub

 ' The following VBA script is cited from this page:
 ' https://stackoverflow.com/questions/18663127/paste-excel-range-in-outlook
Function RangetoHTML(rng As Range)
' By Ron de Bruin.
    Dim fso As Object
    Dim ts As Object
    Dim TempFile As String
    Dim TempWB As Workbook

    TempFile = Environ$("temp") & "/" & Format(Now, "dd-mm-yy h-mm-ss") & ".htm"

    'Copy the range and create a new workbook to past the data in
    rng.Copy
    Set TempWB = Workbooks.Add(1)
    With TempWB.Sheets(1)
        .Cells(1).PasteSpecial Paste:=8
        .Cells(1).PasteSpecial xlPasteValues, , False, False
        .Cells(1).PasteSpecial xlPasteFormats, , False, False
        .Cells(1).Select
        Application.CutCopyMode = False
        On Error Resume Next
        .DrawingObjects.Visible = True
        .DrawingObjects.Delete
        On Error GoTo 0
    End With

    'Publish the sheet to a htm file
    With TempWB.PublishObjects.Add( _
         SourceType:=xlSourceRange, _
         Filename:=TempFile, _
         Sheet:=TempWB.Sheets(1).Name, _
         Source:=TempWB.Sheets(1).UsedRange.Address, _
         HtmlType:=xlHtmlStatic)
        .Publish (True)
    End With

    'Read all data from the htm file into RangetoHTML
    Set fso = CreateObject("Scripting.FileSystemObject")
    Set ts = fso.GetFile(TempFile).OpenAsTextStream(1, -2)
    RangetoHTML = ts.ReadAll
    ts.Close
    RangetoHTML = Replace(RangetoHTML, "align=center x:publishsource=", _
                          "align=left x:publishsource=")

    'Close TempWB
    TempWB.Close savechanges:=False

    'Delete the htm file we used in this function
    Kill TempFile

    Set ts = Nothing
    Set fso = Nothing
    Set TempWB = Nothing
End Function
Notes: In the code,
4. Press the "F5" key to run the code. In the popped up" Kutools for Excel" dialog box, select the range of cells you need to send as part of an email body content, then click "OK". See screenshot:

Then an Outlook email will be created automatically. You can see that the range you selected in the worksheet is inserted into the email body. See screenshot:

4.1.2 Email a range as an attachment from Excel
If you need to email a range of cells in a worksheet as an attachment from Excel. You can try the following VBA code.
1. Press the "Alt" + "F11" keys.
2. In the opening "Microsoft Visual Basic for Applications" window, click "Insert" > "Module". Then paste the following VBA code in the" Module (Code)" window.
VBA code: Email a range as an attachment from Excel
Sub SendRange()
'Update 20220809
Dim xFile As String
Dim xFormat As Long
Dim Wb As Workbook
Dim Wb2 As Workbook
Dim Ws As Worksheet
Dim FilePath As String
Dim FileName As String
Dim OutlookApp As Object
Dim OutlookMail As Object
Dim WorkRng As Range
xTitleId = "KutoolsforExcel"
Set WorkRng = Application.Selection
Set WorkRng = Application.InputBox("Range", xTitleId, WorkRng.Address, Type:=8)
Application.ScreenUpdating = False
Application.DisplayAlerts = False
Set Wb = Application.ActiveWorkbook
Wb.Worksheets.Add
Set Ws = Application.ActiveSheet
WorkRng.Copy Ws.Cells(1, 1)
Ws.Copy
Set Wb2 = Application.ActiveWorkbook
Select Case Wb.FileFormat
Case xlOpenXMLWorkbook:
    xFile = ".xlsx"
    xFormat = xlOpenXMLWorkbook
Case xlOpenXMLWorkbookMacroEnabled:
    If Wb2.HasVBProject Then
        xFile = ".xlsm"
        xFormat = xlOpenXMLWorkbookMacroEnabled
    Else
        xFile = ".xlsx"
        xFormat = xlOpenXMLWorkbook
    End If
Case Excel8:
    xFile = ".xls"
    xFormat = Excel8
Case xlExcel12:
    xFile = ".xlsb"
    xFormat = xlExcel12
End Select
FilePath = Environ$("temp") & "\"
FileName = Wb.Name & Format(Now, "dd-mmm-yy h-mm-ss")
Set OutlookApp = CreateObject("Outlook.Application")
Set OutlookMail = OutlookApp.CreateItem(0)
Wb2.SaveAs FilePath & FileName & xFile, FileFormat:=xFormat
With OutlookMail
    .To = "xxx@aaa.com"
    .CC = "Email address"
    .BCC = "Email address"
    .Subject = "Monthly sales for 2021"
    .Body = "Hello, please check and read this document. "
    .Attachments.Add Wb2.FullName
    .Display
    '.Send
End With
Wb2.Close
Kill FilePath & FileName & xFile
Set OutlookMail = Nothing
Set OutlookApp = Nothing
Ws.Delete
Application.DisplayAlerts = True
Application.ScreenUpdating = True
End Sub
Notes:
3. Press the "F5" key to run the code. In the popped up "Kutools for Excel" dialog box, select the range of cells you need to send as an attachment in an email, then click "OK". See screenshot:

Then an Outlook email will be created automatically. And the range of cells you selected in the worksheet is saved as an Excel workbook and attached in the Message window. See screenshot:

4.2 Send emails when a button is clicked in Excel
If you need to click a command button to trigger a macro for sending an email from Excel, for example, send the current workbook as an attachment to others by clicking a command button in the worksheet. You can follow the steps as follow to get it done.
1. Click "Developer" > "Insert" > "Command Button (ActiveX Control)". Then draw a command button in the worksheet.
Tips: If you already have a command button, skip this step.

2. Press the "Alt" + "F11" keys to open the "Microsoft Visual Basic for Applications" window. In the window, click "Insert" > "Modue", then paste the VBA code (the code used to email the current workbook as an attachment from Excel) in the Module (Code) window.

Note: Here the name of the macro you created in step 2 is "SendWorkbook".
3. Press the "Alt" + "Q" keys to close the "Microsoft Visual Basic for Applications" window.
4. Now you need to assign the macro to the command button. Right click the command button, select "View Code" from the right-click menu.

5. Then the "Microsoft Visual Basic for Applications" window pops up, you can see the following two lines are listed in the "Sheet (Code)" window.
Private Sub CommandButton1_Click()
End Sub
6. Enter the name of the existing macro inside the subprocedure for the command button.

7. Press the "Alt" + "Q" keys to close the "Visual Basic Editor", and click "Developer" > "Design Mode" to turn off the design mode.

Now you can click the command button to send an email with the current workbook as an attachment in the email.
4.3 Send emails from a specified email account
Normally, when launching an email from Excel with VBA code, the sender’s email account is the default account in Outlook. Suppose you have configured several email accounts in your Outlook and want to use a certain account to send the emails from Excel instead of using the default account. The following VBA code can help.
The following codes are necessary in this case.
VBA code 1:
Dim OutlookMail As Outlook.MailItemVBA code 2:
For Each xAccount In OutlookApp.Session.Accounts
  If VBA.LCase(xAccount.SmtpAddress) = VBA.LCase("zxm@addin99.com") Then 'Specify your email account here
    OutlookMail.SendUsingAccount = xAccount
  End If
Next
How to use the above VBA codes?
In this example, we are going to specify a certain email account to send the current workbook as an attachment from Excel. Please do as follows.
1. Press the "Alt" + "F11" keys. In the "Microsoft Visual Basic for Applications" window, click "Tools" > "References". And then check the "Microsoft Outlook 16.0 Object Library" box and click "OK" in the "References – VBAProject" dialog box.
2. Click "Insert" > "Module". Then paste the following VBA code in the "Module (Code)" window.
VBA code: Send the current workbook as an email attachment from Excel through a specified Outlook account
Sub SendWorkBook()
'Update by Extendoffice 20220809
Dim OutlookApp As Object
Dim OutlookMail As Outlook.MailItem 'important! Here can’t be declared as Object
Dim xAccount As Account
Set OutlookApp = CreateObject("Outlook.Application")
Set OutlookMail = OutlookApp.CreateItem(olMailItem)
On Error Resume Next
'The following lines helps to specify a certian email account
For Each xAccount In OutlookApp.Session.Accounts
  If VBA.LCase(xAccount.SmtpAddress) = VBA.LCase("zxm@addin99.com") Then 'Specify your email account here
    OutlookMail.SendUsingAccount = xAccount
  End If
Next
'End
With OutlookMail
    .To = "xxx@aaa.com"
    .CC = "Email Address"
    .BCC = "Email Address"
    .Subject = "kte feature"
    .Body = "Hello, please check and read this document, thank you."
    .Attachments.Add Application.ActiveWorkbook.FullName
    .Display
    '.Send
End With
Set OutlookMail = Nothing
Set OutlookApp = Nothing
End Sub
3. Press the "F5" key to run the code. Then an Outlook email message pops up, you can see that the "From" field is populated with the email account you specified in the code.
4.4 Send an email when a date reached
If you need to send an email based on a specific due date, for example, as shown in the screenshot below, there is a project table, "when the due date in the range E2:E7 is equal to or less than 7 days from today (assuming the current date is 2022/8/4)", an email will be sent automatically to the corresponding project leaders and notify them that the project is about to expire.

1. In the worksheet contains the project table, right click the sheet tab and click "View code" from the right-clicking menu.

2. In the opening "Microsoft Visual Basic for Applications" window, paste the following VBA code in the "Sheet (Code)" window.
VBA code: Automatically send an email when a due date is met
Public Sub SendMailDueDate()
'Updated by Extendoffice 20220804
Dim xRgDate As Range
Dim xRgSend As Range
Dim xRgText As Range
Dim xRgDone As Range
Dim xOutApp As Object
Dim xMailItem As Object
Dim xLastRow As Long
Dim vbCrLf As String
Dim xMailBody As String
Dim xRgDateVal As String
Dim xRgSendVal As String
Dim xMailSubject As String
Dim i As Long
On Error Resume Next
Set xRgDate = Range("E2:E7") 'Please reference the due date column range
If xRgDate Is Nothing Then Exit Sub
Set xRgSend = Range("C2:C7") 'Please reference the email addresses column range
If xRgSend Is Nothing Then Exit Sub
Set xRgText = Range("D2:D7") 'Please reference the remark column range (the remark used to notify project leaders of the expiration of the project)
If xRgText Is Nothing Then Exit Sub
xLastRow = xRgDate.Rows.Count
Set xRgDate = xRgDate(1)
Set xRgSend = xRgSend(1)
Set xRgText = xRgText(1)
Set xOutApp = CreateObject("Outlook.Application")
For i = 1 To xLastRow
xRgDateVal = ""
xRgDateVal = xRgDate.Offset(i - 1).Value
If xRgDateVal <> "" Then
If CDate(xRgDateVal) - Date <= 7 And CDate(xRgDateVal) - Date > 0 Then
xRgSendVal = xRgSend.Offset(i - 1).Value
xMailSubject = xRgText.Offset(i - 1).Value & " on " & xRgDateVal
vbCrLf = "

"
            xMailBody = ""
            xMailBody = xMailBody & "Dear " & xRgSendVal & vbCrLf
            xMailBody = xMailBody & "Remark : " & xRgText.Offset(i - 1).Value & vbCrLf
            xMailBody = xMailBody & ""
Set xMailItem = xOutApp.CreateItem(0)
With xMailItem
.Subject = xMailSubject
.To = xRgSendVal
.CC = "Email address"
.BCC = "Email address"
.HTMLBody = xMailBody
.Display
'.Send
End With
Set xMailItem = Nothing
End If
End If
Next
Set xOutApp = Nothing
End Sub
Notes: In the code,
3. Press the "F5" key to run the code. Then, if the expiration date matches the conditions, the corresponding email will be created. In this case, two emails will be created as shown in the screenshot below.

5. A handy tool to help you easily send emails from Excel
If you are a VBA newbie, the above methods may be not easy for you to handle. Here we recommend "Kutools for Excel"’s Send Emails feature, with this feature, you can easily send emails from Excel with several clicks only. Please do as follows.
5.1 Easily create a mailing list that includes the email fields you need
Before applying the Send Emails feature, you need to create a mailing list that contains the email fields you need. Here the Create Mailing List feature can help.
1. Click "Kutools Plus" > "Create Mailing List".

2. In the opening "Create Mailing List" window, you need to configure as follows.

Then a sample mailing list table is created as shown in the screenshot below.

3. Now you need to replace the original data in the sample with your own field data.

Now you have created a mailing list table. Please go ahead to apply the" Send Emails" feature to send emails from Excel based on the fields you created.
Kutools for Excel - Supercharge Excel with over 300 essential tools, making your work faster and easier, and take advantage of AI features for smarter data processing and productivity. Get It Now
5.2 Easily send emails including the fields you created in the mailing list
After creating the mailing list (click to know how) that contains the fields you may need in your emails, you can now send emails from Excel with these fields.
1. Select the entire mailing list, click "Kutools Plus" > "Send Emails".

2. In the "Send Emails" dialog box, please do the following configuration.

3. Then a "Kutools for Excel" dialog box pops up to tell you how many emails are sent, click the "OK" button to close this dialog box.
Tips: You can go to the "Sent Items" folder in your Outlook to check the emails you sent.

5.3 Easily send emails with HTML body (including hyperlink, image, etc.)
This Send Emails feature allows you to build a html email, which includes hyperlink, image, different font sizes and font colors, etc.
After creating a mailing list that includes the email fields you need, when you configure the Send Emails dialog box, you can make the body content rich by using the options on the toolbar.
See the screenshot below:

5.4 Easily insert Outlook default signature when sending emails
In the above method, we demonstrated a VBA code to help you send emails with Outlook default signature. Here with the Send Emails feature, you just need to check an option, then Outlook default signature will be inserted in emails you sent from Excel.
After creating a mailing list that includes the email fields you need, when configure the Send Emails dialog box, you need to click "Options" > "Use Outlook’s signature settings".
Note: Please ensure that there is a check mark displaying before the Use Outlook’s signature settings option.

When recipients receive the email, they can see Outlook default signature displayed at the end of the email body.
5.5 Easily send emails from a specified email account
To use a certain email account to send the emails from Excel instead of using the default account, the Send Emails feature can also help to easily get it done.
After creating a mailing list that includes the email fields you need, when configure the Send Emails dialog box, you need to click "Options" > "Sent from", then click the email account you need to send emails from.
Note: After selecting the email account, a check mark will be displayed before it.

Click here to know more about this Send Emails feature.
Kutools for Excel - Supercharge Excel with over 300 essential tools, making your work faster and easier, and take advantage of AI features for smarter data processing and productivity. Get It Now
In conclusion, sending emails from Excel is quite useful in our daily work. This article covers more comprehensive topics of emails sending from Excel, if there are other topics or easier solutions, please leave a comment to let me know.
Best Office Productivity Tools
Supercharge Your Excel Skills with Kutools for Excel, and Experience Efficiency Like Never Before. Kutools for Excel Offers Over 300 Advanced Features to Boost Productivity and Save Time. Click Here to Get The Feature You Need The Most...
Office Tab Brings Tabbed interface to Office, and Make Your Work Much Easier
- Enable tabbed editing and reading in Word, Excel, PowerPoint, Publisher, Access, Visio and Project.
- Open and create multiple documents in new tabs of the same window, rather than in new windows.
- Increases your productivity by 50%, and reduces hundreds of mouse clicks for you every day!
All Kutools add-ins. One installer
Kutools for Office suite bundles add-ins for Excel, Word, Outlook & PowerPoint plus Office Tab Pro, which is ideal for teams working across Office apps.
- All-in-one suite — Excel, Word, Outlook & PowerPoint add-ins + Office Tab Pro
- One installer, one license — set up in minutes (MSI-ready)
- Works better together — streamlined productivity across Office apps
- 30-day full-featured trial — no registration, no credit card
- Best value — save vs buying individual add-in