How to get an OpenAI API key (steps by steps & FAQ)
The OpenAI API offers developers a gateway to cutting-edge artificial intelligence, enabling the integration of AI into a wide range of applications. Whether you're building chatbots, enhancing data analysis, or developing novel AI-driven tools, obtaining an OpenAI API key is a critical first step. This comprehensive guide will walk you through the process of obtaining an OpenAI API key, understanding its billing, and addressing common questions.
Table of Contents
- Step 1: Create an OpenAi account (If you already have an account, go to Step 2)
- Step 2: Create a new API key
Understanding OpenAI API key Billing
- Is the OpenAI API key free?
- The cost structure of OpenAI API key
- Setting up billing and payment methods
- Managing usage limits
Video: How to get OpenAI API key?
How to get an OpenAI API key
To get an OpenAI API key, please follow steps below:
Step 1: Create an OpenAI account
If you want to obtain an OpenAI key, first, you need to have an OpenAI account. This step will guide you on how to create an OpenAI account. If you already have an OpenAI account, directly go to the step 2.
Navigate to the OpenAI website. Then you can see the Log in button in the top right corner of the website, click it.

Then in the new open page, click "Sign up", and then follow the website's instructions to complete the registration process.

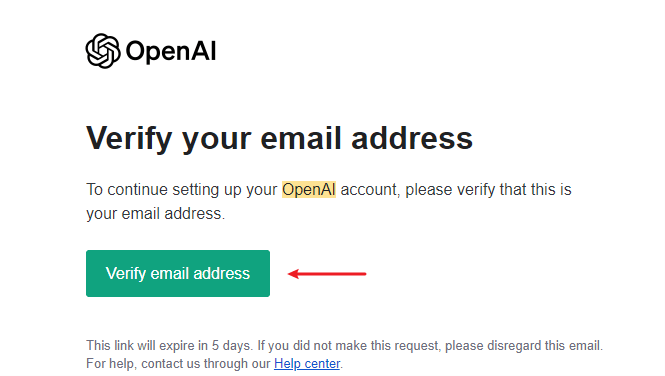
Once you've completed the signup process, OpenAI will send you a confirmation email. To verify your account, open the email and click on the provided verification link. Completing this step is crucial for securing your account.
With your account now verified, go back to the OpenAI website and select the "Log In" option. Use the username and password you registered with to access your account.


Step 2: Create a new API key
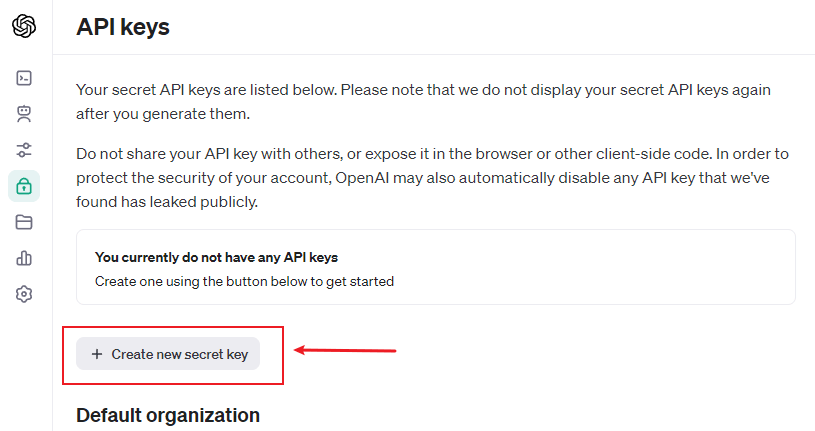
After logging into your OpenAI account, navigate to the left side of the webpage and click on the "API keys" section, represented by a lock icon.

Now in the API keys section, click the "Create new secret key" button to create a new API key.
A dialog box pops out for you to name this secret API key, enter a specific name and click Create secret key button.
Tip: If you plan to have multiple secret API keys for different apps or organizations, it's crucial to assign each key a descriptive name. This practice aids in quickly distinguishing between the keys when you need to refer to a specific one.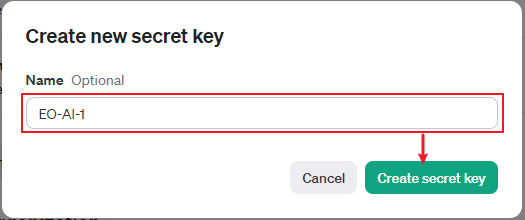
Upon clicking the "Create secret key" button, your new secret API key will be generated. Be sure to use the "Copy" button to copy this key and then paste it into the necessary application. It's important to do this promptly, as the key will no longer be visible once this dialog box is closed.
Importance note: It's crucial to securely save this key to somewhere secure because, for security purposes, it cannot be retrieved once more. This key is essential for authenticating your applications with OpenAI's services.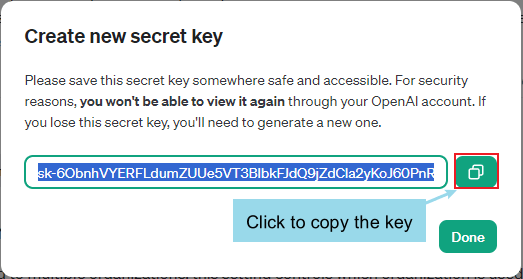
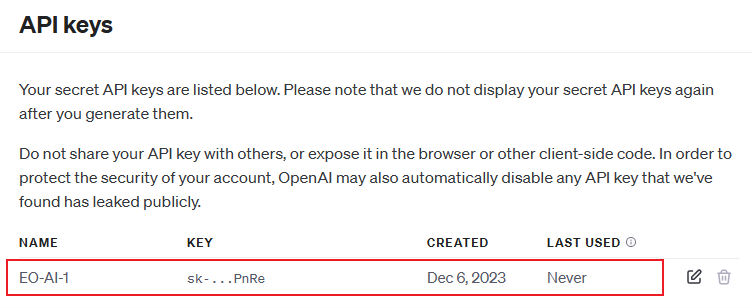
Click "Done" to close the box. Now you can see the API key is generated and shown in the API keys section.


Unlock Excel: Kutools AI Assistant integrates OpenAI's ChatGPT intelligence into Excel!
Kutools AI Aide dives into groundbreaking AI-driven data analysis, code generation, and custom formulas—all through seamless natural language. Transform your spreadsheets into a powerhouse of insights! Give it a try and see how it transforms your data management experience!


Understanding OpenAI API Key Billing
Besides understanding how to generate an OpenAI API key, it's crucial to know about its associated costs. This section of the tutorial will delve into the pricing structure and guide you on setting up billing and usage limits for your API key. Keep reading for more detailed information.
Is the OpenAI API key free?
Creating an OpenAI API key initially comes at no cost. New users on a free trial are granted $5 (USD) in credits, which are valid for three months. After exhausting this credit or upon expiration, you'll need to provide billing details to maintain access to your chosen API. Note that without billing information, your login will remain active, but you won't be able to execute additional API requests.
The cost structure of OpenAI API key
OpenAI offers a variety of models, each with unique capabilities and associated costs, calculated per 1,000 tokens. Tokens can be thought of as fragments of words; roughly, 1,000 tokens equate to about 750 words. To give you an idea, this paragraph contains 45 tokens.
If you are seeking detailed cost information for specific AI models like GPT-4 or gpt-3.5-turbo, which are utilized in ChatGPT, I recommend visiting OpenAI's AI model pricing page. This page should provide you with the specific pricing details and options for the models you are interested in.
This pricing structure enables users to select the model that best fits their needs and budget, ensuring a flexible and scalable approach to leveraging OpenAI's advanced AI capabilities.
It's important to note that charges are based on your monthly usage.
For getting details about how much tokens you have used, please navigate to the left pane of the website and click "Usage" button, then in the Usage section, you can view the daily costs and monthly bill.


Setting up billing and payment methods
OpenAI charges for use of its API on a usage basis, so, if you haven't already set up a payment method for billing, you'll need to do so. Otherwise, the API Key won't work after exhausting its free credit or upon expiration.
To set up billing, please follow the steps below:
Step 1: Go to Billing section
Click on the "Setting" button on the left menu then click "Billing" to go to the "Billing Settings" section.

Step 2: Add your payment method
In the Billing Settings section, if you have never added any payment for API usage, click "Add payment details" button.

Then choose "Individual" or "Company" as you need, and add your credit card and fill details.


To add a new payment method or modify an existing one, navigate to the "Billing Settings" section and select the "Payment Methods" button. Follow the on-site instructions to complete the update or addition of your payment details.

Managing usage limits
If you're concerned about accidentally incurring significant expenses each month on your API key, you have the option to set usage limits. This feature allows you to control your spending by defining a maximum threshold for your monthly API usage, preventing unexpected high charges.
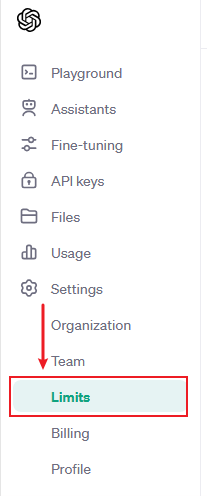
Click on the "Setting" button on the left menu then click "Limits".
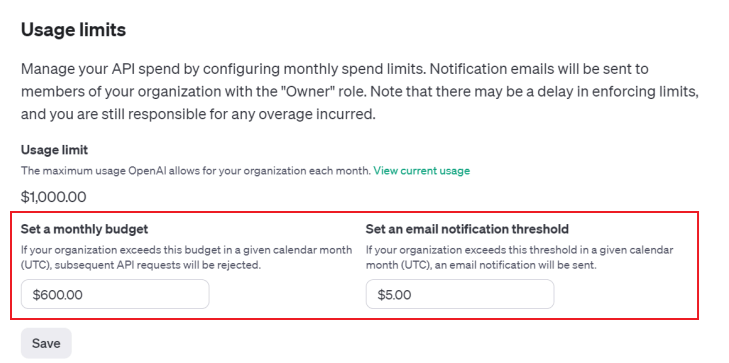
Scroll to "Usage limits" section, set a monthly budget and a threshold for sending an email notification if it exceeds. Then click "Save" button.


Understanding Rate Limits in OpenAI API
Rate limits in the context of OpenAI API refer to the caps placed on the number of times a user or a client can access services within a specific timeframe. These limits are essential for preventing the overuse of resources, ensuring the API's stability and availability for all users.
Organizational-Level Implementation:
Unlike some systems where rate limits apply at an individual user level, OpenAI implements these restrictions at the organizational level. This approach means that the limits are shared across all users within a single organization, making it crucial for organizations to manage their API usage strategically.
Variability Across Models:
It's important to note that rate limits can vary depending on the model being used within the OpenAI API. Different models may have different thresholds for access, reflecting their computational requirements and complexity.
Monthly Expenditure Caps:
In addition to rate limits, organizations also face caps on their total monthly expenditure on the API. These are often referred to as “usage limits” and are in place to prevent unexpected high charges and to encourage responsible usage of the OpenAI services.
For those looking to delve deeper into the specifics of rate limits, including the exact numbers and how they might affect your usage, OpenAI provides detailed information on their official website. This resource is invaluable for organizations planning their API strategy and budgeting.
FAQ about OpenAI API Key
Where do I find my API key?
Log in your OpenAI account, then click API keys button in the left pane to go to the API keys section, then you can find your API keys.
How to fix the "Incorrect API Key Provided"
To resolve the “Incorrect API Key Provided” error, follow these steps:
Verify the API Key:
Double-check the API key you've entered. Ensure there are no typos or extra spaces. Copy and paste directly from the source to avoid errors.
Check API Key Status:
Ensure that the API key is active and hasn’t been regenerated or deleted or cached.
Correct API Key Usage:
Make sure you're not using the API Key for a different organization or AI project.
If you’ve tried all the above steps and still encounter the error, reach out to OpenAI’s support team for assistance.
Remember, keeping your API key secure while ensuring it's correctly implemented is crucial for the smooth functioning of your applications with OpenAI services.
The Best Office Productivity Tools
Kutools for Excel - Helps You To Stand Out From Crowd
Kutools for Excel Boasts Over 300 Features, Ensuring That What You Need is Just A Click Away...
Office Tab - Enable Tabbed Reading and Editing in Microsoft Office (include Excel)
- One second to switch between dozens of open documents!
- Reduce hundreds of mouse clicks for you every day, say goodbye to mouse hand.
- Increases your productivity by 50% when viewing and editing multiple documents.
- Brings Efficient Tabs to Office (include Excel), Just Like Chrome, Edge and Firefox.
Table of contents
- Video: How to get OpenAI API key
- How to get an OpenAI API key
- Step 1: Create an OpenAi account
- Step 2: Create a new API key
- Understanding OpenAI API key Billing
- Is the OpenAI API key free?
- The cost structure of OpenAI API key
- Setting up billing and payment methods
- Managing usage limits
- Understanding Rate Limits in OpenAI API
- FAQ about OpenAI API key
- Where do I find my API key?
- Can I share my API key with others?
- How to fix the "Incorrect API Key Provided"
- Best Office Productivity Tools
- Comments