Advanced scan to identify and manage duplicate emails in Outlook
Managing duplicate emails in Outlook can be challenging—especially when duplicates exist across multiple folders, come with different message attributes, or need to be handled in different ways. Kutools for Outlook provides a powerful feature called Advanced Scan and Remove Duplicate Emails, enabling you to perform precise filtering, cross-folder comparison, and flexible bulk actions such as deleting, moving, or categorizing duplicate messages.
This article provides a complete, step-by-step guide to using this advanced feature and highlights its key advantages.
- Why Choose “Advanced Scan and Remove Duplicate Emails”?
- How to Use Advanced Scan and Remove Duplicate Emails
Why Choose “Advanced Scan and Remove Duplicate Emails”?
The Advanced Scan and Remove Duplicate Emails tool offers far more control and depth than a simple duplicate scan. Its major advantages include:
📂 Cross-folder duplicate detection
- Within each selected folder individually
- Across all selected folders simultaneously
🔍 Deep and customizable scanning
🔧 Flexible handling options
- Delete them (move to Deleted Items)
- Move them to any specified folder
- Categorize them with one or more color categories
🎯 Flexible rules for determining which email to retain
- Retain the earliest email
- Retain the latest email
🧩 Adjustable display and result fields
🖱️ Detailed right-click controls for precision management
- Entire duplicate groups
- Individual items
How to Use Advanced Scan and Remove Duplicate Emails
Managing duplicate emails becomes much easier with the Advanced Scan and Remove Duplicate Emails feature. Follow the steps below to perform a thorough and customized duplicate cleanup in Outlook.
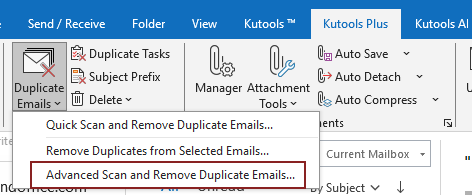
Step 1: Launch the Advanced Scan and Remove Duplicate Emails Feature
- Go to the Kutools Plus tab.
- Click Duplicate Emails > Advanced Scan and Remove Duplicate Emails...

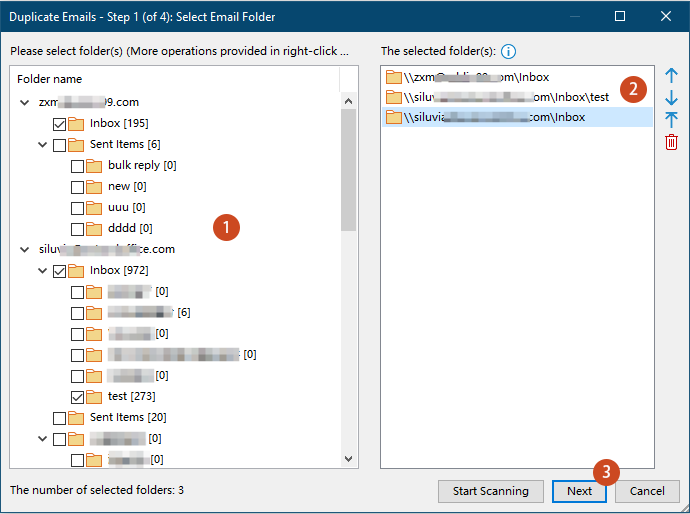
Step 2: Select Folder(s) to Search for Duplicate Emails
In the Duplicate Emails – Step 1 window:
- All email accounts will be listed in the left list; you need to check the folders you want to include in the duplicate scan.
- The selected folders appear in the right list where higher folders take priority when keeping one reserved item. You can reorder or remove folders using the control buttons.
- Click Next.

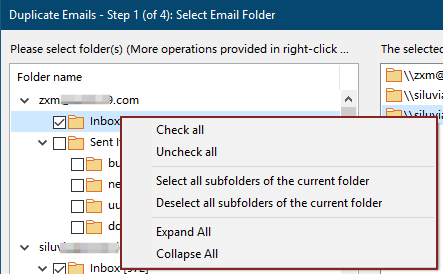
- Right-click menu is available for quick folder selection:
- Check all: Selects all folders and subfolders.
- Uncheck all: Clears all selections.
- Select all subfolders of the current folder: Selects every subfolder under the folder you right-clicked, without affecting folders in other sections.
- Deselect all subfolders of the current folder: Clears the selection of all subfolders under the folder you right-clicked.
- Expand All / Collapse All: Expands or collapses the entire folder tree to help you view and locate folders more easily.
- The number of selected folders is displayed in the lower-left corner, allowing you to quickly confirm how many folders will be included in the scan.

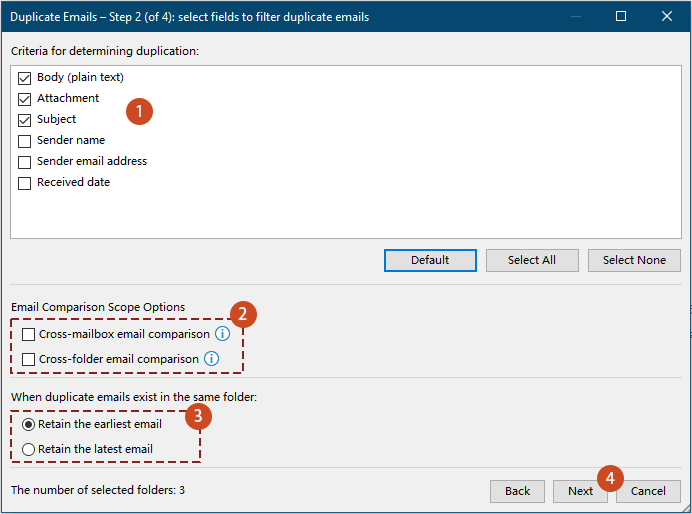
Step 3: Select Criteria to Identify Duplicate Emails
In the Duplicate Emails – Step 2 window:
- Check the fields you want to compare.
The default selected fields are Body, Attachment, and Subject. You can select additional fields as needed to refine the duplicate detection.
- Specify whether the comparison should extend across folders or mailboxes.
- Cross-mailbox email comparison:
Compares emails across different mailboxes in your Outlook profile.
- Cross-folder email comparison:
Compares emails across all selected folders instead of limiting the comparison to each folder individually.
If neither option is selected, duplicate detection will be performed separately within each selected folder, and emails in different folders will not be compared with one another. - Cross-mailbox email comparison:
- Specify which email should be retained — the earliest one or the latest one.
- Click Next.

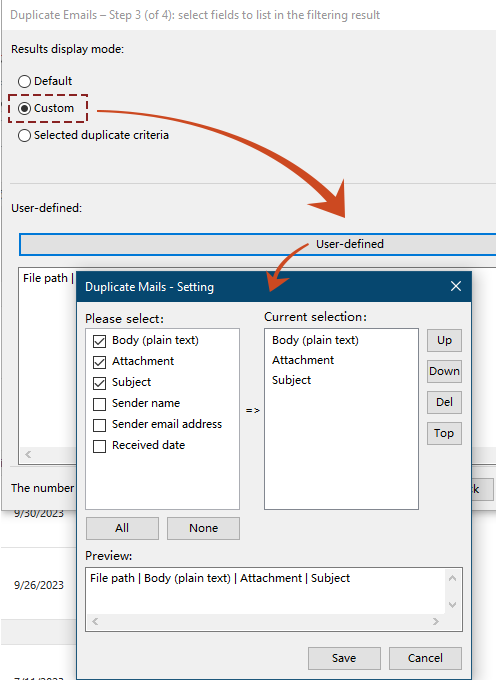
Step 4: Select the Fields to Be Displayed in the Filtering Results
In the Duplicate Emails – Step 3 window:
- Choose how the duplicate emails will be displayed in the filtering result.
You can select from three display modes:
- Default: show the predefined fields (File path, Subject and Body) in the filtering results.
This option requires no further configuration and is suitable for most users.
- Custom: manually configure which fields appear in the filtering result.
Steps:
- Select Custom.
- Click the User-defined button to open the Duplicate Mails – Setting dialog.
- In the dialog, check the fields you want to include under Please select. And use the Up, Down,Del, or Top buttons to adjust the order or remove fields under Current selection.
- The Preview section shows what the final display will look like.
- Click Save to apply your custom settings.
- Selected duplicate criteria: list only the fields that were chosen as duplicate comparison criteria in Step 3.
- Default: show the predefined fields (File path, Subject and Body) in the filtering results.
- Finally, click Start Scanning to begin the duplicate detection based on your settings.

Step 5: Delete, Move, or Categorize Duplicate Emails
After filtering, all duplicate emails are listed in the Duplicate Emails – Step 4 window.
Each duplicate group is displayed with all duplicate items checked, while the reserved email remains unchecked.

You may now handle duplicates in various ways:
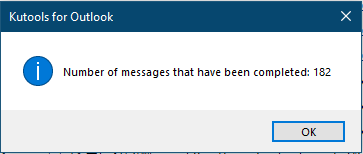
Delete all checked duplicate emails while keeping the reserved one.
- In the Duplicate email processing method drop-down list, choose Delete (Except Reserved, Move to the Deleted Items folder).
- Click Apply now.

- A dialog will display the number of deleted duplicate emails. Click OK to close the dialog and complete the operation.
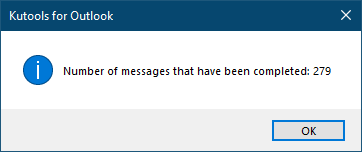


All checked duplicate emails have now been successfully removed from the selected folder and moved to the Deleted Items folder.
Move Duplicate Emails to a Folder
If you only want to move duplicate emails to a specific folder, do as follows:
- Choose Move(Except Reserved) from the Duplicate email processing method drop-down list.
- Click Apply now.

- Select or create a target folder in the popup dialog, then click OK.
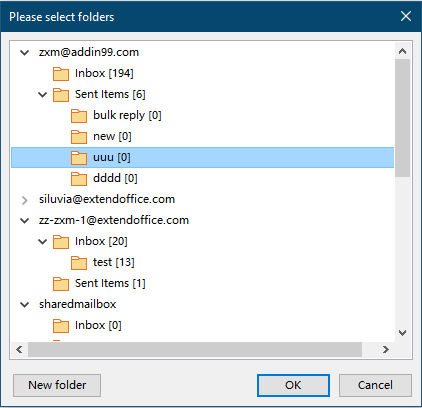
- Confirm the number of moved items. Click OK to close the dialog and complete the operation.


All checked duplicate emails have now been successfully moved to the target folder.
Add Categories to Duplicate Emails
Besides deleting or moving duplicated emails, you can also categorize them for easier identification.
- Choose Add categories (Including Reserved) from the Duplicate email processing method drop-down list.
- Click Apply now.

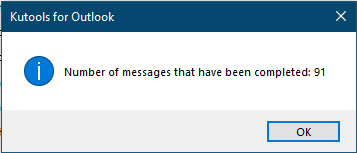
- Select one or more categories in the Color Categories dialog. Click OK..
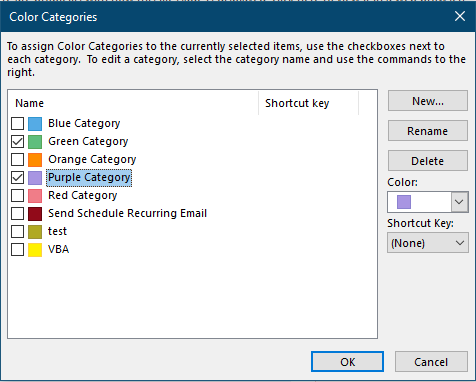
- A dialog will display the number of categorized duplicate emails. Click OK to close the dialog and complete the operation.


Now all checked duplicate emails have been categorized, making them easier to identify in the folders.
More Handy Operations (Right-Click Menu in Step 4)
During Step 4, additional operations are available through the right-click menu.
The options differ depending on whether you right-click a duplicate group or an individual duplicate email.
A. Manage an entire duplicate group
You can right-click the group name to perform actions on all checked items in that group. Then:
- Add categories to checked items in the group (including the reserved email)
- Move checked items in the group (except the reserved email)
- Delete checked items in the group
(except the reserved email; deleted emails are moved to the Deleted Items folder)
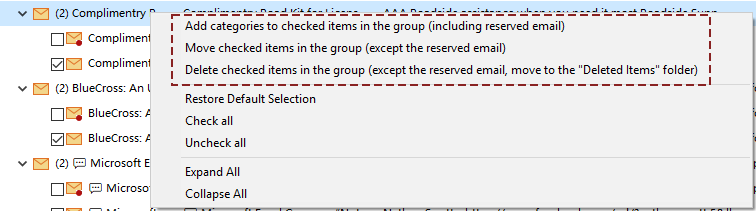

- For Move or Categorize: A folder selection dialog or category selection dialog will be displayed after confirmation.
- For Delete: A confirmation dialog will appear to ensure that you want to delete the duplicate emails in that group.
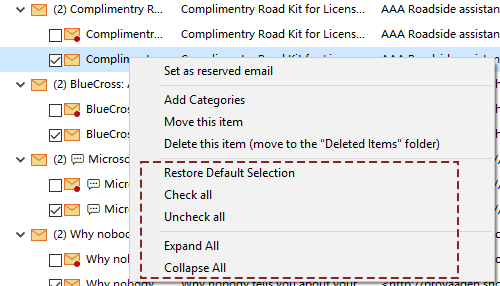
B. Manage a specific duplicate item
You can right-click a single duplicate email to manage only that item.
Available actions include:
- Set as reserved email – Marks this email as the one to keep.
- Add Categories – Assigns one or more color categories to the selected email.
- Move this item – Moves the email to another folder.
- Delete this item – Moves to the Deleted Items folder.
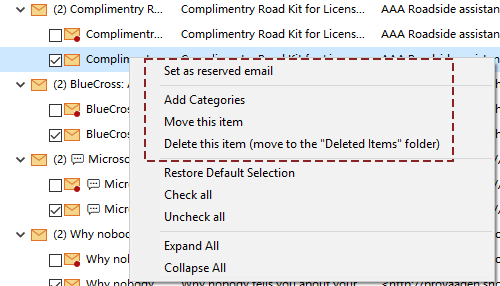

- For Move or Categorize: A folder selection dialog or category selection dialog will be displayed after confirmation.
- For Delete: A confirmation dialog will appear to ensure that you want to delete the selected duplicate email.
C. Additional options in the context menu
- Restore Default Selection – Reverts all duplicate items in the window to their original checked/unchecked status.
- Check all – Checks all duplicate emails (including the reserved emails) listed in the window.
- Uncheck all – Unchecks all duplicate emails listed in the window.
- Expand All / Collapse All – Expands or collapses all folders and duplicate groups in the window. When collapsed, only the mailbox accounts are displayed.

Conclusion
The Advanced Scan and Remove Duplicate Emails feature in Kutools for Outlook provides a powerful and flexible solution for managing duplicate messages—especially when dealing with large mailboxes or complex folder structures. With deep filtering rules, cross-folder scanning, customizable result display, and multiple action methods, this tool helps you keep your Outlook clean, organized, and efficient with just a few clicks.
Whether you prefer automated bulk processing or detailed manual control, this advanced feature covers all your needs for duplicate email management.
Best Office Productivity Tools
Experience the all-new Kutools for Outlook with 100+ incredible features! Click to download now!
📧 Email Automation: Auto Reply (Available for POP and IMAP) / Schedule Send Emails / Auto CC/BCC by Rules When Sending Email / Auto Forward (Advanced Rules) / Auto Add Greeting / Automatically Split Multi-Recipient Emails into Individual Messages ...
📨 Email Management: Recall Emails / Block Scam Emails by Subjects and Others / Delete Duplicate Emails / Advanced Search / Consolidate Folders ...
📁 Attachments Pro: Batch Save / Batch Detach / Batch Compress / Auto Save / Auto Detach / Auto Compress ...
🌟 Interface Magic: 😊More Pretty and Cool Emojis / Remind you when important emails come / Minimize Outlook Instead of Closing ...
👍 One-click Wonders: Reply All with Attachments / Anti-Phishing Emails / 🕘Show Sender's Time Zone ...
👩🏼🤝👩🏻 Contacts & Calendar: Batch Add Contacts From Selected Emails / Split a Contact Group to Individual Groups / Remove Birthday Reminders ...
Use Kutools in your preferred language – supports English, Spanish, German, French, Chinese, and 40+ others!


🚀 One-Click Download — Get All Office Add-ins
Strongly Recommended: Kutools for Office (5-in-1)
One click to download five installers at once — Kutools for Excel, Outlook, Word, PowerPoint and Office Tab Pro. Click to download now!
- ✅ One-click convenience: Download all five setup packages in a single action.
- 🚀 Ready for any Office task: Install the add-ins you need, when you need them.
- 🧰 Included: Kutools for Excel / Kutools for Outlook / Kutools for Word / Office Tab Pro / Kutools for PowerPoint
Table of contents
- Why Choose “Advanced Scan and Remove Duplicate Emails”
- How to Use Advanced Scan and Remove Duplicate Emails
- Best Office Productivity Tools