Split comma separated values into rows/columns in Excel - easy guide
In certain situations, you might find yourself needing to split comma-separated values from selected cells into individual rows or columns. This guide will explore different effective methods to help you achieve this, providing step-by-step instructions to ensure you can efficiently manage and reorganize your data according to your needs.


Split comma separated values into different columns
To split comma separated values in selected cells into different columns, try the methods in this section.
Use the Text to Column wizard to split comma separated values into columns
To split comma separated values in selected cells into columns, the commonly used method is the Text to Column wizard in Excel. Here, I will show you step-by-step how to use this wizard to achieve the desired result.
1. Select the range of cells you want to split values into columns, and then click "Data" > "Text to Columns". See screenshot:

2. In the first "Convert Text to Columns Wizard" dialog box, select the "Delimited" option, and then click the "Next" button.

3. In the second "Convert Text to Columns Wizard" dialog box, only check the "Comma" box in the "Delimiters" section, and click the "Next" button.

4. In the last "Convert Text to Columns Wizard" dialog box, select a cell for locating the splitting values in the "Destination" box, and finally click the "Finish" button.

Now all the values in selected cells which were separated by commas are split to different columns as bellow screenshot shown.

Easily split comma separated values into multiple columns with Kutools
As you can see, the "Text to Columns" wizard requires multiple steps to complete the task. If you need a simpler method, the "Split Cells" feature of "Kutools for Excel" is highly recommended. With this feature, you can conveniently split cells into multiple columns or rows based on a specific delimiter, by completing the settings in a single dialog box.
After installing Kutools for Excel, select "Kutools" > "Merge & Split" > "Split Cells" to open the "Split Cells" dialog box.
- Select the range of cells containing the text you wish to split.
- Select the "Split to Columns" option.
- Select "Comma" (or any delimiter you need) and click "OK".

- Select a destination cell and click "OK" to get all split data.


Split comma separated values into different rows
This section demonstrates two methods to help you split comma separated values into different rows in Excel. Please do as follows.
Split comma separated values into multiple rows with VBA
For splitting comma separated values into rows, you can apply the following VBA code.
1. Press the "Alt" + "F11" keys simultaneously to open the "Microsoft Visual Basic for Applications" window.
2. In the "Microsoft Visual Basic for Applications" window, click "Insert" > "Module". Then copy and paste the below VBA code into the Module window.
VBA code: Split comma separated values into rows
Sub SplitAll()
	Dim xRg As Range
	Dim xRg1 As Range
	Dim xCell As Range
	Dim I As Long
	Dim xAddress As String
	Dim xUpdate As Boolean
	Dim xRet As Variant
	On Error Resume Next
	xAddress = Application.ActiveWindow.RangeSelection.Address
	Set xRg  = Application.InputBox("Please select a range", "Kutools for Excel", xAddress, , , , , 8)
	Set xRg  = Application.Intersect(xRg, xRg.Worksheet.UsedRange)
	If xRg Is Nothing Then Exit Sub
		If xRg.Columns.Count > 1 Then
			MsgBox "You can't select multiple columns", , "Kutools for Excel"
			Exit Sub
			End If
			Set xRg1 = Application.InputBox("Split to (single cell):", "Kutools for Excel", , , , , , 8)
			Set xRg1 = xRg1.Range("A1")
			If xRg1 Is Nothing Then Exit Sub
				xUpdate = Application.ScreenUpdating
				Application.ScreenUpdating = False
				For Each xCell In xRg
					xRet = Split(xCell.Value, ",")
					xRg1.Worksheet.Range(xRg1.Offset(I, 0), xRg1.Offset(I + UBound(xRet, 1), 0)) = Application.WorksheetFunction.Transpose(xRet)
					I = I + UBound(xRet, 1) + 1
				Next
				Application.ScreenUpdating = xUpdate
			End Sub
3. Press the "F5" key to run the code. In the popping up "Kutools for Excel" dialog box, select the cells you want to split, and then click the "OK" button.

4. In the second popping up "Kutools for Excel" dialog box, select a cell for locating the splitting values, then click "OK".

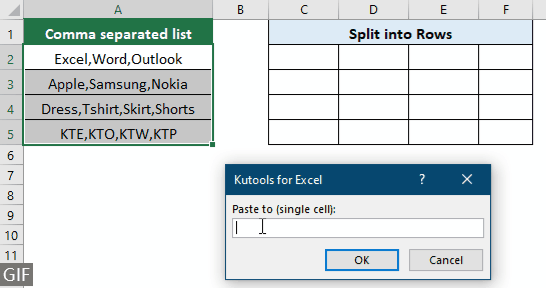
Then you can see the comma separated values in selected cells are split into rows as bellow screenshot shown.

Easily split comma separated values into rows with Kutools for Excel
VBA code is too hard for Excel newbi to modify for meeting their needs. Here the "Split Cells" feature of "Kutools for Excel" can also help to easily split comma separated values into multiple rows in Excel.
After installing Kutools for Excel, select "Kutools" > "Merge & Split" > "Split Cells" to open the "Split Cells" dialog box.
- Select the range of cells containing the comma separated values you wish to split.
- Select the "Split to Rows" option.
- Select "Comma" (or any delimiter you need) and click "OK".
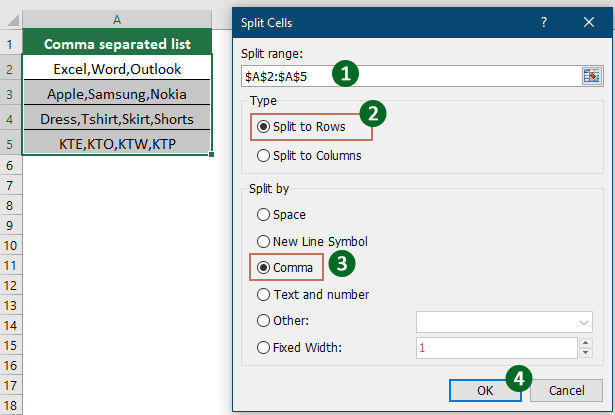
- Select a destination cell and click "OK" to get all split data.


Demo: Quickly split comma separated values into rows or columns with Kutools for Excel
Best Office Productivity Tools
Supercharge Your Excel Skills with Kutools for Excel, and Experience Efficiency Like Never Before. Kutools for Excel Offers Over 300 Advanced Features to Boost Productivity and Save Time. Click Here to Get The Feature You Need The Most...
Office Tab Brings Tabbed interface to Office, and Make Your Work Much Easier
- Enable tabbed editing and reading in Word, Excel, PowerPoint, Publisher, Access, Visio and Project.
- Open and create multiple documents in new tabs of the same window, rather than in new windows.
- Increases your productivity by 50%, and reduces hundreds of mouse clicks for you every day!
All Kutools add-ins. One installer
Kutools for Office suite bundles add-ins for Excel, Word, Outlook & PowerPoint plus Office Tab Pro, which is ideal for teams working across Office apps.
- All-in-one suite — Excel, Word, Outlook & PowerPoint add-ins + Office Tab Pro
- One installer, one license — set up in minutes (MSI-ready)
- Works better together — streamlined productivity across Office apps
- 30-day full-featured trial — no registration, no credit card
- Best value — save vs buying individual add-in