How to Password Protect Multiple Excel Files at Once
Excel can encrypt a workbook with a password so that anyone opening the file must enter the password first. This is useful for payroll reports, financial records, customer lists, and other files that should not be opened freely. However, Excel's built-in Encrypt with Password command protects only one workbook at a time. Applying the same password manually becomes inefficient when a folder contains dozens or hundreds of files.
This tutorial shows two ways to password protect multiple Excel files at once. Use VBA when the files are stored in one folder, or use Kutools for Excel to encrypt selected files, folders, subfolders, and OneDrive files through one dialog box.
- Password protect all Excel files in one folder with VBA
- Password protect multiple Excel files with Kutools for Excel
- Which method should you use?
- Frequently Asked Questions
📝 Note:
The methods in this tutorial set a password required to open each Excel file. They do not protect individual worksheets, lock cells, or prevent changes to the workbook structure.
Password protect all Excel files in one folder with VBA
If all the workbooks are stored in the same folder, VBA can open each supported Excel file, save it again with the same password, and then close it. The code below processes .xls, .xlsx, .xlsm, and .xlsb files while keeping their original formats.
For example, a Payroll Reports folder may contain January Payroll.xlsx, February Payroll.xlsx, March Payroll.xlsm, and Payroll Summary.xlsb. The macro can apply one password to all four files in a single run.
⚠️ Before you begin:
- Create a backup copy of the folder. The macro saves the password directly to the original files.
- Close every workbook that you want to protect.
- Place the workbook containing the macro outside the folder that will be processed.
- Open a blank workbook.
- Press Alt + F11 to open the Microsoft Visual Basic for Applications window.
- Click Insert > Module.
- Paste the following VBA code into the module:
Sub ProtectAll() 'Updated by Extendoffice Dim xWorkBook As Workbook Dim xFileDialog As FileDialog Dim xPassword As Variant Dim xFolderPath As String Dim xFileName As String Dim xFullPath As String Dim xExtension As String Dim xSuccessCount As Long Dim xFailedCount As Long On Error GoTo CleanUp Set xFileDialog = Application.FileDialog(msoFileDialogFolderPicker) With xFileDialog .AllowMultiSelect = False .Title = "Select the folder containing the Excel files" If .Show <> -1 Then Exit Sub xFolderPath = .SelectedItems(1) & "\" End With xPassword = Application.InputBox( _ Prompt:="Enter the password to apply to all files", _ Title:="Password Protect Excel Files", _ Type:=2) If VarType(xPassword) = vbBoolean Then Exit Sub If Len(CStr(xPassword)) = 0 Then MsgBox "The password cannot be blank.", _ vbInformation, "Password Protect Excel Files" Exit Sub End If Application.ScreenUpdating = False Application.DisplayAlerts = False xFileName = Dir(xFolderPath & "*.*") Do While xFileName <> "" xExtension = LCase$(Mid$(xFileName, InStrRev(xFileName, ".") + 1)) Select Case xExtension Case "xls", "xlsx", "xlsm", "xlsb" xFullPath = xFolderPath & xFileName If StrComp(xFullPath, ThisWorkbook.FullName, vbTextCompare) <> 0 Then Set xWorkBook = Nothing Err.Clear On Error Resume Next Set xWorkBook = Workbooks.Open( _ Filename:=xFullPath, _ UpdateLinks:=0, _ ReadOnly:=False) If Err.Number <> 0 Or xWorkBook Is Nothing Then xFailedCount = xFailedCount + 1 Err.Clear Else xWorkBook.SaveAs _ Filename:=xFullPath, _ FileFormat:=xWorkBook.FileFormat, _ Password:=CStr(xPassword) If Err.Number <> 0 Then xFailedCount = xFailedCount + 1 Err.Clear Else xSuccessCount = xSuccessCount + 1 End If xWorkBook.Close SaveChanges:=False End If On Error GoTo CleanUp End If End Select xFileName = Dir Loop CleanUp: Application.DisplayAlerts = True Application.ScreenUpdating = True MsgBox xSuccessCount & " file(s) protected successfully." & vbCrLf & _ xFailedCount & " file(s) could not be protected.", _ vbInformation, "Process Complete" End Sub - Press F5 while the pointer is inside the code, or close the editor and run ProtectAll from Developer > Macros.
- In the folder picker, select the folder containing the Excel files, and click OK.
- Enter the password that you want to apply to every file, and click OK.
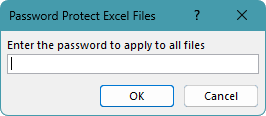
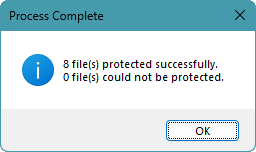
- Wait for the completion message. It shows how many files were protected and how many could not be processed.
Open one of the processed files to test the result. Excel now asks for the password before opening the workbook.
📝 Notes:
- The macro applies the same password to all supported Excel files in the selected folder.
- It processes the selected folder only. Files in subfolders are not included.
- Files that are already encrypted cannot be opened without their current passwords and will be counted as failures.
- An open, read-only, corrupted, permission-restricted, or otherwise unavailable file may also fail.
- To reuse the macro later, save its workbook as an Excel Macro-Enabled Workbook (*.xlsm).
- Microsoft cannot retrieve a forgotten file password. Store the password securely before processing the files.
Password protect multiple Excel files with Kutools for Excel
For files stored in different folders, subfolders, or OneDrive, use the Encrypt Workbooks feature in Kutools for Excel. It lets you collect the required workbooks in one window, review the list, and apply the same password to all selected files without VBA.
- Close the workbooks that you want to protect.
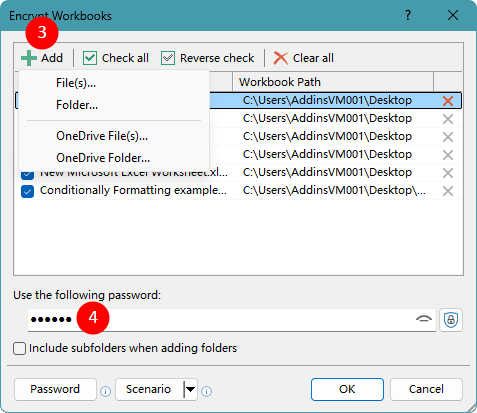
- In a separate workbook, click Kutools Plus > Encrypt Workbooks > Encrypt Workbooks.
- Click Add, and choose one of the following options:
- File(s): Add selected files from your computer.
- Folder: Add files from a local folder.
- OneDrive File(s): Add selected OneDrive files.
- OneDrive Folder: Add files from a OneDrive folder.
- Enter the password in the Use the following password box.
- Click OK to encrypt the workbooks.
⚠️ Workbooks with Sensitivity Labels:
If a workbook requires a Sensitivity Label, click OK when prompted, and then select the appropriate label. Kutools applies the password after the label is confirmed.
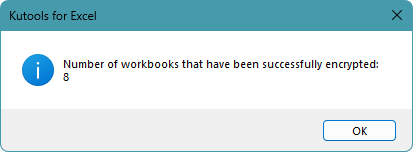
- Check the number of workbooks encrypted successfully, and click OK.
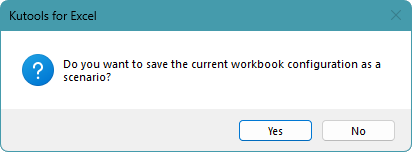
- Choose whether to save the current workbook configuration as a scenario. To reuse the same file selection later, click Yes, enter a scenario name, and click OK. Otherwise, click No.
Tips
- To include files from nested folders, select Include subfolders when adding folders.
- Clear the checkbox beside any workbook that you do not want to encrypt, or remove it from the list.
- Click the Workbook Name or Workbook Path column heading to sort the list.
- The OneDrive File(s) and OneDrive Folder options are supported in Excel 2013 and later versions.
- Use Passwords Manager to insert a password saved in Kutools Password Manager.
- Use the scenario commands to open, save, rename, delete, or organize saved scenarios.
- Keep the password in a secure location. A forgotten password may make the encrypted workbooks inaccessible.
Pros
- Adds files from different folders to one encryption task.
- Can include all Excel files in selected folders and subfolders.
- Supports OneDrive files and folders in compatible Excel versions.
- Saves passwords and workbook configurations for repeated tasks.
- Reports how many workbooks were encrypted successfully.
Kutools for Excel - Packed with over 300 essential tools for Excel. Make Excel tasks faster, easier, and more efficient. Download now!
Which method should you use?
| Situation | Recommended method | Why |
|---|---|---|
| All files are stored in one folder and you can use macros | VBA | Applies one password to supported Excel files without installing an additional tool |
| Files are stored in different folders | Kutools Encrypt Workbooks | Lets you add selected files and folders to the same task |
| You need to include files from subfolders | Kutools Encrypt Workbooks | Includes nested folders through one checkbox |
| You need to process OneDrive workbooks | Kutools Encrypt Workbooks | Adds OneDrive files or an entire OneDrive folder in Excel 2013 and later versions |
| You regularly protect the same set of files | Kutools Encrypt Workbooks | Saves the workbook configuration as a reusable scenario |
Frequently Asked Questions
Is encrypting an Excel file the same as protecting a worksheet?
No. File encryption requires a password before the workbook can be opened. Worksheet protection controls what users can edit after the workbook is open. If you need both types of protection, configure them separately.
Can the VBA code protect files in subfolders?
The VBA code in this tutorial processes only the selected folder. Subfolder processing requires additional recursive code. Use Kutools and select Include subfolders when adding folders when the folder structure contains multiple levels.
What happens if some files already have passwords?
The VBA code cannot open an encrypted workbook without its existing password, so it counts that file as a failure. Before running either method, separate files that already use passwords or confirm how they should be handled.
Can I apply a different password to each workbook?
The methods shown here are designed to apply the same password to the selected files. Different passwords require separate runs or a customized VBA process that supplies a password for each workbook.
Can a forgotten workbook password be recovered?
Microsoft cannot retrieve forgotten passwords for encrypted Excel files. Keep an unencrypted backup until you have tested the results, and store the password in an approved secure location.
Conclusion
Use VBA when you need to apply one password to the supported Excel files in a single folder. It is suitable for an occasional batch and reports files that could not be processed. For files spread across different folders, nested folders, or OneDrive, Kutools Encrypt Workbooks provides a more flexible point-and-click workflow and can save the selection as a reusable scenario.
The Best Office Productivity Tools
Kutools for Excel - Helps You To Stand Out From Crowd
Kutools for Excel Boasts Over 300 Features, Ensuring That What You Need is Just A Click Away...
Office Tab - Enable Tabbed Reading and Editing in Microsoft Office (include Excel)
- One second to switch between dozens of open documents!
- Reduce hundreds of mouse clicks for you every day, say goodbye to mouse hand.
- Increases your productivity by 50% when viewing and editing multiple documents.
- Brings Efficient Tabs to Office (include Excel), Just Like Chrome, Edge and Firefox.
Table of Contents
- Password protect all Excel files in one folder with VBA
- Password protect multiple Excel files with Kutools for Excel
- Which method should you use?
- Frequently Asked Questions
- Conclusion
- The Best Office Productivity Tools
Kutools for Excel
300+ advanced Excel tools in one add-in.
🎁 30-Day Free Trial available